DialogViews are an essential element in creating a smooth and engaging user experience for your SwiftUI app. They allow you to present information, messages, or alerts to your users in a visually pleasing and interactive way. Whether you’re looking to create a confirmation prompt, display an error message, or present a modal view, DialogViews are the perfect way to add an extra layer of interactivity to your app.
In our previous blog we outlined how to build a basic dialogs page. For this tutorial we will guide you through the process of creating a DialogView to display received dialogs within a larger dialogs page.
You can download the finished project of this part from this link: https://github.com/QuickBlox/examples/tree/Part%234-Dialogs-Screen
And don’t forget to consult our official documentation here.
QuickBlox SwiftUI tutorial Series:
Let’s Get Started !
1. Review Previous Tutorial
Check out our previous blog if you haven’t already seen it to follow the initial first steps for building a dialog page with SwiftUI. We showed you how to fetch dialogs from the QuickBlox server.
For this blog, we will work on the design of the DialogsScreen and create a DialogView to correctly display information about the received dialog.
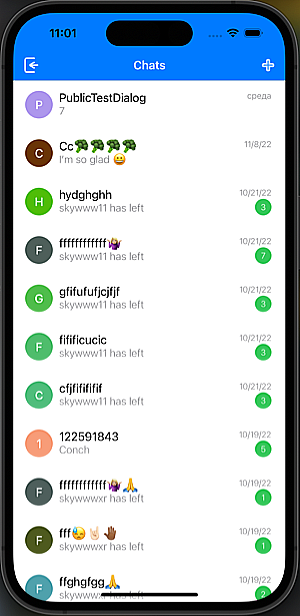
This is what the DialogView will look like:

And this is what the DialogsScreen will look like:
2. Review the QuickBlox Dialog Model
To correctly perform this task, we need to be familiar with the Quickblox dialog model that we receive from the server.
Since we are communicating with the server using the Quickblox iOS SDK, we automatically use their QBChatDialog model when developing our application.
Please note then, all future mentions of dialog, refer to QBChatDialog.
3. Decide What Data is Needed
Let’s pay attention to the design of the DialogView and define the data that we need to correctly display in this view.
Here are the parts of DialogView:
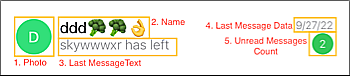
- The circle in which the photo of the dialog dialog.photo will be displayed if it is present or it will be a capital letter or symbol of the dialog dialog.name. The color will depend on the name of the dialog dialog.name.
- Dialog name. We will use dialog.name
- The text of the last message. We will use dialog.lastMessageText
- The date the last message was sent. We will use dialog.lastMessageDate
- Number of unread messages. We will use dialog.unreadMessagesCount
And so, we have all the data to display in the dialog!
4. Create a DialogView with these properties
For convenience, we will expand the dialog model with extensions.
extension QBChatDialog: Identifiable {
    var title: String {
        return name ?? "Untitled"
    }

    var unreadMessagesCounter: String? {
        var trimmedUnreadMessageCount = ""
        if unreadMessagesCount > 0 {
            if unreadMessagesCount > 99 {
                trimmedUnreadMessageCount = "99+"
            } else {
                trimmedUnreadMessageCount = String(format: "%d", unreadMessagesCount)
            }
            return trimmedUnreadMessageCount
        } else {
            return nil
        }
    }

    var avatarColor: UIColor {
        return UInt(createdAt?.timeIntervalSince1970 ?? Date().timeIntervalSince1970).generateColor()
    }

    var avatarCharacter: String {
        return String(self.title.stringByTrimingWhitespace().capitalized.first ?? Character("C"))
    }
}
Let’s use the dialog extensions and create a new DialogView.swift file:
import SwiftUI
import Quickblox


struct DialogView: View {

    @State var dialog: QBChatDialog

    var body: some View {
        return HStack(spacing: 9) {
            Text(dialog.avatarCharacter)
                .foregroundColor(.white)
                .font(.system(size: 17, weight: .medium))
                .frame(width: 40, height: 40, alignment: .center)
                .background(
                    RoundedRectangle(cornerRadius: 20, style: .circular)
                        .fill(Color(dialog.avatarColor))
                )

            VStack(alignment: .leading, spacing: 0) {
                Text(dialog.title)
                    .font(.system(size: 17))
                    .lineLimit(1)
                    .frame(height: 20, alignment: .bottom)
                Text(dialog.lastMessageText ?? "")
                    .foregroundColor(.secondary)
                    .font(.system(size: 15, weight: .light))
                    .lineLimit(1)
                    .frame(height: 20, alignment: .top)
                    .frame(maxWidth: .infinity, alignment: .leading)
            }
            .padding(.trailing, 24)

            VStack(alignment: .trailing, spacing: 0) {
                Text(dialog.lastMessageDate?.formatString() ?? "")
                    .font(.system(size: 12, weight: .light))
                    .foregroundColor(.secondary)
                    .frame(height: 16, alignment: .top)

                Text(dialog.unreadMessagesCounter ?? "99+")
                    .font(.system(size: 12, weight: .light))
                    .padding(3)
                    .foregroundColor(.white)
                    .frame(height: 24)
                    .frame(minWidth: 24)
                    .background(
                        Capsule()
                            .fill(.green)
                            .opacity(dialog.unreadMessagesCounter == nil ? 0.0 : 1.0)
                    )
            }
        }
        .frame(height: 40)
    }
}
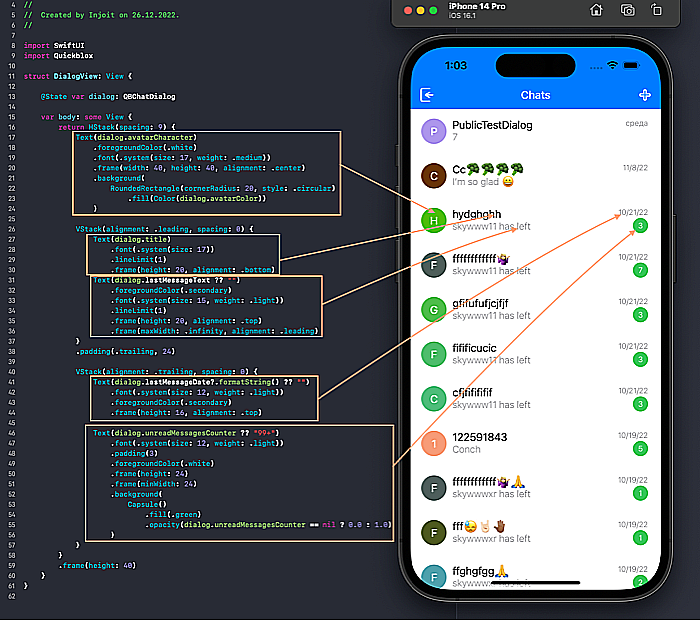
In this image, arrows are used to link the DialogView elements to code blocks:
Let’s now prepare our DialogsView:
import SwiftUI
import Quickblox
import UIKit


struct DialogsView: View {

    init() {
        //MARK: Disable selection style.
        UITableViewCell.appearance().selectionStyle = .none
    }

    @Environment(\.presentationMode) var presentationMode
    @State var dialogs: [QBChatDialog] = []
    let quickBloxServerAPI = QuickBloxServerAPI()

    var body: some View {
        ZStack {
            Color.white.edgesIgnoringSafeArea(.all)
            Color.clear
                .overlay(
                    List {
                        ForEach(dialogs) { dialog in
                            ZStack {
                                DialogView(dialog: dialog)
                                NavigationLink(destination: ChatView()) {
                                    EmptyView()
                                }
                                .frame(width: 0)
                                .opacity(0)
                            }
                            .padding(.vertical, 4)
                            .padding(.leading, -3)
                            .listRowSeparator(.hidden)
                        }
                    }
                        .listStyle(PlainListStyle())
                        .refreshable {
                            fetchDialogs()
                        }
                        .onAppear() {
                            fetchDialogs()
                            UITableView.appearance().allowsSelection = true
                            UITableViewCell.appearance().selectionStyle = .none
                        }
                )}

        .navigationBarBackButtonHidden(true)
        .navigationBarItems(leading: Button(action: {}) {
            Image(uiImage: UIImage(named: "exit") ?? UIImage())
        })
        .navigationBarTitle("Chats", displayMode: .inline)
        .navigationBarItems(trailing: Button(action: {}) {
            Image(uiImage: UIImage(named: "add") ?? UIImage())
        })
    }

    private func fetchDialogs() {
        quickBloxServerAPI.fetchDialogs { result in
            switch result {
            case .success(let dialogs):
                guard let dialogs = dialogs else { return }
                DispatchQueue.main.async {
                    self.dialogs = dialogs
                }
            case .failure(let error):
                debugPrint("[DialogsView] \(#function) error: \(error.localizedDescription)")
            }
        }
    }
}


struct DialogsView_Previews: PreviewProvider {
    static var previews: some View {
        DialogsView()
    }
}
When we click on the DialogView, we expect to be taken to the chat screen. We will make sure to create a ChatScreen in a later tutorial, but for now let’s create a placeholder for this Screen:
import SwiftUI


struct ChatView: View {
    var body: some View {
        Text("Hello, ChatView!")
    }
}


struct ChatView_Previews: PreviewProvider {
    static var previews: some View {
        ChatView()
    }
}
5. Create Additional Users & Group Dialogs
We’re now ready to receive dialogs from the server and display them on DialogsView.
To get the full effect of what the dialogs page will look like, Let’s create a few more dialogs in the admin panel so that the picture is more complete.
To do this, go to the Quickblox admin panel and go to the Users page.
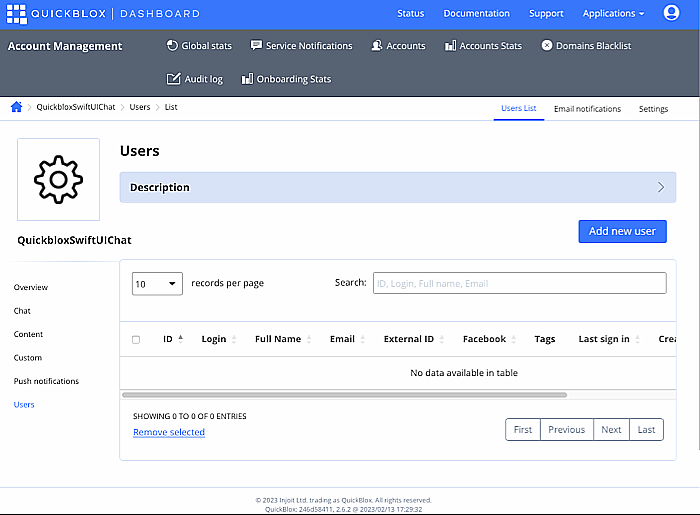
Click on the “Add new user” button.
A template for creating and editing a User will open.
To create a new user, you need to fill in the required fields and confirm the creation of the user.

Create the number of new users you need!
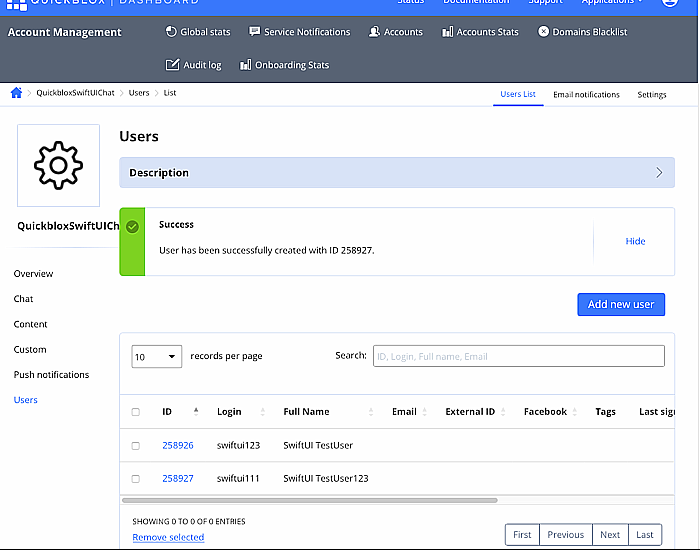
Great! Now that we have more users, we can create group dialogs.
Let’s do that!
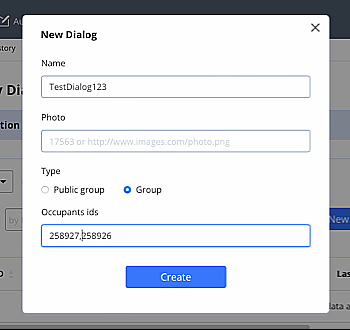
Go to the “Chat” page

Click the “New Dialog” button. The template for creating a new dialog will open.
Note: When creating a group dialog, you must enter the user IDs that will be in this dialog in the appropriate field. You also need to use commas without spaces to separate user IDs.
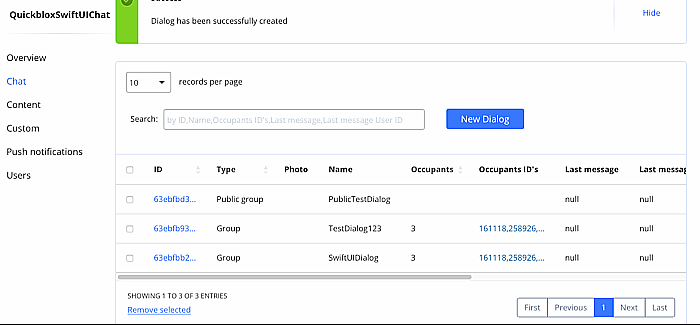
Of course, we can always add a user to group dialogs.
We can create multiple group dialogs and a public dialog. We will create private dialogs later from the application.
6. Request Dialogs from Server
Now everything is ready to request our dialogs from the server.
Let’s do it! Let’s run our application to get dialogs from the server.
You should see something similar to this:
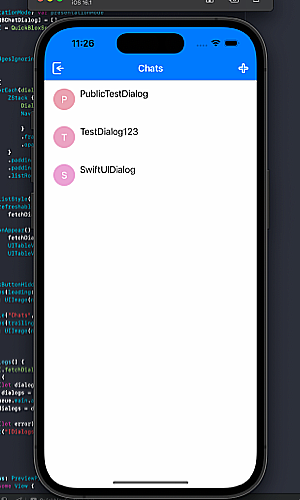
So far our dialogs don’t look quite right as they are missing some fields. We’ll fix this soon! In the meantime, to improve the appearance of the DialogScreen, you can make stub constants for the missing dialog properties on the DialogView.
Great!!!
In this part of the tutorial, we created a DialogView and improved its design.
In the next part, we will start creating a ChatView to display messages and send messages to the chat.
Have Questions? Need Support?
Join the QuickBlox Developer Discord Community, where you can share ideas, learn about our software, & get support.
Join QuickBlox Discord
 AI Agent — automate conversations and workflows. Now available on Free plan


