In recent years, chatbots have become increasingly popular for businesses and individuals alike, as they offer a convenient way to automate communication with customers and users. ChatGPT is an AI language model that can engage in human-like conversations, making it a great choice for creating a chatbot that can simulate natural language interactions. QuickBlox SDK is a powerful tool that allows developers to easily integrate chat and messaging features into their applications.
In the following chatbot development guide, we’ll show you how to create your own ChatGPT chatbot using OpenAI API and Javascript SDK. We’ll cover the necessary steps to set up an application, configure the JS SDK for messaging, create a basic chatbot and integrate with OpenAI API for enhanced intelligence. By the end of the tutorial we hope you will have a working model in place!
What is a ChatBot?
A chatbot is a computer program that is designed to simulate human-like conversations with users, typically through text-based messaging interfaces. Chatbots are powered by artificial intelligence (AI) technologies, such as natural language processing (NLP) and machine learning, and they can interpret and respond to user messages in a way that feels natural and human-like.
There are many different types of chatbots, ranging from simple rule-based bots that follow predefined scripts, to more advanced bots that use AI to understand and respond to user input more flexibly and dynamically. AI can analyze sentiment and emotions within messages and suggest automated replies that are most likely to be appropriate for the conversation. When combined with AI, chatbots can become an incredibly powerful technology
Learn more about, Enhancing Healthcare Apps with OpenAI Whisper and ChatGPT
What are Chatbots used for?
Chatbot technology is becoming increasingly popular, as it provides a more efficient way to communicate with customers and helps businesses run more smoothly. There are countless use cases. Chatbots can be used to provide customer service, provide helpful information, and even help promote products and services. Advances in AI that are improving the efficiency of chatbots means they can be used for an ever-increasing number of services.
Introducing ChatGPT
No doubt you’re aware of all the buzz around ChatGPT, a new AI platform that has taken the world by storm. ChatGPT is an open-source chatbot framework based on the GPT-3 language model produced by OpenAI. This new AI platform gained over 1 million users within 5 days of its launch in December 2022. By February 2023, this number had risen to 100 million. ChatGPT has garnered so much attention because it is one of the most sophisticated language models available and has demonstrated impressive capabilities in its ability to generate meaningful and accurate responses to user input.
Combining OpenAI and JS SDK
In the following tutorial, we’ll dive into a JavaScript chatbot framework that simplifies the development process. The QuickBlox JavaScript SDK allows programmers to create a modern chat application, while OpenAI API enables programmers to integrate ChatGPT to provide useful chatbot functionality.
Learn more about, How to Launch JavaScript Chat and WebRTC Video Conferencing Samples
Creating your own ChatGPT ChatBot
1. Register for a QuickBlox account
For this AI chatbot development project, which uses the QuickBlox JS SDK, you first need to register for a QuickBox account.
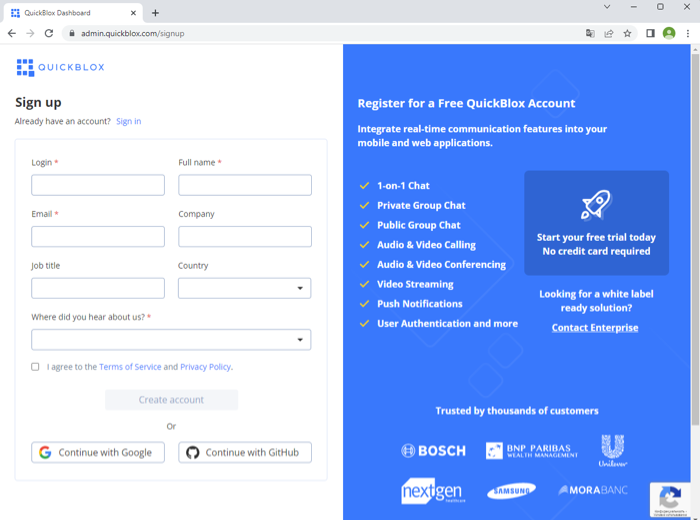
Picture 1. Signing up for a QuickBlox account
On the signup page, complete the required details and then click to “Create account.” After signing up, you will be able to access all of QuickBlox’s services and features.
2. Create an App
After signing into your account you will see the main page where you need to find the “New app” button and click on it to create an Application.
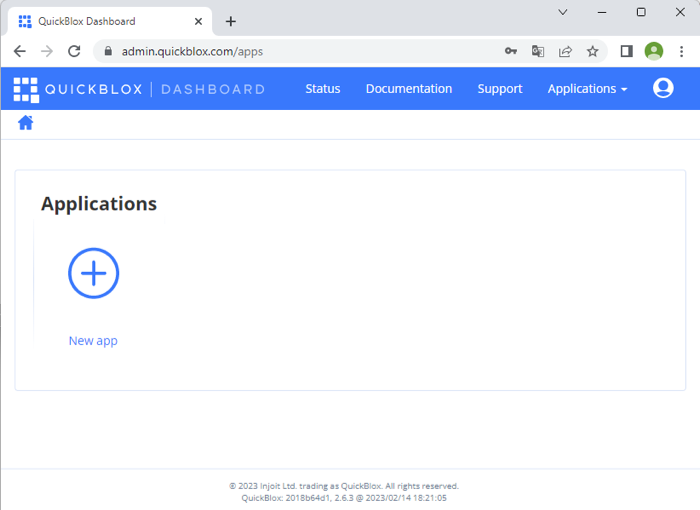
Picture 2. Create a “New app”
Learn how to use the QuickBlox admin panel in our earlier blog: How to Create an App and Use the QuickBlox Admin Panel
Enter a title and type for the application. Other fields are optional. Then click on the “Create app” button.
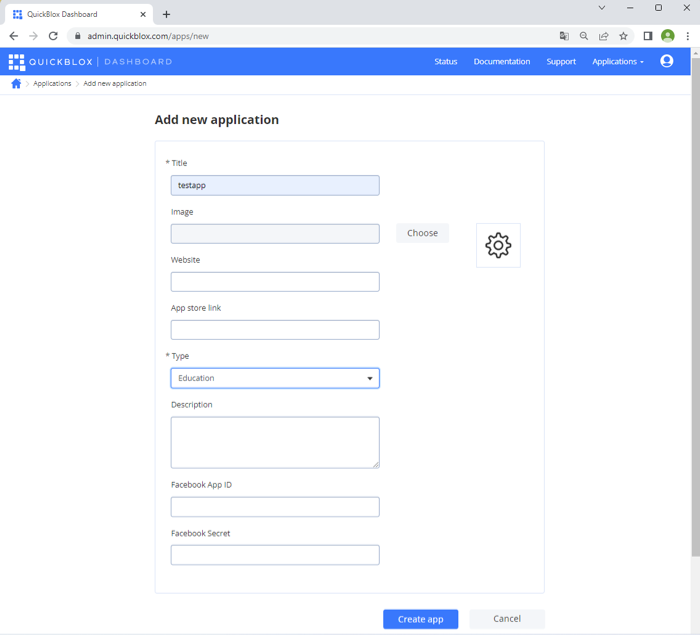
Picture 3. “Create app”
On the “Overview” page for the created app, you will be given credentials.

Picture 4. Application credentials
3. Create an App User
Next you need to create an app user in the QuickBlox dashboard.
Follow the steps below:
- Navigate to Dashboard => YOUR_APP => Add a new user in the QuickBlox Dashboard.
- Fill in the Add user profile info. Enter the email/login and password, and confirm the password for the new user account. These parameters are required for creating a user.
- Click the Add user button. Similarly, you can create more users in the Dashboard.
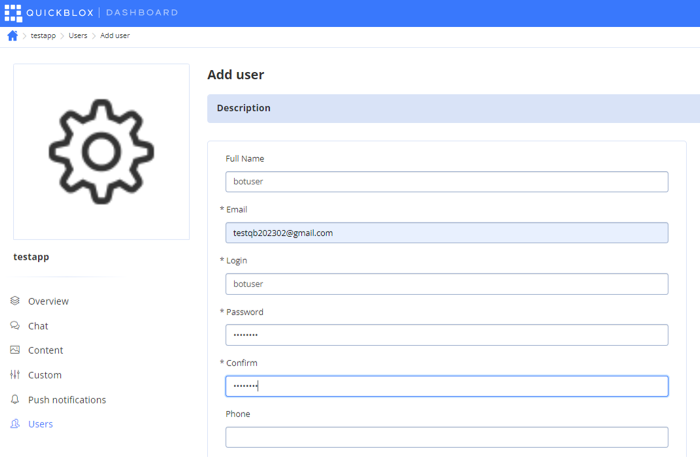
Picture 5. Create application user
Now that we have created an app and an app user, we can create a JS application that will use this creation to listen to the messages from users to the bot.
Step 4. Create a chatbot project in Visual Studio Code
To start coding to create our chatbot we need to first launch the Visual Studio Code development environment and follow these steps:
- Create a project folder in your development environment. It will be the root directory for your Node.js application.
- In the development environment terminal, run the command:
mkdir chat-bot
cd chat-bot
npm init -y
Create an entry file, such as index.js. This file will contain the main code for your Node.js application.
Install the dependencies of the QuickBlox library for your application using the command in the terminal:
npm install quickblox --save
Edit the scripts section in the package.json file and add the command:
……………………
"scripts": {
   "start": "node index",
   "test": "echo \"Error: no test specified\" && exit 1"
}
……………………
Open the index.js file and add the code shown below:
var QuickBlox = require("quickblox").QuickBlox;
var QB = new QuickBlox();
Now we have set up everything we need to write our chatbot application and we are ready to start coding.
Step 5. Initialize the QuickBlox SDK
Now we’re ready to start working with the QuickBlox library.
The first step is to initialize the SDK with the application credentials. To do this you must call the init() method and pass the APPLICATION_ID, AUTH_KEY, AUTH_SECRET, and ACCOUNT_KEY as arguments to it.
var APPLICATION_ID = 0;
var AUTH_KEY = "";
var AUTH_SECRET = "";
var ACCOUNT_KEY = "";
QB.init(APPLICATION_ID, AUTH_KEY, AUTH_SECRET, ACCOUNT_KEY);
You can get the app credentials from your QuickBlox account (see picture 4. App credentials).
Additional information about how to add and configure the QuickBlox JavaScript SDK is available in our official JS documentation.
Step 6. Obtain session token
Every user needs to authenticate with QuickBlox before using any QuickBlox functionality. When someone connects with an application using QuickBlox, the application needs to obtain a session token that provides temporary secure access to QuickBlox APIs. A session token is an opaque string that identifies a user and an application.
To create an application session, use the following code.
QB.createSession((error, result) => {
   if (error) {
     console.log('Create session Error: ', error);
   } else {
       console.log('Create session - DONE!');
              //connect to Chat Server.....
   }
});
Step 7. Connect to the Chat Server
Once we’ve created the session, we can connect to the Chat Server.
After the comment “connect to Chat Server…..” add the code snippet below:
var userCredentials = {
  userId: 0,
  password: ""
};

QB.chat.connect(userCredentials, (error, contactList) =>{
  if (error) {
     console.log('QB chat.connect is failed!');
     process.exit(1);
   }
console.log('QB Bot is up and running');
     //listener....
});
Set userCredentials to the value we received earlier when creating the user (Picture 5. Create application user)
Step 8. Add Event Listeners
We need to add event listeners for receiving messages from users by the bot.
After the comment “//listener….” add a code snippet for listening to messages:
QB.chat.onMessageListener = onMessageListener;
………………
function onMessageListener(userId, msg) {
  if (msg.type === "chat" && msg.body) {
    const answerMessage = {
      type: "chat",
      body: "Your send: " + msg.body,
      extension: {
        save_to_history: 1,
        			},
      };

      QB.chat.send(userId, answerMessage);
    }
}
Our bot will only respond with the phrase that was sent to it. Later we will expand the bot’s capabilities.
Step 9. Chatbot integration in the QuickBlox Chat JavaScript Sample
QuickBlox provides integrations with many services to build and integrate chatbots into your application.
Let’s explore this possibility based on the JavaScript chat sample available for download from our website.
In the development environment terminal, run the command:
git clone https://github.com/QuickBlox/quickblox-javascript-sdk.git
After downloading the project in the directory quickblox-javascript-sdk\samples\chat, we can see the example of a chat in JS.
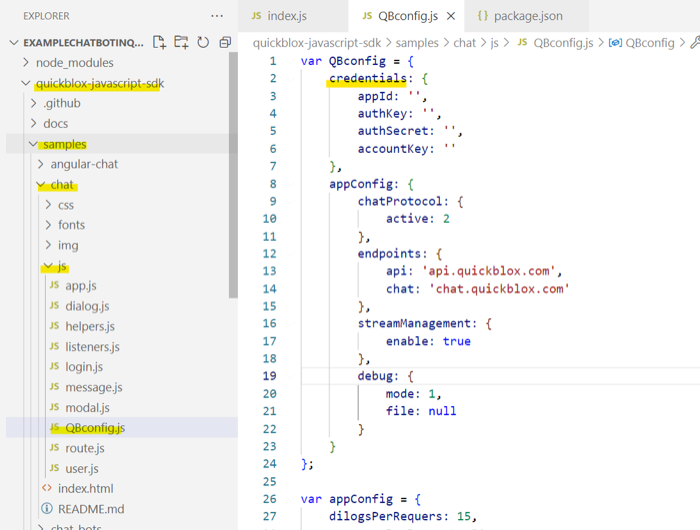
To successfully launch the application, you need to add application parameters in the configuration file (\chat\js\QBConfig.js) in the credentials section.
Add Application Settings (Picture 4. Application credentials) to the QBConfig.js file.
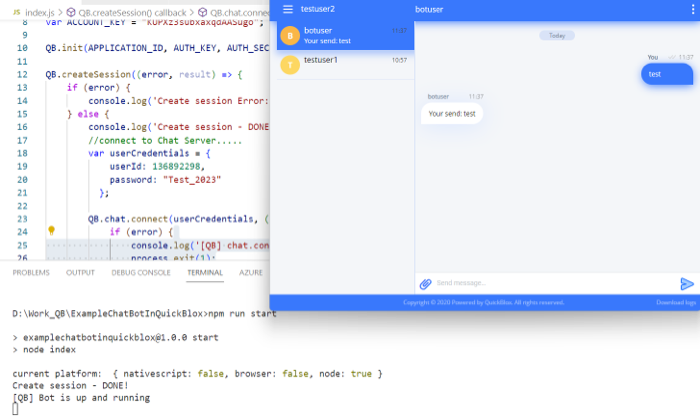
Step 10. Testing the ChatBot
Now that our example is ready, let’s test the chatbot.
Run the chatbot in the terminal with the command:
npm run start
Open the index.html file in the browser, perform authorization and create a chat with the user-bot.
When sending messages to the bot, we will receive our messages in response.
Picture 6. App configuration file
Picture 7. App configuration file (2)
Step 11. Connect Chatbot to OpenAI API
The basic functionality is working, but let’s enhance our chatbot’s performance.
OpenAI API is a great tool for improving the intelligence of bots so that they can understand and interact with users more naturally.
Let’s connect OpenAI to our chatbot now.
First, we need to register for an account with OpenAI:
- Visit the OpenAI website (openai.com).
- Click “Sign up” at the top of the page.
- Enter your name, email address, and password.
- Select “Sign up” to create your account.
- Check your email for a verification link from OpenAI.
- Click the verification link to confirm your account.
- Log in to your OpenAI account with your email and password.
- Explore the OpenAI platform and its resources.
- Get an API Key. You can get an OpenAI API Key here by clicking on + Create new secret key.
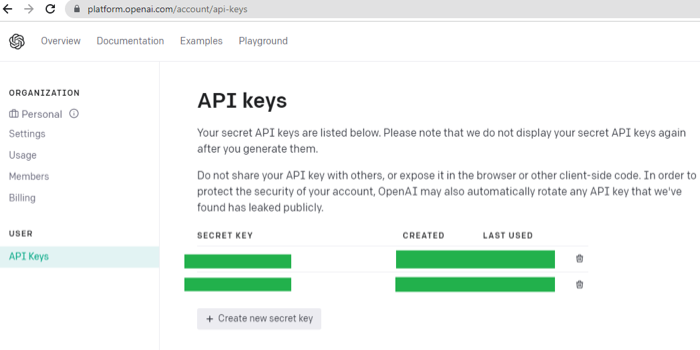
Picture 8. Get an OpenAI API Key
Next we need to add the OpenAI Node.js Library to our chatbot project
(see more here https://www.npmjs.com/package/openai).
Run the command in the terminal:
npm install openai
Open index.js file and write the following code:
const { Configuration, OpenAIApi } = require("openai");
const configuration = new Configuration({
apiKey: '<YOUR_OPENAI_API_KEY>',
});
const openai = new OpenAIApi(configuration);
Add API key from OpenAI instead of <YOUR_OPENAI_API_KEY>.
Change the code of the onMessageListener function to:
async function onMessageListener(userId, msg) {
    if (msg.type === "chat" && msg.body) {
        const response =  await openai.createCompletion({
            model: "text-davinci-003",
            prompt: msg.body,
            temperature: 0.7,
       	max_tokens: 3000,
        });

        const answerMessage = {
            type: "chat",
            body: response.data.choices[0].text,
            extension: {
              save_to_history: 1,
            },
        };

        QB.chat.send(userId, answerMessage);
    }
}
Fantastic! Our chatbot has just got a whole lot smarter!
Again, let’s check his performance.
Run the application with the command in the terminal:
npm run start
Open the index.html of the chat example in the browser and write a message to the bot.
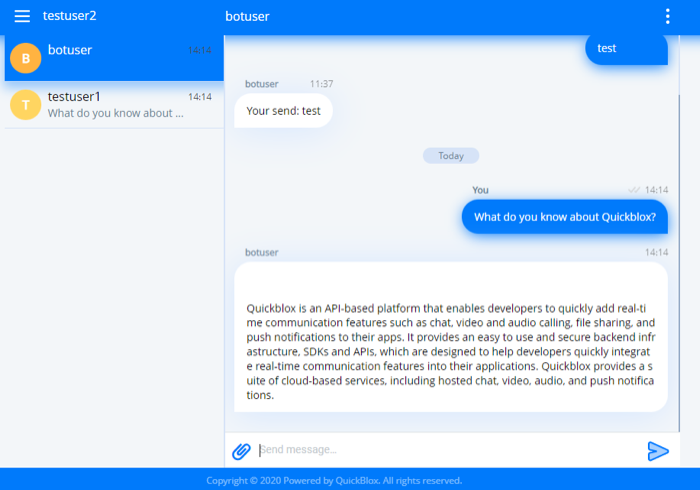
Picture 9. The result of the response of the bot
As you can see from the screenshot above, our chatbot is now capable of providing intelligent detailed responses. Well done!
AI Chatbot Implementation with QuickBlox
By following the steps in this tutorial, we hope you have gained some understanding of how to build a simple chatbot that can answer user messages, using state-of-the-art OpenAI technology and QuickBlox’s powerful messaging platform.
QuickBlox is dedicated supporting developers building AI-powered chat applications. We would love to hear about the projects you’re working on in the comments below or by joining the QuickBlox Developer Community on Discord.
QuickBlox provides a powerful set of SDKs for all major platforms to help you build chat applications and several ready chat samples. Please check out our resources today.
Сode of examples from the article can be downloaded on github
https://github.com/QuickBlox/examples/tree/main/Articles
Have Questions? Need Support?
Join the QuickBlox Developer Discord Community, where you can share ideas, learn about our software, & get support.
Join QuickBlox Discord
 AI Agent — automate conversations and workflows. Now available on Free plan


Thank you for this informative post! It has shed light on a topic I was struggling to understand.
Thank you! We're glad you found it helpful.