Push notifications provide a vital way to keep users engaged with your app, even when their phone is switched off or the app is in background mode. In a previous tutorial, we outlined how to configure Firebase to get your Android app ready to add push notifications. In this tutorial we outline additional steps needed if you are building a cross-platform application with Flutter. Read our step-by-step guide below for easy instruction.
Learn more about: How Push Notifications Can Improve your Business
Tutorial
Once we’ve configured Firebase, we’re ready to add dependencies needed for our project.
Step 1: Adding Libraries
We need to add a series of libraries to our application to send, receive, and show notifications.
We recommend using the firebase messaging library from the pub dev site to receive notifications and the flutter local notifications library also available from pub dev to show push notifications, and the QuickBlox SDK library to send messages.
We attach these libraries to our application by adding them to pubspec.yaml file.
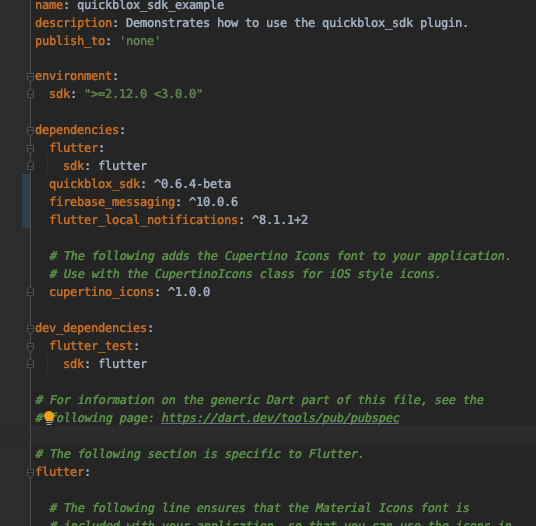
dependencies:
  flutter:
    sdk: flutter
  quickblox_sdk: ^0.7.1
  firebase_messaging: ^10.0.6
  flutter_local_notifications: ^8.1.1+2
  cupertino_icons: ^1.0.3
Step 2. Adding code for push notifications
Next, we add the code for showing push notifications.
If we have a simple application we would write the code in a widget, but of course in a larger application, the code can be written in the bloc or some manager.
void initSubscription() async {
    FirebaseMessaging.instance.getToken().then((token) {
      QB.subscriptions.create(token!, QBPushChannelNames.GCM);
    });

    try {
      FirebaseMessaging.onMessage.listen((message) {
        showNotification(message);
      });
    } on PlatformException catch (e) {
      //some error occurred
    }
  }

void showNotification(RemoteMessage message) {
    AndroidNotificationChannel channel = const AndroidNotificationChannel(
        'channel_id', 'some_title', 'some_description',
        importance: Importance.high);

    AndroidNotificationDetails details = AndroidNotificationDetails(
        channel.id, channel.name, channel.description,
        icon: 'launch_background');

    FlutterLocalNotificationsPlugin plugin = FlutterLocalNotificationsPlugin();
    int id = message.hashCode;
    String title = "some message title";
    String body = message.data["message"];

    plugin.show(id, title, body, NotificationDetails(android: details));
}
Step 3. Token subscription
Tokens are needed to bind our application with Firebase and the Quickblox server. Without a token we can’t receive a message from Quickblox. They function like a unique identifier.
The method which “sends” the token to the Quickblox server is initSubscription. Let’s look inside the code snippet to see how it works:
FirebaseMessaging.instance.getToken().then((token) {
  //Here we create subscription in Quickblox by Firebase token
  QB.subscriptions.create(token!, QBPushChannelNames.GCM);
});
First we receive a token from the Firebase library. Then using the second method QB.subscriptions.create() we send this token to the Quickblox server, notifying the server about our device. The received token is the first parameter. We also need to add the type of subscription as the second parameter. For Firebase we use QBPushChannelNames.GCM.
Step 4. Showing push notifications
Now, let’s look at the next code snippet:
try {
   FirebaseMessaging.onMessage.listen((message) {
     showNotification(message);
   });
} on PlatformException catch (e) {
  //some error occurred
}
From this code snippet you can see that we have subscribed for new messages, which we will receive and pass them to the showNotification method.
Once the message has been received, we can show the push notification, and we can do this very simply by calling the second method showNotification. Let’s look at the code:
AndroidNotificationChannel channel = const AndroidNotificationChannel(
        'channel_id', 'some_title', 'some_description',
        importance: Importance.high);
First, we initialize the required constant and set up some additional parameters, for example “importance.”
Next we set up Android notification details:
AndroidNotificationDetails details = AndroidNotificationDetails(
        channel.id, channel.name, channel.description,
        icon: 'launch_background');
Finally, we can show our notification with the following code snippet:
FlutterLocalNotificationsPlugin plugin = FlutterLocalNotificationsPlugin();
    int id = message.hashCode;
    String title = "some message title";
    String body = message.data["message"];

    plugin.show(id, title, body, NotificationDetails(android: details));
We’ve set up a plugin with our data and call method show, from the plugin, to display the notification.
Mission accomplished!
Now the application is ready to receive and display push notifications.
If you want to start building chat with QuickBlox SDKs and APIs, sign-up for a free account today.
Want to learn more about building Flutter apps? Check out our other tutorials:
How to Launch a Flutter Chat Sample
How to Get Started with QuickBlox Flutter SDK
Have Questions? Need Support?
Join the QuickBlox Developer Discord Community, where you can share ideas, learn about our software, & get support.
Join QuickBlox Discord
 AI Agent — automate conversations and workflows. Now available on Free plan