With so many chat apps on the market, how do you make yours stand out from the rest? As well as the ability to send and receive text messages, many app developers include additional in-built features to make their apps more engaging and fun. For example, app users enjoy adding Gifs and stickers to their chat messages to give them more personality and emotion.
Stickers are a form of visual communication that can be used in chat apps. They are typically small images, often animated, that depict a character, object, or scene, used to express emotions, sentiments, or reactions in a more playful and visually interesting way than plain text. Stickers can be used in place of or in addition to text, and can be selected from a library of pre-made stickers within the chat app. Many chat apps now include packs of stickers which can be purchased in-app.
When you build a chat app with the QuickBlox Flutter SDK, you are able to expand the capabilities of the SDK to create this awesome feature. For this project we’ll be integrating the QuickBlox SDK with the Stipop SDK to enable support for stickers. The Stipop SDK offers a vast selection of over 150,000 .png and .gif stickers that can be seamlessly incorporated into various mobile app functions such as chat, comment sections, live streams, video calls, and more.
Read on to learn the simple steps involved.
Learn more about: How to get started with QuickBlox Flutter SDK
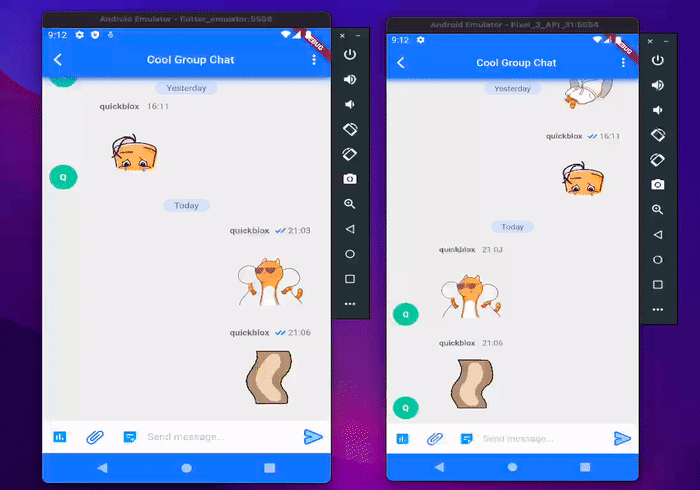
Table of Contents
Initial Setup
To get started we first need to create a template application that can be used to support this feature. The Quickblox chat sample application provides code we can use to get our chat screen up and running in no time at all.
Learn more about: Introducing the New Flutter Chat Code Sample
For simplicity we’ll be working with three screens: Splash, Login, and Chat. The _dialogId on the Chat screen has been hard-coded so users will be directed to the appropriate group chat. The template application code can be found here.
Create an account in QuickBlox
- To create a new account, click this link, you can also use your Google or GitHub accounts to sign in.
- Afterward, click the “New app” button to create the app.
- Type in the required information about your organization into the designated fields and click the “Add” button.
- Finally, go to the Dashboard, choose YOUR_APP, and then go to the Overview section to copy the Application ID, Authorization Key, Authorization Secret, and Account Key.
After obtaining the necessary application credentials, insert them into the main.dart file located in the template application. For added security, it is recommended to store the credentials in a keys.env file and exclude it from version control by adding it to the .gitignore. By following these steps, the application can now be executed using the specified commands.
flutter packages get
flutter run
Ta-da! You now have a basic chat application functioning.
Integrate Stipop SDK
Stipop provides access to stickers through APIs, which can be utilized directly or integrated through their SDKs. As we currently do not require significant customization, it would be more efficient to integrate the SDK and utilize its pre-existing interface.
Rather than using Stipop’s official documentation, I recommend using the steps below for integration with Flutter.
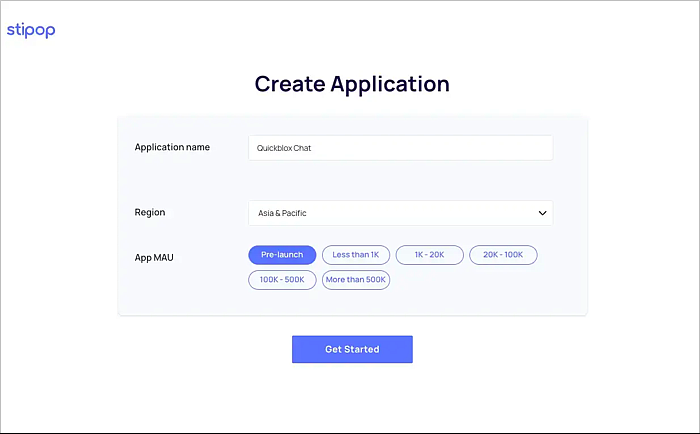
Create an application on Stipop dashboard
- Follow this link to sign up and create a new account, or you can use your Google account to sign in.
- Once you have done that, you can create a new application from here.
- Go to the settings tab on the dashboard and copy the
Application ID.
- Then, paste this ID into the keys.env file with the key
stipopApplicationId.
Integrate SDK — Android steps
- Go to the
Build tab in the Stipop dashboard and download the Stipop.json file.
- Create the folder
android/app/src/main/assets if it doesn’t already exist, and move Stipop.json into it.
- Then open the project level gradle (
android/build.gradle) and add the necessary code.
// at project level build.gradle
allprojects {
  repositories {
    maven { url 'https://jitpack.io' }
  }
}
- Navigate to the
android/app/build.gradle file in your app level and add a dependency.
// at app level build.gradle
defaultConfig {
  ..
  multiDexEnabled true // You may need this option
}
dependencies {
  implementation 'com.github.stipop-development:stipop-android-sdk:0.5.0'
}
- Navigate to
android/app/src/main/res/styles.xml and update the ‘parent’ attribute to inherit from ‘Theme.MaterialComponents’ as this is the SDK UI theme that uses MaterialComponents. The code should look like this:
<style name="LaunchTheme" parent="Theme.MaterialComponents.DayNight.NoActionBar">
    <item name="android:windowBackground">@drawable/launch_background</item>
</style>

<style name="NormalTheme" parent="Theme.MaterialComponents.DayNight.NoActionBar">
    <item name="android:windowBackground">?android:colorBackground</item>
</style>
- Go to
android/app/src/main/{package}/MainActivity and replace FlutterActivity with FlutterFragmentActivity, as the SDK uses AndroidX UI components.
import io.flutter.embedding.android.FlutterFragmentActivity

class MainActivity: FlutterFragmentActivity()
Integrate SDK — IOS steps
- Go to the
Build tab on the Stipop dashboard and download the Stipop.plist file.
- Open the iOS module in Xcode and drag and drop the
Stipop.plist file into the Runner directory. Finish by importing it.
Integrate SDK — Flutter steps
- In your
pubspec.yaml file, add the stipop_sdk dependency like this:
dependencies:
  flutter:
    sdk: flutter
  stipop_sdk:
    git:
      url: https://github.com/stipop-development/stipop-flutter-sdk.git
      ref: develop
Note: We encountered difficulties with version 0.2.3 of the SDK listed here, so we decided to directly include the most recent version from GitHub.
- Run the command
flutter packages get to install any missing dependencies and then run the application again.
If the app is now running successfully, any errors you may see would be similar to the following:
quickblox-chat-fun-feature/android/app/src/debug/AndroidManifest.xml Error:
 Attribute application@name value=(android.app.Application) from (unknown)
 is also present at [:stipop_sdk] AndroidManifest.xml:11:18-68 value=(com.stipop.plugin.GlobalApplication).
 Suggestion: add 'tools:replace="android:name"' to  element at AndroidManifest.xml:3:4-33:19 to override.

FAILURE: Build failed with an exception.

* What went wrong:
Execution failed for task ':app:processDebugMainManifest'.
> Manifest merger failed : Attribute application@name value=(android.app.Application) from (unknown)
   is also present at [:stipop_sdk] AndroidManifest.xml:11:18-68 value=(com.stipop.plugin.GlobalApplication).
   Suggestion: add 'tools:replace="android:name"' to  <application> element at AndroidManifest.xml:3:4-33:19 to override.
Go to the android/app/src/debug/AndroidManifest.xml file and implement the following alterations:
<manifest xmlns:android="http://schemas.android.com/apk/res/android"
    xmlns:tools="http://schemas.android.com/tools"
    package="com.example.quickblox_polls_feature">

    <!-- Replace label with your app label -->
    <application
        android:label="quickblox_polls_feature"
        android:name="${applicationName}"
        android:icon="@mipmap/ic_launcher"
        tools:replace="android:name">
    </application>
    <uses-permission android:name="android.permission.INTERNET"/>
</manifest>&l/pre>
The app should now be running successfully with the Stipop SDK integrated, making the application ready for use.
Using Data Models
Next we need to build two data models to support stickers in our application.
The first, StickerMessageProperties, will store the properties of stickers used while sending the sticker. While there are not many properties at the moment, this will be useful in the future if we need to expand the model.
The second, StickerMessage, will identify and convert our message object to a sticker for UI display when a message is received.
class StickerMessageProperties {
  final String stickerImgUrl;

  StickerMessageProperties({
    required this.stickerImgUrl,
  });

  Map toJson() {
    return {
      "stickerImgUrl": stickerImgUrl,
      "action" : "messageActionSticker",
    };
  }

  factory StickerMessageProperties.fromData(String stickerImage) {
    return StickerMessageProperties(
      stickerImgUrl: stickerImage,
    );
  }
}
import 'package:quickblox_polls_feature/models/message_wrapper.dart';
import 'package:quickblox_sdk/models/qb_message.dart';

class StickerMessage extends QBMessageWrapper {
  StickerMessage(
    super.senderName,
    super.message,
    super.currentUserId, {
    required this.stickerImgUrl,
  });

  final String stickerImgUrl;

  factory StickerMessage.fromMessage(
      String senderName, QBMessage message, int currentUserId) {
    return StickerMessage(
      senderName,
      message,
      currentUserId,
      stickerImgUrl: message.properties!['stickerImgUrl']!,
    );
  }
  StickerMessage copyWith({String? stickerImgUrl}) {
    return StickerMessage(
      senderName!,
      qbMessage,
      currentUserId,
      stickerImgUrl: stickerImgUrl ?? this.stickerImgUrl,
    );
  }
}
We’re done! These two models are all that is required.
Building the logic to support stickers
Next we need to create the logic to support stickers by utilizing the data models that we have established in the previous section. To do this, let’s create a roadmap of steps:
- Create an event in chat_screen_events.dart that will notify us when a sticker is pressed and provide us with the properties of the sticker.
- Call a repository method to send the message in the form of a sticker.
- Upon receiving a message, we need to verify that it is a
sticker message and convert it into a StickerMessage object.
Let’s go to chat_screen_events.dart and make an event.
class SendStickerMessageEvent extends ChatScreenEvents {
  final StickerMessageProperties stickerMessageProperties;

  SendStickerMessageEvent(this.stickerMessageProperties);
}
Let’s now go to the chat_screen_bloc to capture this event.
 if (receivedEvent is SendStickerMessageEvent) {
  try {
    await Future.delayed(const Duration(milliseconds: 300), () async {
      await _sendStickerMessage(
        stickerProperties: receivedEvent.stickerMessageProperties,
      );
    });
  } on PlatformException catch (e) {
    states?.add(
      SendMessageErrorState(makeErrorMessage(e), 'Can\'t send sticker'),
    );
  } on RepositoryException catch (e) {
    states?.add(
      SendMessageErrorState(e.message, 'Can\'t send sticker'),
    );
  }
}

Future _sendStickerMessage({
  required StickerMessageProperties stickerProperties,
}) async {
  await _chatRepository.sendStickerMessage(
    _dialogId,
    data: stickerProperties,
  );
}
We will create the repository method in the chat_repository.dart file. This method will take the sticker properties we get from the event and pass them down to the repository.
Future sendStickerMessage(
  String? dialogId, {
  required StickerMessageProperties data,
}) async {
  if (dialogId == null) {
    throw RepositoryException(_parameterIsNullException,
        affectedParams: ["dialogId"]);
  }

  await QB.chat.sendMessage(
    dialogId,
    saveToHistory: true,
    markable: true,
    properties: data.toJson(),
  );
}
We are using the toJson method to convert the sticker properties into a map and then passing this map to the message properties. If you need further information on parameters such as markable and saveToHistory, please refer to the official Quickblox documentation.
Now, turning our focus to the receiver’s end, we need to verify if we have received a sticker message and convert it into the StickerMessage object accordingly.
In the chat_screen_bloc file, we have a HashSet<QBMessageWrapper> _wrappedMessageSet which stores all the messages sorted by time. To handle stickers, we will now update the _wrapMessages() method, which is called every time new messages are received, to wrap the QBMessage(s) in the List<QBMessageWrappers>.
Future&lList&lQBMessageWrapper>> _wrapMessages(
    List&lQBMessage?> messages) async {
  List&lQBMessageWrapper> wrappedMessages = [];
  for (QBMessage? message in messages) {
    if (message == null) {
      break;
    }

    QBUser? sender = _getParticipantById(message.senderId);
    if (sender == null && message.senderId != null) {
      List&lQBUser?> users =
          await _usersRepository.getUsersByIds([message.senderId!]);
      if (users.isNotEmpty) {
        sender = users[0];
        _saveParticipants(users);
      }
    }
    String senderName = sender?.fullName ?? sender?.login ?? "DELETED User";

    if (message.properties?['action'] == 'pollActionVote') {
      //SOME CODE HERE

    } else if (message.properties?['action'] == 'messageActionSticker') {
      //OUR CODE HERE
      wrappedMessages.add(
        StickerMessage.fromMessage(senderName, message, _localUserId!),
      );
    } else {
      wrappedMessages
          .add(QBMessageWrapper(senderName, message, _localUserId!));
    }
  }
  return wrappedMessages;
}
We use the action field to check if the message is a sticker message in the above code. If it is, we convert it to a StickerMessage object, which will aid us in displaying the UI. We now have a list of messages that include stickers, that can be shown in the UI.
Note: to keep the code snippet example above short and clear , we used “Some Code Here” as a placeholder for the remaining code.
Constructing the UI
Now that we have the data models and logic ready, let’s now build the UI for the stickers.
Head over to chat_list_item.dart. We are going to add a condition to the _buildMessageBody() method which is called from the build method. This condition will check if the message is a sticker message, and if so, it will render an image (the sticker).
return Container(
  padding: const EdgeInsets.only(left: 10, right: 12, bottom: 8),
  child: Row(
    mainAxisSize: MainAxisSize.min,
    crossAxisAlignment: CrossAxisAlignment.end,
    children:  <Widget>[
      Container(
        child: _message.isIncoming && _dialogType != QBChatDialogTypes.CHAT
            ? AvatarFromName(name: _message.senderName)
            : null,
      ),
      Padding(padding: EdgeInsets.only(left: _dialogType == 3 ? 0 : 16)),
      Expanded(
          child: Padding(
        padding: const EdgeInsets.only(top: 15),
        child: Column(
          crossAxisAlignment: _message.isIncoming
              ? CrossAxisAlignment.start
              : CrossAxisAlignment.end,
          children:  <Widget>[
            IntrinsicWidth(
              child: Column(
                crossAxisAlignment: CrossAxisAlignment.stretch,
                children: [
                  Row(
                    mainAxisSize: MainAxisSize.min,
                    mainAxisAlignment: MainAxisAlignment.spaceBetween,
                    children: _buildNameTimeHeader(),
                  ),
                  //OUR CODE HERE
                  _message is StickerMessage
                      ? _buildStickerBody()
                      : _buildMessageBody()
                ],
              ),
            ),
          ],
        ),
      ))
    ],
  ),
);
Let’s write the _buildStickerBody() method, which will render the sticker message.
Widget _buildStickerBody() {
  return Container(
    constraints: const BoxConstraints(maxWidth: 234),
    padding: const EdgeInsets.only(
      left: 16,
      right: 16,
      top: 13,
      bottom: 13,
    ),
    child: Image.network(
      (_message as StickerMessage).stickerImgUrl,
      height: 100,
      width: 100,
    ),
  );
}
We are using the Image.network widget to load the stickerImgUrl from the _message, resulting in a minimal UI ready to render stickers as seen below:

Let’s add a button to _buildEnterMessageRow method in chat_screen.dart that will open the Stipop’s sticker keyboard and allow users to choose a sticker. This method renders the row where we enter the message.
//Declare the stipop variable at the top, where other variables are declared
Stipop stipop = Stipop();

Widget _buildEnterMessageRow() {
    return SafeArea(
      child: Column(
        children: [
          _buildTypingIndicator(),
                //SOME CODE HERE
                SizedBox(
                  width: 50,
                  height: 50,
                  child: IconButton(
                    icon: SvgPicture.asset('assets/icons/attachment.svg'),
                    onPressed: () {
                      NotificationBarUtils.showSnackBarError(
                          context, "This feature is not available now");
                    },
                  ),
                ),

                //OUR CODE HERE
                SizedBox(
                  width: 50,
                  height: 50,
                  child: IconButton(
                    icon: const Icon(
                      Icons.sticky_note_2_rounded,
                      color: Colors.blue,
                    ),
                    onPressed: () {
                      stipop.show();
                    },
                  ),
                ),
                //SOME CODE HERE
              ],
            ),
          ),
        ],
      ),
    );
  }
We have created an IconButton and assigned the stipop.show() method to its onPressed callback, which will open the sticker keyboard like this:
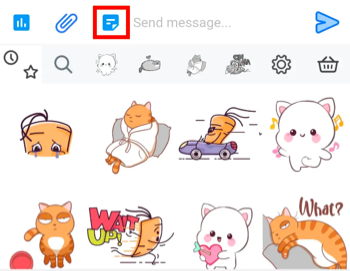
We will be initializing the stipop variable to connect to the Stipop sdk in the next section.
Final steps
Let’s now combine our logic with the UI to finalize the stickers feature.
We still have some outstanding tasks to tackle.
We need to connect to the Stipop SDK to enable the sticker keyboard. When any sticker is pressed, we need to send an event to our BLoC to notify the system and call the necessary APIs.
We should go to the chat_screen.dart file to connect the Stipop SDK. We can add the initState method, which is the first thing that is called when the page is built.
Stipop stipop = Stipop();

@override
void initState() {
  super.initState();

  //Connect to stipop SDK and pass the application Id.
  stipop.connect(
    userId: dotenv.env['stipopApplicationId'],
    onStickerPackSelected: (spPackage) {},
    onStickerDoubleTapped: (spSticker) {},
    pickerViewAppear: (spIsViewAppear) {},
    onStickerSingleTapped: (sticker) {},
  );
}
We are calling the connect method from Stipop SDK and passing the application id from Stipop’s dashboard in the integration section. With this, we will be able to utilize the methods that will notify us when the sticker is tapped and notify our system about the sticker.
@override
void initState() {
  super.initState();
  stipop.connect(
    userId: dotenv.env['stipopApplicationId'],
    onStickerPackSelected: (spPackage) {},
    onStickerDoubleTapped: (sticker) {
      //Pushing the sticker event to the BLoC
      bloc?.events?.add(
        SendStickerMessageEvent(
          StickerMessageProperties.fromData(sticker.stickerImg!),
        ),
      );
    },
    pickerViewAppear: (spIsViewAppear) {},
    onStickerSingleTapped: (sticker) {
      //Pushing the sticker event to the BLoC
      bloc?.events?.add(
        SendStickerMessageEvent(
          StickerMessageProperties.fromData(sticker.stickerImg!),
        ),
      );
    },
  );
}
Whenever a sticker is single or double-tapped, we add the SendStickerMessageEvent to our BLoC. The rest is already taken care of by our logic.
Additionally, when leaving the chat screen or disposing of it, we should hide the keyboard (if it is already open). To do this, add the following code to the dispose method:
@override
void dispose() {
  TypingStatusManager.cancelTimer();
  _scrollController?.removeListener(_scrollListener);
  _scrollController = null;
  _inputController = null;

  //Hide sticker keyboard
  stipop.hide();
  super.dispose();
}
We want to make sure that when the user taps the TextField to enter a text message, the sticker keyboard is closed so the system keyboard can be used. Currently, tapping the TextField while the sticker keyboard is open doesn’t allow the user to enter a text message.
Go to the _buildEnterMessageRow function and add this code:
//SOME CODE HERE
Expanded(
  child: Container(
    padding: const EdgeInsets.only(top: 2, bottom: 2),
    child: TextField(
      //Add the onTap callback to TextField
      onTap: () => stipop.hide(),
      controller: _inputController,
      onChanged: (text) {
        TypingStatusManager.typing(
          (TypingStates state) {
            switch (state) {
              case TypingStates.start:
                bloc?.events?.add(StartTypingEvent());
                break;
              case TypingStates.stop:
                bloc?.events?.add(StopTypingEvent());
                break;
            }
          },
        );
      },
 //SOME CODE HERE
),
In the code above, we added an onTap callback to the TextField and called the stipop.hide() method, which will close the sticker keyboard (if open).
Demo of stickers feature
If you have followed all of the steps, the stickers functionality should be ready and working. However, if you notice any errors or missing pieces, you can compare your code to the full source code in our repository.
What’s next
This article concentrated on developing the fundamental features of adding stickers and Gifs to a chat app, rather than refining the UI/UX. We have a few ideas on how it could be improved such as caching the stickers so they don’t need to be loaded from the network each time the chat is opened.
What do you think? Please share you thoughts about how we can improve this feature in the comments below.
Have Questions? Need Support?
Join the QuickBlox Developer Discord Community, where you can share ideas, learn about our software, & get support.
Join QuickBlox Discord
 AI Agent — automate conversations and workflows. Now available on Free plan


Amazing write-up
Thank you for sharing this blog.
Keep Posting!