Push notifications are an excellent way to keep your app users informed of new content. If you are building an app with QuickBlox iOS SDK, we fully support the use of Apple VoIP Push Notifications. In this tutorial I will outline how VoIP push notifications can be used with the QuickBlox SDK.
Table of Contents
PushKit
If you are using QuickBlox to provide IP telephony (VoIP) in your app, it would be a great idea to use PushKit to handle incoming calls on user devices. PushKit is a framework from Apple that provides an efficient way to manage calls that doesn’t require your app to be running to receive calls. The call initiator creates the event for the QuickBlox server to send a push notification with VoIP type to the user’s device with information about that call. Upon receiving the notification, the device wakes up your app and gives it time to notify the user and connect to the QuickBlox server.
CallKit
PushKit requires you to use CallKit when handling VoIP calls. CallKit ensures that apps providing call-related services on a user’s device work seamlessly together on the user’s device, and respect features like Do Not Disturb. CallKit also operates the system’s call-related UIs, including the incoming and outgoing call screens. It gives your app more native look and feel by displaying the same interfaces as the Phone app.
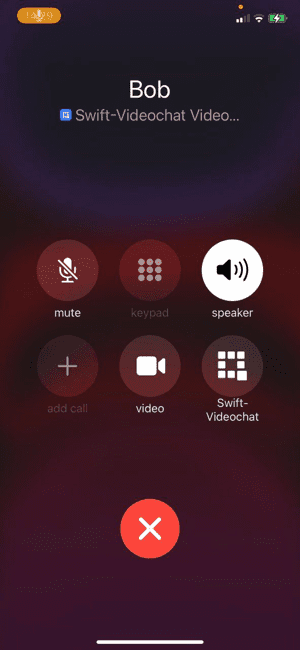
To present these interfaces, use a CXProvider object, which manages user interactions for both incoming and outgoing calls. Create a provider object early in your app’s life cycle and make it available to your app’s call-related code.
// Configure the app's CallKit provider object.
let config = CXProviderConfiguration(localizedName: "VoIP Service")
config.supportsVideo = true
config.maximumCallsPerCallGroup = CallKitConstant.defaultMaximumCallsPerCallGroup
config.maximumCallGroups = CallKitConstant.defaultMaximumCallGroups
config.supportedHandleTypes = [.phoneNumber]
if let image = UIImage(named: "qb-logo") {
    config.iconTemplateImageData = image.pngData()
}
config.ringtoneSound = "ringtone.wav"

// Create the provider and attach the custom delegate object
// used by the app to respond to updates.
provider = CXProvider(configuration: config)
provider?.setDelegate(callManager, queue: nil)
CXCallUpdate objects are used to set new and changed information about a call.
private func callUpdate(withTitle title: String, hasVideo: Bool) -> CXCallUpdate {
        let update = CXCallUpdate()
        update.localizedCallerName = title
        update.supportsHolding = false
        update.supportsGrouping = false
        update.supportsUngrouping = false
        update.supportsDTMF = false
        update.hasVideo = hasVideo
        return update
    }
Create the QBRTCAudioSession object for setting up the type of audio session needed for each call. The call can be audio or video, but each requires a different configuration. The audio session can also be used by other applications such as YouTube, which again requires its own configuration. At the start of every call, you will need to set up the right configuration for the type of audio session you require, and at the end of the call the session must be deactivated to release that configuration.
private let qbAudioSession = QBRTCAudioSession.instance()
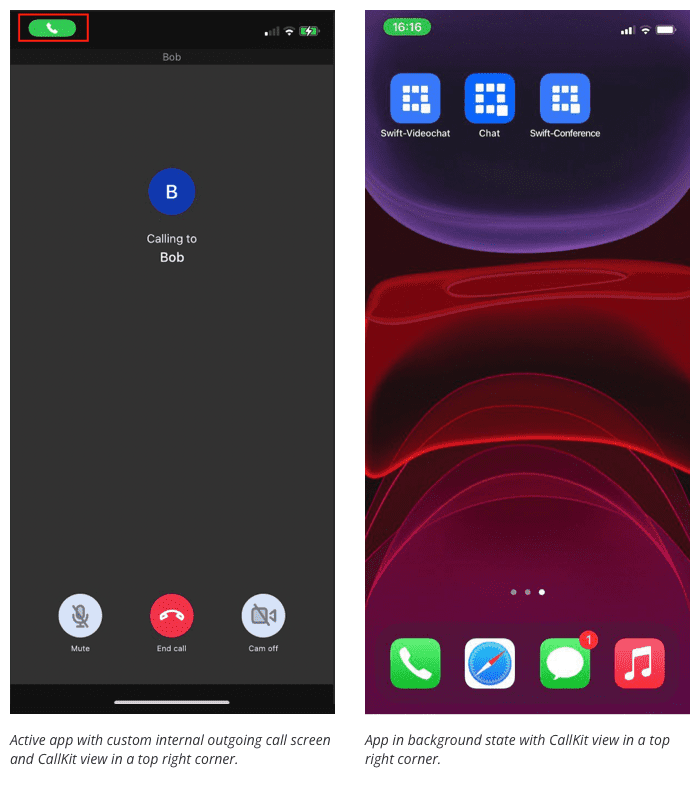
To show an outgoing call, request CXStartCallAction. Use CXHandle object to specify the recipient.
private func handle(withText text: String) -> CXHandle {
        return CXHandle(type: .generic, value: text)
    }

    func reportOutgoingCall(sessionId: String,
                            title: String,
                            hasVideo: Bool,
                            completion: ReportCallCompletion? = nil) {

        let callUuid = UUID(uuidString: sessionID)

        guard let provider = provider else {
            return
        }

        let action = CXStartCallAction(call: callUuid, handle: handle(withText: title))
        let transaction = CXTransaction(action: action)

        callController.request(transaction) { [weak self] error in
            defer { completion?() }
            if let error = error {
                debugPrint("\(#function) Error: \(error)")
            }
            guard let update = self?.callUpdate(withTitle: title, hasVideo: hasVideo) else {
                return
            }
            provider.reportCall(with: callUuid, updated: update)
        }
    }
To show an incoming call using the information provided by the external notification, create a UUID and a CXCallUpdate object to uniquely identify the call and the caller, and pass them both to the provider using the reportNewIncomingCall(with:update:completion:) method.
 func reportIncomingCall(sessionId: String,
                            title: String,
                            hasVideo: Bool,
                            state: IncommingCallState,
                            completion: ReportCallCompletion? = nil) {

        guard let provider = provider else {
            return
        }

        let update = callUpdate(withTitle: title, hasVideo: hasVideo)
        let callUuid = UUID(uuidString: sessionID)

        provider.reportNewIncomingCall(with: call.uuid, update: update) { [weak self] error in
            defer { completion?() }
            if let error = error {
                debugPrint("\(#function) Error: \(error)")
                return
            }
            switch state {
            case .valid:
                self?.callUuid = callUuid
                self?.qbAudioSession.useManualAudio = true
            case .missed: provider.reportCall(with: call.uuid, endedAt: Date(), reason: .remoteEnded)
            case .invalid: provider.reportCall(with: call.uuid, endedAt: Date(), reason: .unanswered)
            }
        }
    }

After the call is connected, the system calls the provider(_:perform:) method of the provider delegate. In your implementation, the delegate is responsible for configuring the QBRTCAudioSession.
func provider(_ provider: CXProvider, perform action: CXStartCallAction) {
        guard let call = call,
              action.callUUID == callUuid else {
            action.fail()
            return
        }
        updateAudioSessionConfiguration(call.hasVideo)

        action.fulfill()
    }

    func provider(_ provider: CXProvider, perform action: CXAnswerCallAction) {
        guard let call = call,
              action.callUUID == callUuid else {
            action.fail()
            return
        }
        updateAudioSessionConfiguration(call.hasVideo)

        // for the answer action you can call
        // the fulfill(withDateConnected: Date())
        // after the QBRTCSession object will be receive
        delegate?.callKit(self, didTapAnswer: call.sessionID)
    }

    private func updateAudioSessionConfiguration(_ hasVideo: Bool) {
        let configuration = QBRTCAudioSessionConfiguration()
        configuration.categoryOptions.insert(.duckOthers)

        // adding blutetooth support
        configuration.categoryOptions.insert(.allowBluetooth)
        configuration.categoryOptions.insert(.allowBluetoothA2DP)

        // adding airplay support
        configuration.categoryOptions.insert(.allowAirPlay)

        if hasVideo == true {
            // setting mode to video chat to enable airplay audio and speaker only
            configuration.mode = AVAudioSession.Mode.videoChat.rawValue
        }
        qbAudioSession.setConfiguration(configuration)
    }
You will also need to implement CXProvider delegate methods provider(_:didActivate:) and provider(_:didDeactivate:) to manage audio session activation.
func provider(_ provider: CXProvider, didActivate audioSession: AVAudioSession) {
        qbAudioSession.audioSessionDidActivate(audioSession)
        qbAudioSession.isAudioEnabled = true
    }

    func provider(_ provider: CXProvider, didDeactivate audioSession: AVAudioSession) {
        qbAudioSession.audioSessionDidDeactivate(audioSession)
    }
The full CallKit implementation can be found in the CallKitManager class in our samples:
Objective-C
Swift
Sending VoIP Notifications
When one of your users initiates a phone call, your app needs to create and setup a QBMEvent.
// Initiates a phone call metod

// Show CallKit screen
callKitManager.reportOutgoingCall(sessionId: call.sessionID, title: call.title, hasVideo: call.hasVideo, completion: nil)

// Create VOIP call event
let payload = ["ios_voip": "1", // Special identifier for QuickBlox server
               // other useful information
               "message": "\(initiatorName) is calling you.",
               "sessionID": session.id,
               "opponentsIDs": participantsIds,
               "contactIdentifier": participantsNames,
               "conferenceType" : NSNumber(value: type.rawValue).stringValue, // video or audio
               "timestamp" : "\(timeStamp)" // date and time when the call started
]

let data = try? JSONSerialization.data(withJSONObject: payload,
                                       options: .prettyPrinted)
var message = ""
if let data = data {
    message = String(data: data, encoding: .utf8) ?? ""
}

// Determine participants who are offline to send them a VOIP Push
for member in members.keys {
    QBChat.instance.pingUser(withID: member.uintValue, timeout: TimeIntervalConstant.dialingTimeInterval) { (timeInterval, success) in
        if (success) {
            debugPrint("\(#function)  Participant with id: \(member) is online. There is no need to send a VoIP notification.")
            return
        }
        let event = QBMEvent()
        event.notificationType = QBMNotificationType.push
        event.usersIDs = "\(member)"
        event.type = .oneShot
        event.message = message
        QBRequest.createEvent(event, successBlock: { response, events in
           debugPrint("\(#function) Send voip push to Participant with id: \(member) - Success")
        }, errorBlock: { response in
            debugPrint("\(#function) Send voip push to Participant with id: \(member) - Error: \(response.error?.error?.localizedDescription ?? "")")
        })
    }
}

// Start call using QBRTCSession
session = QBRTCClient.instance().createNewSession(withOpponents: opponentsIDs, with: type)
let userInfo = [
    "timestamp" : "\(timeStamp)" // date and time when the call started
]
session.start(userInfo)
Once the event is created, the QuickBlox server will send notifications for all users who have been subscribed to receive notifications and specified in event.usersIDs.
Subscribe to receive VoIP notifications
The system can’t deliver push notifications to your app until you create a PKPushRegistry object and specify the notification type as VoIP. Typically, you create this object at launch time and store a reference to it for the duration of your app’s runtime. During configuration, always specify a delegate object to subscribe and receive notifications.
func registerForVoIPPushes() {
    self.voipRegistry = PKPushRegistry(queue: DispatchQueue.main)
    self.voipRegistry.delegate = self
    self.voipRegistry.desiredPushTypes = [.voIP]
}
In order to deliver notifications to a user device, the QuickBlox server must know the address of that device. PushKit provides the address to you in the form of a device token, which is an opaque data object. When you register your app’s supported push types, the PKPushRegistry object creates a PKPushCredentials object and delivers it to your delegate’s pushRegistry(_:didUpdate:for:) method. The credential’s object contains the device token for the current device. Create QBMSubscription object with this token to subscribe to the Quickblox server to receive VoIP notifications.
func pushRegistry(_ registry: PKPushRegistry, didUpdate pushCredentials: PKPushCredentials, for type: PKPushType) {
        guard let token = registry.pushToken(for: .voIP) else {
            return
        }

        let userDefaults = UserDefaults.standard
        if let lastToken = userDefaults.object(forKey: UsersConstant.token) as? Data,
           token == lastToken {
            // No need to renew your subscription
            return
        }
        // Caching the token for verification
        userDefaults.setValue(token, forKey: UsersConstant.token)
        userDefaults.set(true, forKey: UsersConstant.needUpdateToken)

        deleteLastSubscription { [weak self] in
            self?.createSubscription(withToken: token)
        }
    }

    private func deleteLastSubscription(withCompletion completion:@escaping () -> Void) {
        let userDefaults = UserDefaults.standard
        guard let lastSubscriptionId = userDefaults.object(forKey: UsersConstant.subscriptionID) as? NSNumber  else {
            // Token received for the first time
            completion()
            return
        }

        // Remove old token from Quickblox server
        QBRequest.deleteSubscription(withID: lastSubscriptionId.uintValue) { (response) in
            userDefaults.removeObject(forKey: UsersConstant.subscriptionID)
            debugPrint("\(#function) Unregister Subscription request - Success")
            completion()
        } errorBlock: { (response) in
            debugPrint("[\(#function) Unregister Subscription request - Error")
            completion()
        }
    }

    private func createSubscription(withToken token: Data) {
        guard let deviceUUID = UIDevice.current.identifierForVendor?.uuidString else {
            return
        }

        // Setup a subscription
        let subscription = QBMSubscription()
        subscription.notificationChannel = .APNSVOIP
        subscription.deviceUDID = deviceUUID
        subscription.deviceToken = token

        // Subscribe to recive voip notification on QuickBlox server
        QBRequest.createSubscription(subscription, successBlock: { response, objects in
            guard let subscriptions = objects, subscriptions.isEmpty == false else {
                return
            }
            var newSubscription: QBMSubscription? = nil
            for subscription in subscriptions {
                if subscription.notificationChannel == .APNSVOIP,
                   let subscriptionsUIUD = subscription.deviceUDID,
                   subscriptionsUIUD == deviceUUID {
                    newSubscription = subscription
                }
            }
            guard let newSubscriptionID = newSubscription?.id else {
                return
            }

            // Caching the newSubscriptionID for removing
            let userDefaults = UserDefaults.standard
            userDefaults.setValue(NSNumber(value: newSubscriptionID), forKey: UsersConstant.subscriptionID)

            debugPrint("[\(#function) Create VOIP Subscription request - Success")
        }, errorBlock: { response in
            debugPrint("[\(#function) Create VOIP Subscription request - Error")
        })
    }
Respond to VoIP Push Notifications in Your App
For VoIP push notifications, the system launches or wakes your app and delivers the notification to your app’s PKPushRegistry object, which calls the pushRegistry(_:didReceiveIncomingPushWith:for:completion:) method of its delegate. Use that method to extract the call data from the notification’s payload dictionary and display the incoming call UI. While CallKit processes your request, establish a connection with the QuickBlox server.
func pushRegistry(_ registry: PKPushRegistry,
                      didReceiveIncomingPushWith payload: PKPushPayload,
                      for type: PKPushType,
                      completion: @escaping () -> Void) {

        defer {
            completion()
        }

        guard (type == .voIP) else {
            return
        }

        // Extracting the call data
        guard let opponentsIDs = payload.dictionaryPayload["opponentsIDs"] as? String,
              let contactIdentifier = payload.dictionaryPayload["contactIdentifier"] as? String,
              let sessionID = payload.dictionaryPayload["sessionID"] as? String,
              let conferenceType = payload.dictionaryPayload["conferenceType"] as? String,
              let timestamp = payload.dictionaryPayload["timestamp"] as? String else {
            return
        }

        // It is necessary to process the case when the application became active
        // before receiving the notification and the session has already been received
        if callHelper.callReceived(sessionID) == true {
            debugPrint("\(#function) Received a voip push with the same session that has an active call at that moment")
            return
        }

        var state: IncommingCallState = .valid

        // Knowing the start time of the call and the time interval for answering the call,
        // you can determine whether it was missed.
        let startTimeInterval = Int64(timestamp)
        let timeIntervalNow = Date().timeStamp
        let receivedTimeInterval = (timeIntervalNow - startTimeInterval) / 1000
        if receivedTimeInterval > Int64(QBRTCConfig.answerTimeInterval()) {
            state = .missed
        }

        // Display the incoming call
        callKitManager.reportIncomingCall(sessionId: sessionID, title: contactIdentifier, hasVideo: (conferenceType == .video), state: state, completion: completion)

        // Establishes a connection with the Quickblox.
        if QBChat.instance.isConnected || QBChat.instance.isConnecting {
            return
        }
        let profile = Profile()
        QBChat.instance.connect(withUserID: profile.ID, password: profile.password, completion: nil)
    }
After establishing a connection to the QuickBlox server, wait until the QBRTCSession is received. The session object has a method for starting, accepting, and rejecting the call. For example, the initiator generates the session and calls method start(). The recipient retrieves a signal with information needed to generate a session object on his side. After that the recipient calls method accept() to end the exchange of information and to start the call connection.
class CallViewController: UIViewController {
    var session: QBRTCSession?

    override func viewDidLoad() {
        super.viewDidLoad()

        QBRTCClient.instance().add(self as QBRTCClientDelegate)
    }

    ...
}

extension CallViewController: QBRTCClientDelegate {
    // MARK: QBRTCClientDelegate
    func didReceiveNewSession(_ session: QBRTCSession, userInfo: [String : String]? = nil) {
       if self.session != nil {
          // we already have a video/audio call session, so we reject another one
          // userInfo - the custom user information dictionary for the call from caller. May be nil.
          let userInfo = ["key":"value"] // optional
          session.rejectCall(userInfo)
          return
       }
       // saving session instance here
       self.session = session
    }

    ...
}
More information about the QBRTCSession can be found at QuickBlox Docs.
One more thing
It’s also a good idea to handle the following cases for incoming VoIP pushes:
- add a session waiting timer to end the call if the QBRTCSession was not received or it was not possible to establish connections with the server (for example, due to a bad internet connection).
- add a timer to automatically end the call when there are no actions to accept or reject the call (for example, when the recipient activated the application before receiving the notification and does not want to take any action).
- the recipient manages to do the action faster than the QBRTCSession was received.
You can find a complete implementation of handling VoIP notifications, including the cases described above, in our samples:
Obj-C VideoChat WebRTC Sample
Swift VideoChat WebRTC Sample
Basic Terms and References
IP telephony – Wikipedia: Voice overIP
PushKit framework – Apple Developer Documentation
Push Notifications – QuickBlox Developer Documentation
and Apple Developer Documentation.
VoIP Notifications – Apple Developer Documentation
CallKit – Apple Developer Documentation
CXProvider – Apple Developer Documentation
CXCallUpdate – Apple Developer Documentation
Instance Method reportNewIncomingCall(with:update:completion:) – Apple Developer Documentation
QBMEvent – QuickBlox Developer Documentation
PKPushRegistry – Apple Developer Documentation
PKPushCredentials – Apple Developer Documentation
Instance Method pushRegistry(_:didUpdate:for:) – Apple Developer Documentation
QBMSubscription – QuickBlox Developer Documentation
Instance Method pushRegistry(_:didReceiveIncomingPushWith:for:completion:) – Apple Developer Documentation
Have Questions? Need Support?
Join the QuickBlox Developer Discord Community, where you can share ideas, learn about our software, & get support.
Join QuickBlox Discord
 AI Agent — automate conversations and workflows. Now available on Free plan


Hi Bibi, thanks for your question. No, there is no feature in QuickBlox SDK that allows you to keep statistics of missed calls. As mentioned in the article, the Call Kit use for this in iOS
Hello Bibi, thanks for your query. You can use the CallKit system framework to show missed phone calls. CallKit can manage, save, and sort call history automatically. Users can see the call history in the system calls app. You can try calls in our QuickBlox code sample and see how calls are added to the history. You can also use the iOS badge number api to manage missed calls. Hope this helps!