Adding real time communication to your web app is made easy with the Quickblox JavaScript SDK and JavaScript code samples. We’ve created an entire toolkit so that you can save time and money by effortlessly adding chat and video calling features to any web or mobile app. What’s more, our code samples and SDKs are free to use.
Below is a step-by-step tutorial outlining how to download and run our JavaScript code samples for chat and WebRTC video conferencing, so that you can start building today.
Let’s go!
Download samples code
The first thing you need to do is download the sample, for this you may need git.
If you don’t have git, you can find instructions for installing it here Git Guides – install git. If you don’t want to install git – you can just download the archive from the git repository.
Download using git:
git clone git@github.com:QuickBlox/quickblox-javascript-sdk.git
Download the archive without git:
Follow the link GitHub – QuickBlox/quickblox-javascript-sdk: JavaScript SDK of QuickBlox cloud backend platform, press the green “Code” button and select “Download ZIP”
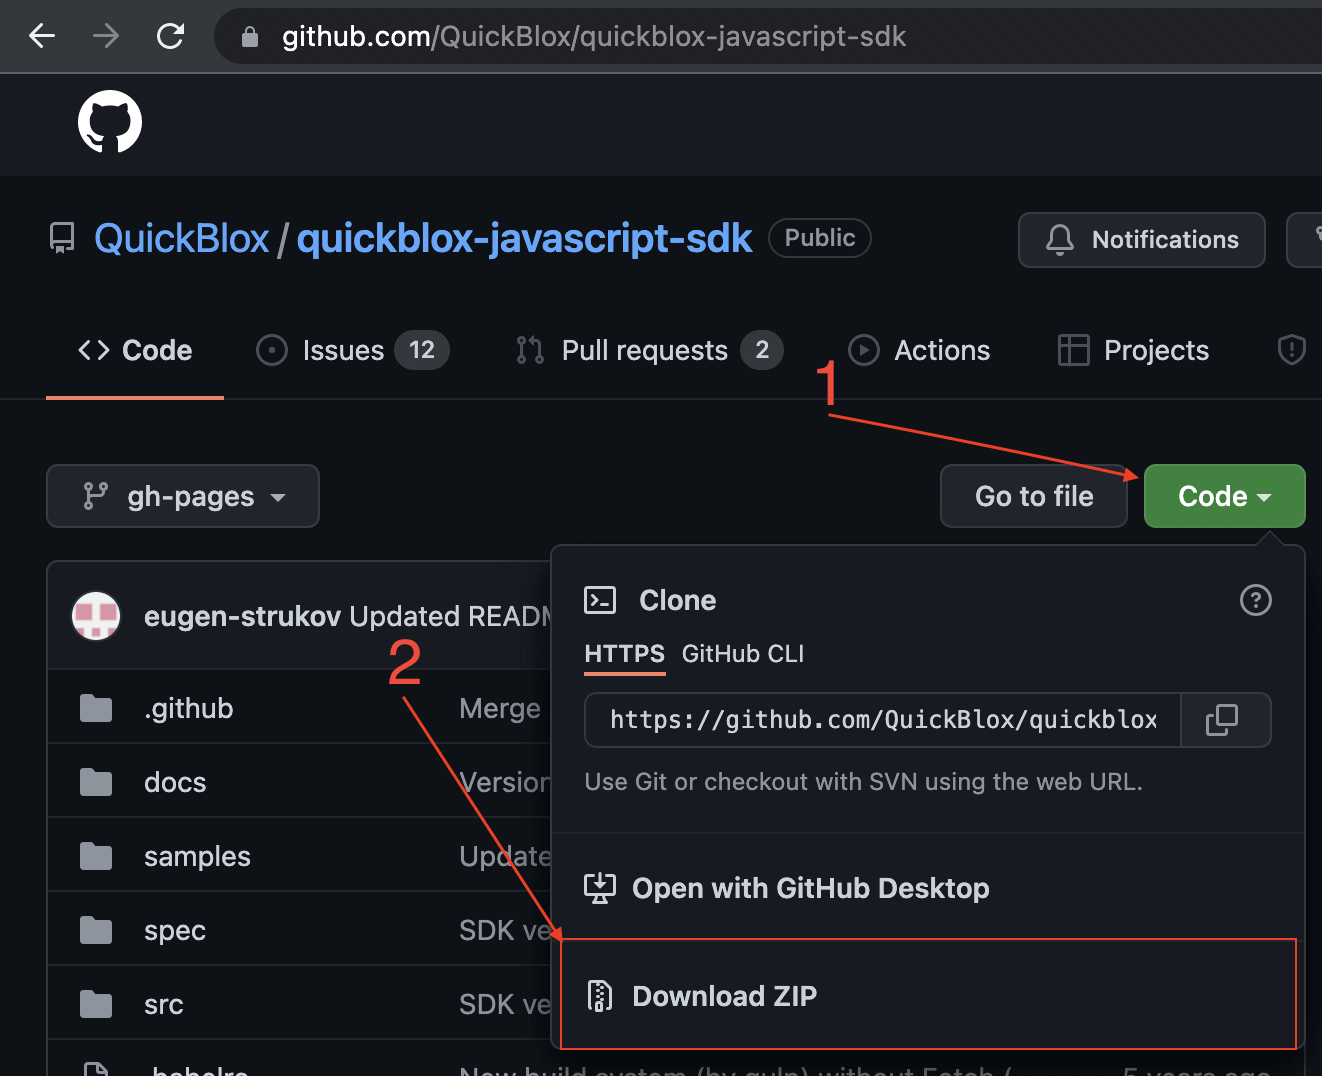

Then unpack the archive.
Application credentials
In order to run samples we need to have application credentials. To create a QuickBlox application follow the steps below:
- Register a new account following this link. Type in your email and password to sign in. You can also sign in with your Google or Github accounts.
- Create the app by clicking New app button.
- Configure the app: type in the information about your organization into corresponding fields and click Add button.
- Go to Dashboard => YOUR_APP => Overview section and copy your Application ID, Authorization Key, Authorization Secret and Account Key.
To run web server we will need npm installed, if you don’t have it see Downloading and installing Node.js and npm | npm Docs.
We have completed our preparations, now let’s move on to launching the samples.
JavaScript chat sample app
To run a code sample follow the steps below:
- Go to the directory from the downloaded and unpacked archive
- Update file
samples/chat/js/QBconfig.js with appId, authKey, authSecret and accountKey obtained at the “Application credentials” step above:
var QBconfig = {
  credentials: {
	appId: '',
	authKey: '',
	authSecret: '',
	accountKey: ''
  }
}
More details can be found here Quick Start | JavaScript SDK | QuickBlox.
- Run web server. Sample will be available at https://localhost:8080/samples/chat.
Video calling sample app
To run a code sample follow the steps below:
- Go to the directory from the downloaded and unpacked archive.
- Update file
samples/webrtc/config.js with appId, authKey, authSecret and accountKey obtained at the “Application credentials” step above:
const creds = {
  appId: '',
  authKey: '',
  authSecret: '',
  accountKey: ''
};
More details can be found here Quick Start | JavaScript SDK | QuickBlox.
- Run web server over
https. Sample will be available at https://localhost:8080/samples/webrtc.
Angular chat sample App
To run a code sample follow the steps below:
- Go to the directory from the downloaded and unpacked archive.
- Update file
samples/angular-chat/src/app/QBconfig.ts with appId, authKey, authSecret and accountKey obtained at the “Application credentials” step above:
export const QBconfig = {
  credentials: {
    appId: '',
    authKey: '',
    authSecret: '',
    accountKey: ''
  }
};
- Install project dependencies. Open terminal (AKA “command prompt” on Windows), navigate to
angular-chat folder from unpacked archive and run following command:
npm install
- Now we can start Angular development server using the following command:
npm start
Sample will be available on http://localhost:4200.
Or if you want to enable ssl:
npm start -- --ssl
Sample will be available on http://localhost:4200.
Video conference sample app
To run the video conference code sample, follow the steps below:
- Go to the directory from the downloaded and unpacked archive.
- Update file
samples/video_conferencing/js/config/apps.js with appId, authKey, authSecret and accountKey obtained at the “Application credentials” step above:
var creds = {
  appId: '',
  authKey: '',
  authSecret: '',
  accountKey: ''
};
- Run web server over
https. The site will be available on https://127.0.0.1:8080/samples/video_conferencing, https://localhost:8080/samples/video_conferencing and https://your_ip:8080/samples/video_conferencing (where your_ip is the IP address of your computer in local network).
- In order to be able to connect to the conference room your should pass conferencing server endpoint as URL parameter, e.g.
https://localhost:8080/samples/video_conferencing?server=conferencing_server.
Additional details about how to obtain conferencing server endpoint and more can be found here Video Conference | JavaScript SDK | QuickBlox.
Web server
Open terminal (AKA “command prompt” on Windows), navigate to folder from unpacked archive and run server from current directory using the following command:
npx http-server .
The site will be available on http://127.0.0.1:8080, http://localhost:8080, http://your_ip:8080 (where your_ip is the IP address of your computer in the local network).
Web server with SSL/TLS
To run web server with SSL/TLS enabled will require an SSL certificate. See section below on how to create one if you don’t have one already.
To run web server over https open terminal (AKA “command prompt” on Windows), navigate to folder from unpacked archive and run the following command:
npx http-server -S -C cert.pem .
The site will be available on http://127.0.0.1:8080/, https://localhost:8080, https://your_ip:8080 (where your_ip is the IP address of your computer in local network).
Create ssl certificate
In order to allow web-browsers to access the audio and video input devices we need an SSL certificate to enable a secure connection (HTTPS).
To check if you have openssl installed use following command:
openssl version
If OpenSSL is installed already – proceed to “Generate certificate”.
If you’re getting an error saying that openssl was not found – proceed with installation steps according to the instructions for your platform:
Windows
Install system specific openssl from this link.
Open command prompt and execute the following commands:
set OPENSSL_CONF=C:\OpenSSL-Win64\bin\openssl.cfg
set Path=%Path%;C:\OpenSSL-Win64\bin
This will set environment variables for current session only.
macOS
Assuming you have homebrew installed:
brew install openssl
Linux
sudo apt install openssl
Generate certificate
To generate key and cert files with OpenSSL use the following command:
openssl req -newkey rsa:2048 -new -nodes -x509 -days 3650 -keyout key.pem -out cert.pem
Use QuickBlox JavaScript SDK today
QuickBlox offers a robust and feature-rich Javascript SDK so that you can effortlessly add real time communication to any web app. Check out our detailed documentation to learn more.
For technical queries about using our SDK or recommendations for our product or documentation please submit a ticket to our support team.
Contact us if you want to learn more about how QuickBlox can support your communication needs.
Have Questions? Need Support?
Join the QuickBlox Developer Discord Community, where you can share ideas, learn about our software, & get support.
Join QuickBlox Discord
 AI Agent — automate conversations and workflows. Now available on Free plan