Welcome to our developer tutorial on setting up Apple Push Notification Service (APNS) for iOS apps using QuickBlox. Push notifications play a crucial role in engaging users and keeping them informed about updates, messages, and events within your iOS applications. With QuickBlox, integrating APNS into your iOS apps becomes a seamless process, empowering you to deliver timely and relevant notifications to your users.
From setting up certificates and provisioning profiles in the Apple Developer Console to configuring your QuickBlox application and handling push notifications within your iOS codebase, we will walk you through the step-by-step process of configuring APNS for your iOS applications using QuickBlox’s robust platform.
Table of Contents
Before you begin
- Register a QuickBlox account. This is a matter of a few minutes and you will be able to use this account to build your apps.
- Configure QuickBlox SDK for your app. Check out our Setup page for more details.
- Create a user session to be able to use QuickBlox functionality. See our Authentication page to learn how to do it.
- We recommend that you read the section Push Notifications in our documentation for more complete information.
Create APNS Certificate
Generate a Certificate Signing Request
You need to generate a certificate signing request file so that you can use it to request an APNS SSL certificate later on. Follow the instructions below to create one:
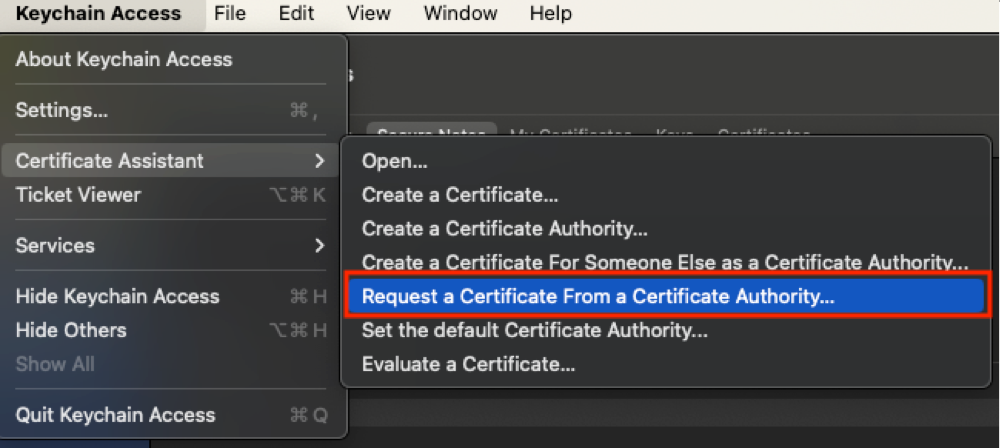
- Launch the Keychain Access application in your macOS and select Keychain Access => Certificate Assistant => Request a Certificate From a Certificate Authority.
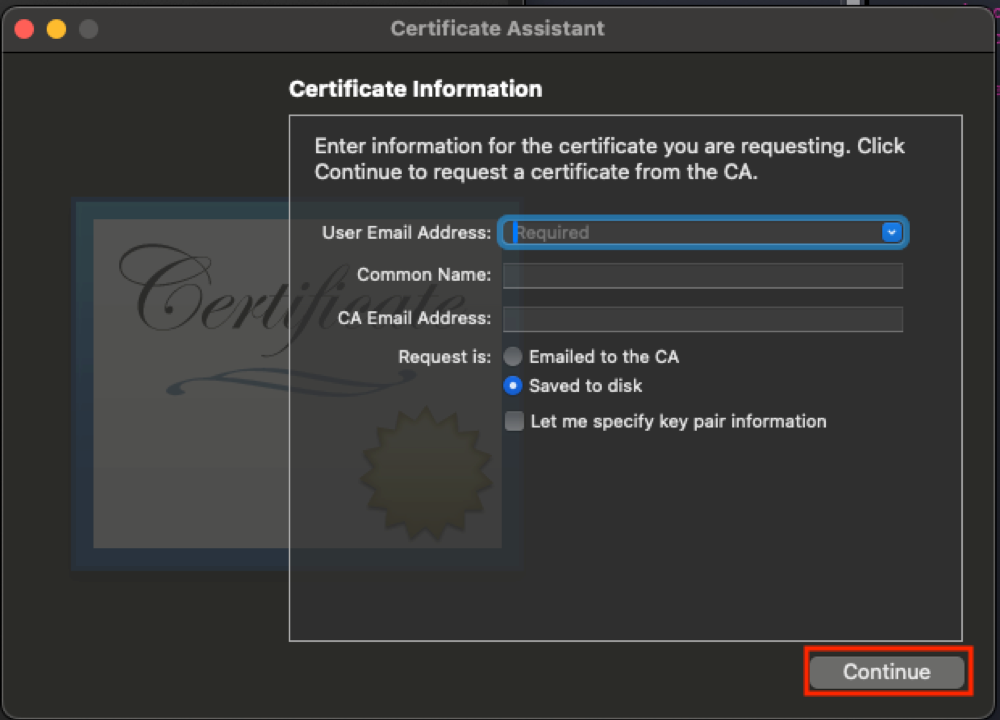
- Enter the required information and check the Saved to disk option. Click Continue.
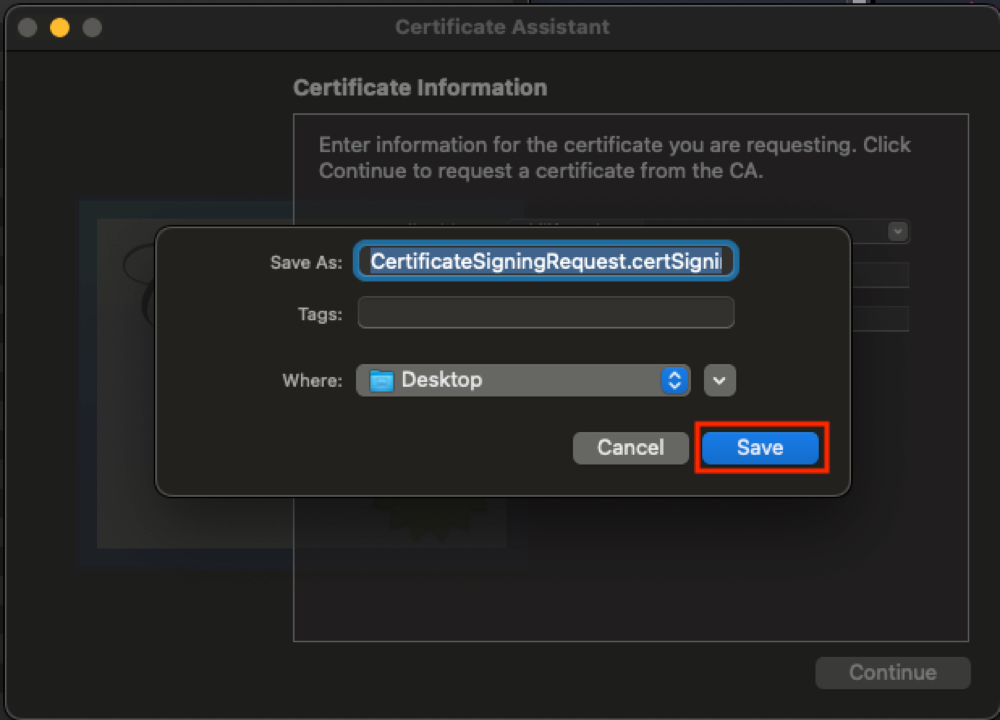
- Save the certificate request using the suggested name and click Save.
Create universal APNS certificate
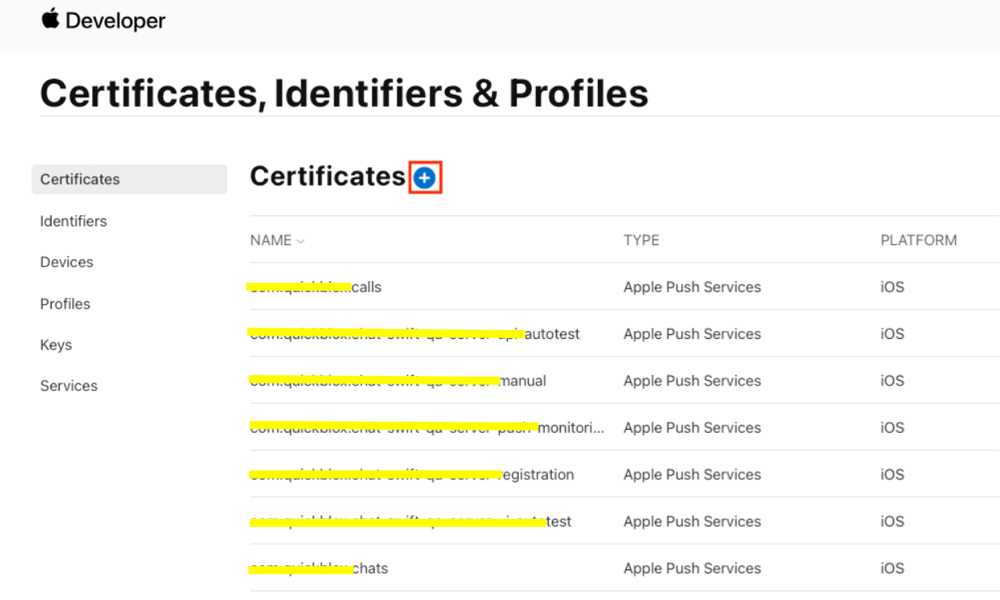
- On the Certificates, IDs & Profiles screen locate Certificates => All sections in the left sidebar and then click on the plus button in the right of the Certificates.
- The Add iOS Certificate screen will appear. Choose Apple Push Notifications service SSL (Sandbox & Production) option and click Continue:
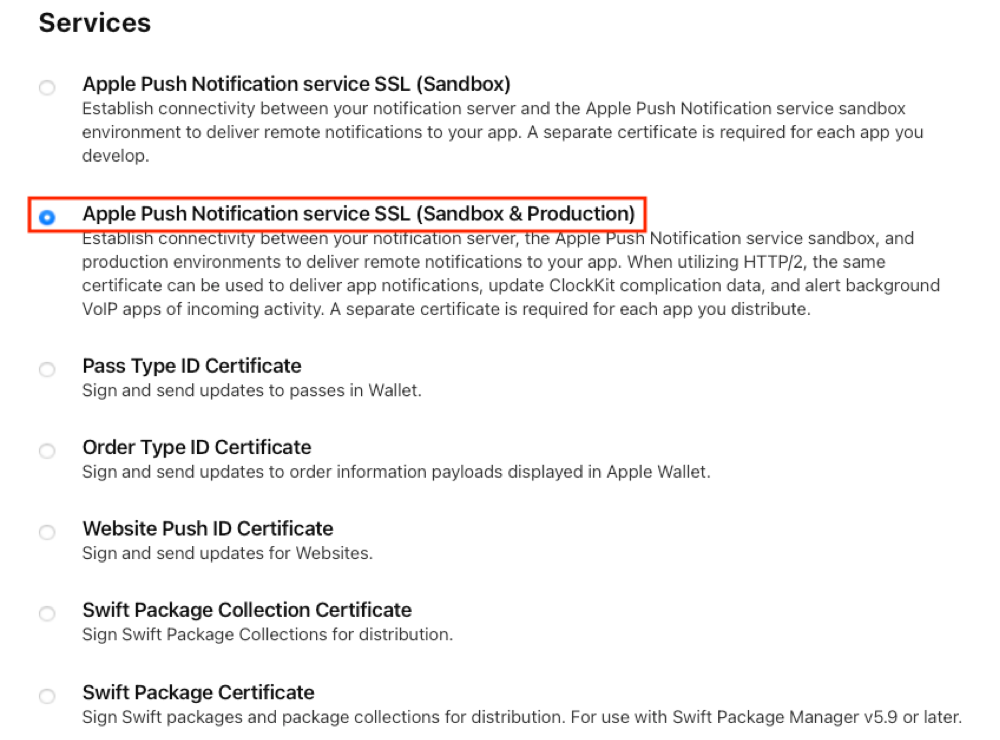
Here we will create a single universal push certificate that is good for both Development and Production environments.
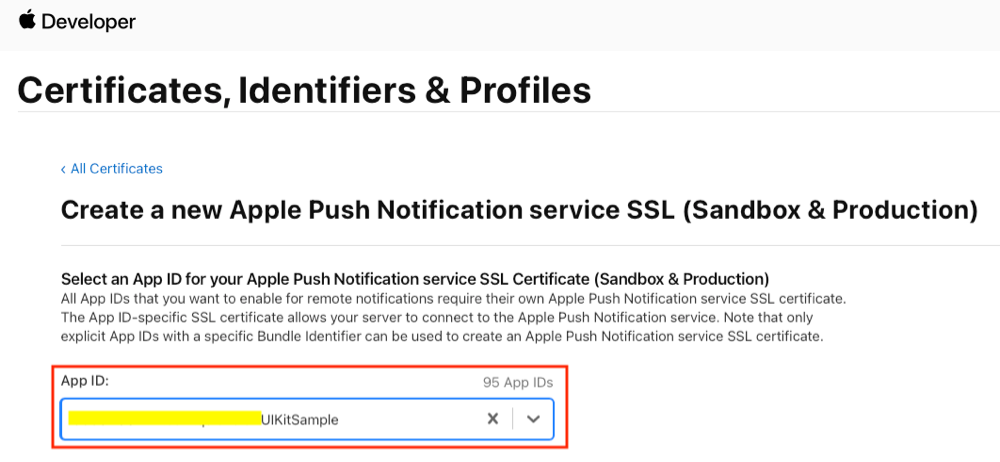
- On the next screen choose an App ID you want to create a push certificate for. Then click Continue.
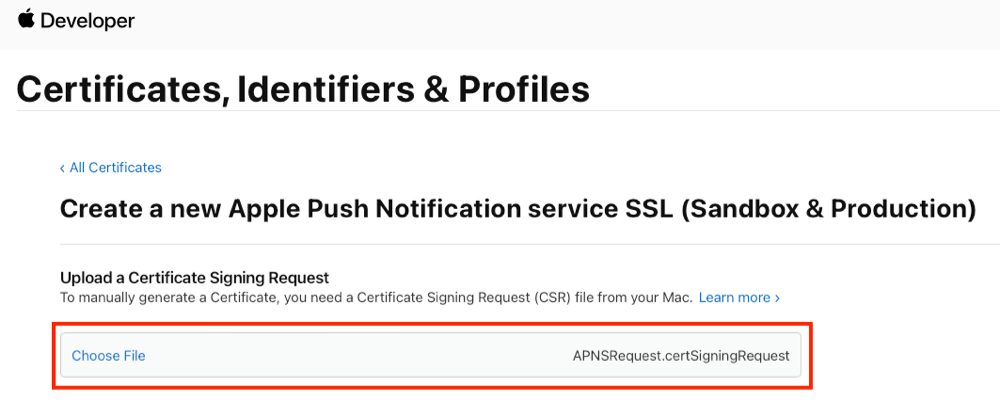
- Click Choose File… button to locate the Certificate Request File that you have saved earlier. Click Continue.
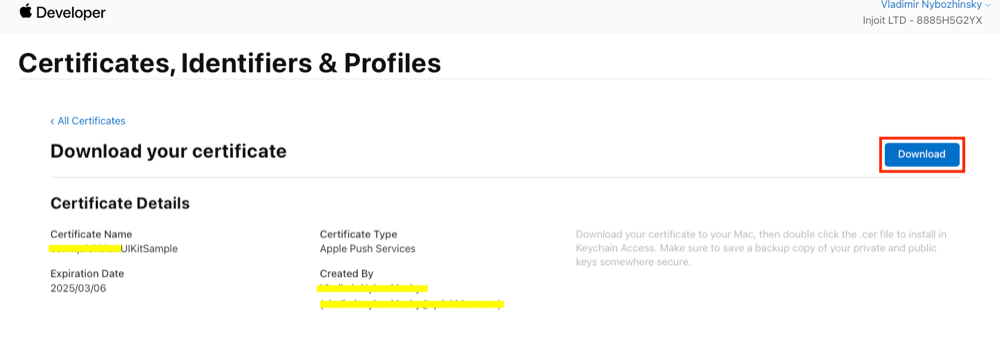
- Your APNS SSL Certificate will now be generated. Click Download and save it to your hard disk.
Create p12 file
- Once your certificate has been created, open the file with the Keychain Access app on your computer. If you are asked which keychain to add the certificate to, select the login option. SSL certificates will be used by the provider(QuickBlox) application so that it can contact the APNs to send push notifications to your applications.
- Still in the Keychain Access app, select the Certificates option in the bottom section of the left sidebar. You will now need to find the certificate you have created. It will have the name Apple Push Services: < Bundle ID > and paired with a private key.
- Right-click on this key and select Export “Apple Push Services …” option.
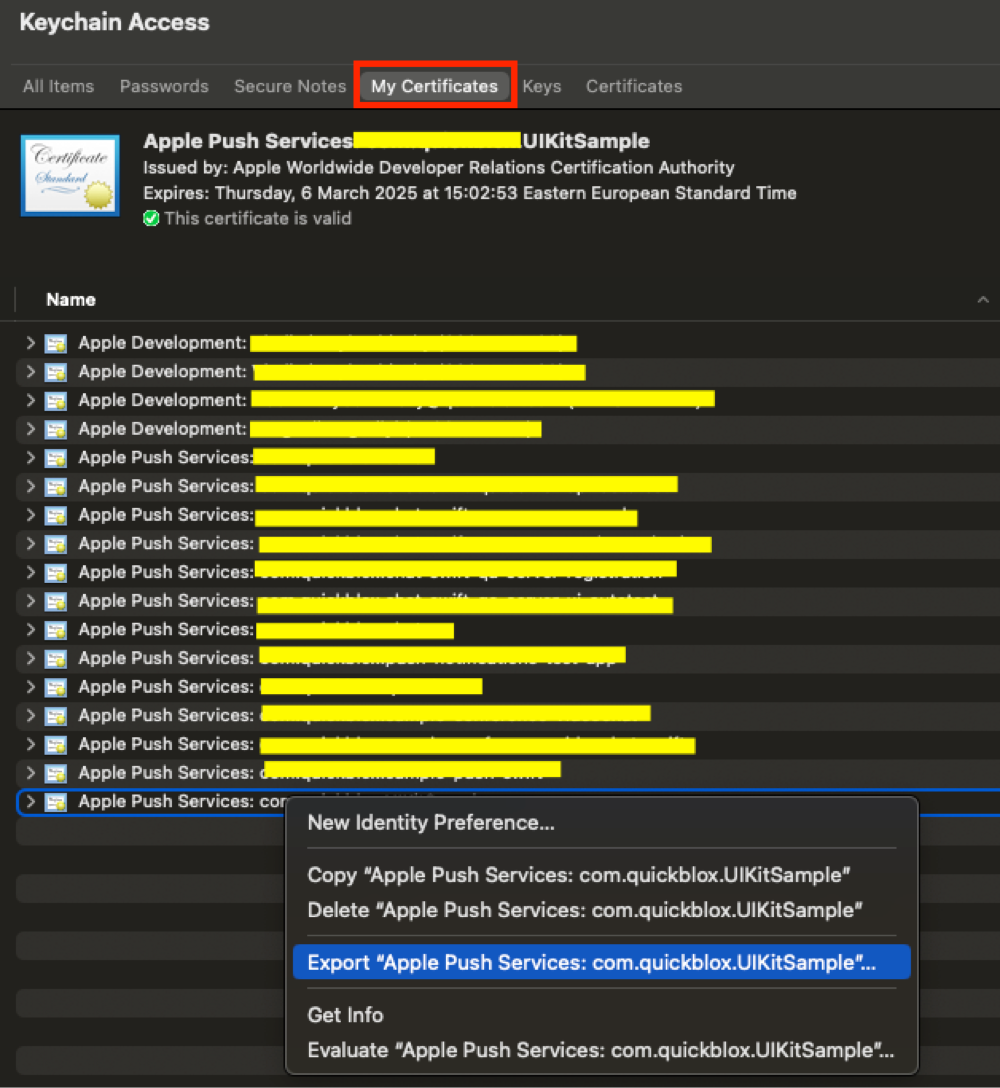
In the popup that appears, you can call the file whatever you want, but make sure that File Format is set to Personal Information Exchange (.p12).
When exporting the certificate, you can provide a password for the p12 file.
That’s all. Now you have a ready-to-go APNS certificate that can be used on both the Development and Production environments of your iOS app.
Upload certificate to Dashboard
To upload the APNS certificate to QuickBlox Dashboard you need to do the following:
- Open your QuickBlox Dashboard.
- Go to the Push notifications module section.
- Switch to the Settings tab.
- Locate Apple Push Notifications Service (APNS) section.
- Upload the newly created APNS certificate.
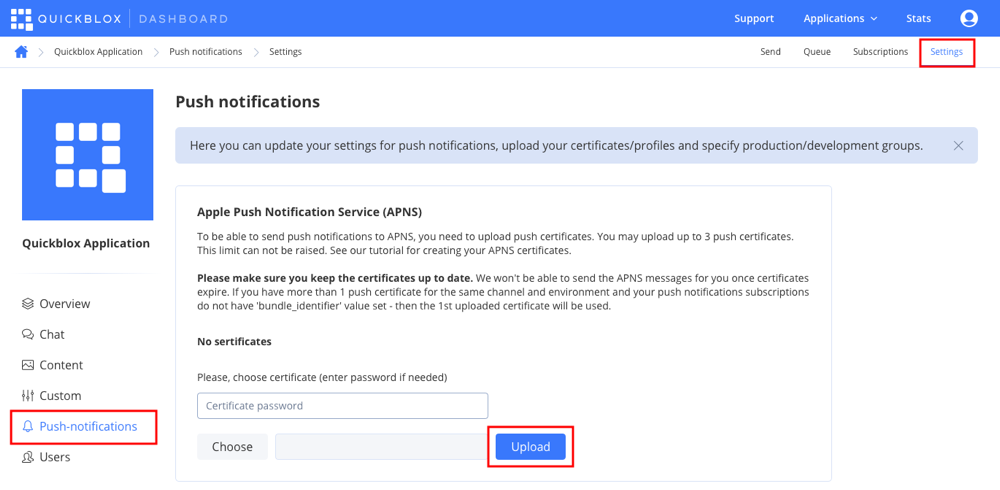
Choose the certificate and enter the password if needed. After this, you will be able to start using push notifications in your iOS application.
Setup APNS for iOS apps with QuickBlox
We’ll look at setting up a project to send and receive push notifications using QuickBlox, using our UI Kit Sample as an example, which you’ll need to download to your Mac. This sample already has a QuickBlox iOS UI Kit connected as a Swift Package. QuickBlox iOS UI Kit will provide us with a ready-made chat app and we can fully test the push notification settings by sending messages to the offline user.
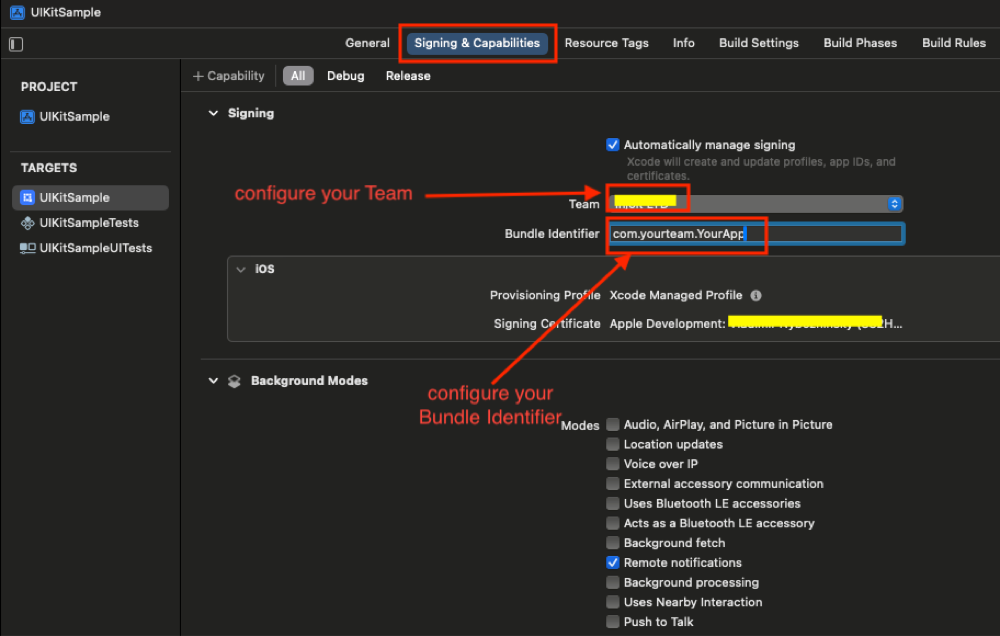
Open the project in XCode and first of all set up your Team and Bundle Identifier. To do this, open your project settings in the “Signing & Capabilities” section and paste the name of your Team and the Bundle Identifier of your application:
To start interacting with QuickBlox, you need to create an application using the QuickBlox admin panel. For more details on how to do this, read our previous blog, How to Create an App and Use the QuickBlox Admin Panel.
Fill in the required fields with the secret keys of this application to initialize the QuickBlox SDK.
In the UI Kit Sample, go to the Connect class and fill in the appropriate fields:
class Connect: ObservableObject {
    …


    init(state: ConnectState = .disconnected) {
        self.state = state
        Quickblox.initWithApplicationId(0, // Your_Application_ID
                                        authKey: "", // Your_Authorization_Key
                                        authSecret: "", // Your_Authorization_Secret
                                        accountKey: "") // Your_Account_Key


        QBSettings.carbonsEnabled = true
        QBSettings.autoReconnectEnabled = true
    }
    ...
}
Great! Now you’re ready to start setting up APNS with QuickBlox!
Set up the project to work with APNS
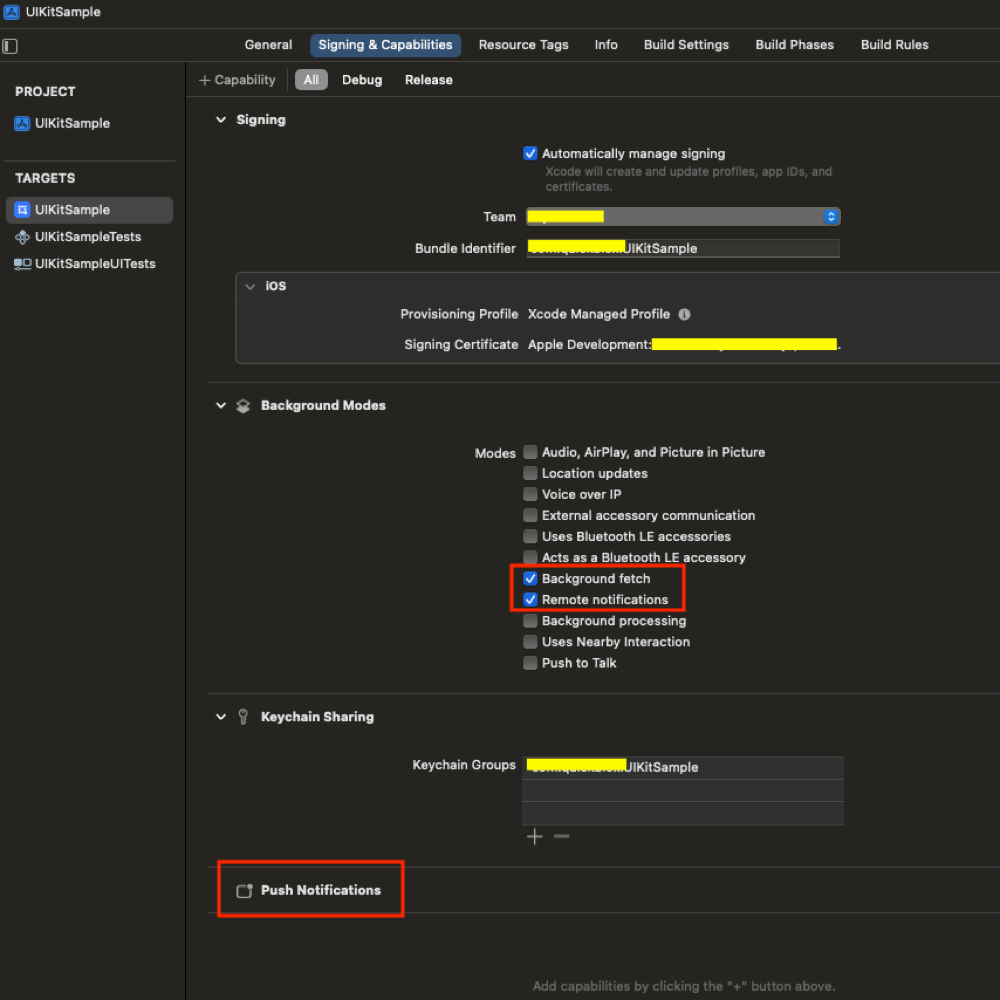
Open the project settings on the “Signing & Capabilities” tab and in the Capability “Background Modes”, set the checkboxes “Background fetch” and “Remote notifications.” Then add new Capability “Push Notifications.””
You should get the result as in the image below:
Add the AppDelegate file to the project
import UIKit
class AppDelegate: NSObject, UIApplicationDelegate {

    func application(_ application: UIApplication, didFinishLaunchingWithOptions launchOptions: [UIApplication.LaunchOptionsKey : Any]? = nil) -> Bool {
        return true
    }

    func application(_ application: UIApplication, didRegisterForRemoteNotificationsWithDeviceToken deviceToken: Data) {
        print("[AppDelegate] didRegisterForRemoteNotificationsWithDeviceToken: \(deviceToken)")
    }

    func application(_ application: UIApplication, didFailToRegisterForRemoteNotificationsWithError error: Error) {
        print("[AppDelegate] Unable to register for remote notifications: \(error.localizedDescription)")
    }
}
Next we will update the code in this file.
Also, so that our SwiftUI application has interaction with the AppDelegate that we just added, we will configure this in the UIKitSampleApp file by adding UIApplicationDelegateAdaptor:
@main
struct UIKitSampleApp: App {
    @UIApplicationDelegateAdaptor(AppDelegate.self) var appDelegate

    var body: some Scene {
        WindowGroup {
            LoginScreen()
        }
    }
}
Add the NotificationsProvider file to the project
import UserNotifications
import Quickblox
import UIKit


class NotificationsProvider: NSObject {
    //MARK: - Properties
    static let shared = NotificationsProvider()

    private var _deviceToken: Data? = nil
    var deviceToken: Data? {
        get { return _deviceToken }
        set {
            if newValue != _deviceToken {
                _deviceToken = newValue
                if _deviceToken != nil, QBSession.current.currentUser != nil {
                    NotificationsProvider.createSubscription()
                }
            }
        }
    }


    //MARK: - Methods
    static func createSubscription() {
        guard let token = shared.deviceToken else {
            return
        }

        guard let deviceUUID = UIDevice.current.identifierForVendor?.uuidString else {
            return
        }

        let subscription = QBMSubscription()
        subscription.notificationChannel = .APNS
        subscription.deviceUDID = deviceUUID
        subscription.deviceToken = token

        QBRequest.createSubscription(subscription, successBlock: { response, objects in
            guard let subscriptions = objects, subscriptions.isEmpty == false else {
                return
            }
            print("[NotificationsProvider] \(#function) - Success")
        }, errorBlock: { response in
            print("[NotificationsProvider] \(#function) Error: \(response.error?.error?.localizedDescription ?? "Error")")
        })
    }

    static func deleteSubscription(withCompletion completion:@escaping () -> Void) {
        guard let deviceUUID = UIDevice.current.identifierForVendor?.uuidString else {
            completion()
            return
        }

        QBRequest.subscriptions { response, objects in
            guard let subscriptions = objects, subscriptions.isEmpty == false else {
                completion()
                return
            }

            for subscription in subscriptions {
                if subscription.notificationChannel == .APNS,
                   let subscriptionsUIUD = subscription.deviceUDID,
                   subscriptionsUIUD == deviceUUID {
                    QBRequest.deleteSubscription(withID: subscription.id) { (response) in
                        self.shared.deviceToken = nil
                        print("[NotificationsProvider] \(#function) Unregister Subscription request - Success")
                        completion()
                    } errorBlock: { (response) in
                        print("[NotificationsProvider] \(#function) Error: \(response.error?.error?.localizedDescription ?? "Error")")
                        completion()
                    }
                }
            }
        }
    }
}


//MARK: - APNS
//MARK: - UNUserNotificationCenterDelegate
extension NotificationsProvider: UNUserNotificationCenterDelegate {
    func registerForRemoteNotifications() {
        let center = UNUserNotificationCenter.current()
        let options: UNAuthorizationOptions = [.alert, .sound, .badge]

        Task {
            let granted = try await center.requestAuthorization(options: options)
            if granted == false {
                return
            }
            let settings = await center.notificationSettings()
            if settings.authorizationStatus != .authorized {
                return
            }
            await MainActor.run {
                UIApplication.shared.registerForRemoteNotifications()
            }
        }
    }
}
Let’s take a closer look at the methods of this class:
var deviceToken: Data? – a globally unique token that identifies this device in the APN which we will send to the Quickblox server to create remote notifications. In the “set” scope of this property, it is checked whether the newValue differs from the internal property and if a value different from the already saved one is set and it is not equal to nil, then the method createSubscription() is called.
To start receiving push notifications, you need to get the current device push token and subscribe with it on the Quickblox backend as follows.
This is what happens in the method createSubscription() and let’s take a closer look:
guard let deviceUUID = UIDevice.current.identifierForVendor?.uuidString else {
            return
        } - get the device UUID and then create an instance of the class QBMSubscription:


 let subscription = QBMSubscription()
        subscription.notificationChannel = .APNS
        subscription.deviceUDID = deviceUUID
        subscription.deviceToken = token
Next, using the Quickblox iOS SDK method QBRequest.createSubscription(subscription, successBlock), we create and subscribe to send and receive push notifications.
We recommend deleting the last Quickblox subscription created on the server when the user logs out from the Quickblox server. To do this we will use the method deleteSubscription(withCompletion) and this is what happens in it:
guard let deviceUUID = UIDevice.current.identifierForVendor?.uuidString else {
            return
        } - get the device UUID.
Next, using the Quickblox iOS SDK method QBRequest.subscriptions(), we get subscriptions for Current User.
Next, using the QBRequest.subscriptions() method from the Quickblox iOS SDK, we get subscriptions for the current user, and in the fetching result we find a subscription with notificationChannel == .APNS and subscription.deviceUDID == phone.deviceUUID. Next, we delete this subscription using the Quickblox iOS SDK method QBRequest.deleteSubscription(withID:)
Next in extension NotificationsProvider:
func registerForRemoteNotifications() – User authorization is required for applications to notify the user using UNUserNotificationCenter via both local and remote notifications.
We recommend that you read the section Push Notifications in our documentation for more complete information.
Now that we have prepared the minimum code base for implementing sending and receiving Push notifications and before applying this code, let’s discuss what tasks and conditions we must fulfill in order for the functionality of sending and receiving Push notifications to work correctly and stably. And, of course, we recommend that you re-read Apple’s documentation about Push Notifications.
- Request for authorization to interact with the user through alerts, sounds, and icon badges.
In order for the device to receive push notifications in this application, the User must confirm the request to receive push notifications, for this we need to make an authorization request, and if the User has given permission to receive push notifications, then we can request registration for remote push notifications and receive a device token. We will receive the current device token in the AppDelegate method and, having received it, we will save it in NotificationsProvider:
func application(_ application: UIApplication, didRegisterForRemoteNotificationsWithDeviceToken deviceToken: Data) {
        NotificationsProvider.shared.deviceToken = deviceToken
}
- When should you request authorization?
It depends on the conditions and goals of your application.
We consider this functionality using the example of a chat application and this type of application dictates to us where and when to make this request.
We need to call authorization when entering into the application and when the application returns to the active state from inactive or background. This is conveniently done in the UIKitSampleApp file and let’s update this file:
@main
struct UIKitSampleApp: App {
    @UIApplicationDelegateAdaptor(AppDelegate.self) var appDelegate
    @Environment (\.scenePhase) private var scenePhase

    var body: some Scene {
        WindowGroup {
            LoginScreen()
                .onChange(of: scenePhase) { newPhase in
                    switch newPhase {
                    case .active:
                        NotificationsProvider().registerForRemoteNotifications()
                    default:
                        print("default")
                    }
                }
        }
    }
}
This is necessary so that we always have an up-to-date device token if the token suddenly becomes expired.
There is also another case where we need to make an authorization request – when a user logs out of the Quickblox server and, without closing the application, logs in as another user and we need to create a current subscription for this user. That is, we must request authorization for push notifications when the user logs into the Quickblox server. In this example, the LoginViewModel has a published authState variable in the didSet block that we will call to request authorization for push notifications and will remove the stored device token when the application state is unauthorized.
Let’s update this file:
@Published var authState: AuthState = .unAuthorized {
        didSet {
            if authState == .authorized {
                notificationsProvider.registerForRemoteNotifications()
            } else if authState == .unAuthorized {
                notificationsProvider.deviceToken = nil
            }
        }
    }
And of course, to limit duplicate requests, we will check if the device token has changed, and if it has changed, then only in this case will we create a new subscription on the Quickblox server. This happens in NotificationsProvider in the set block of the deviceToken variable:
private var _deviceToken: Data? = nil
    var deviceToken: Data? {
        get { return _deviceToken }
        set {
            if newValue != _deviceToken {
                _deviceToken = newValue
                if _deviceToken != nil, QBSession.current.currentUser != nil {
                    NotificationsProvider.createSubscription()
                }
            }
        }
    }
We will store the current device token in the NotificationsProvider and send it to the Quickblox server when the user successfully logs into Quickblox.
To verify the success of this operation, go to the “Users” page in the Quickblox admin panel:

Find the user you need and open their settings.
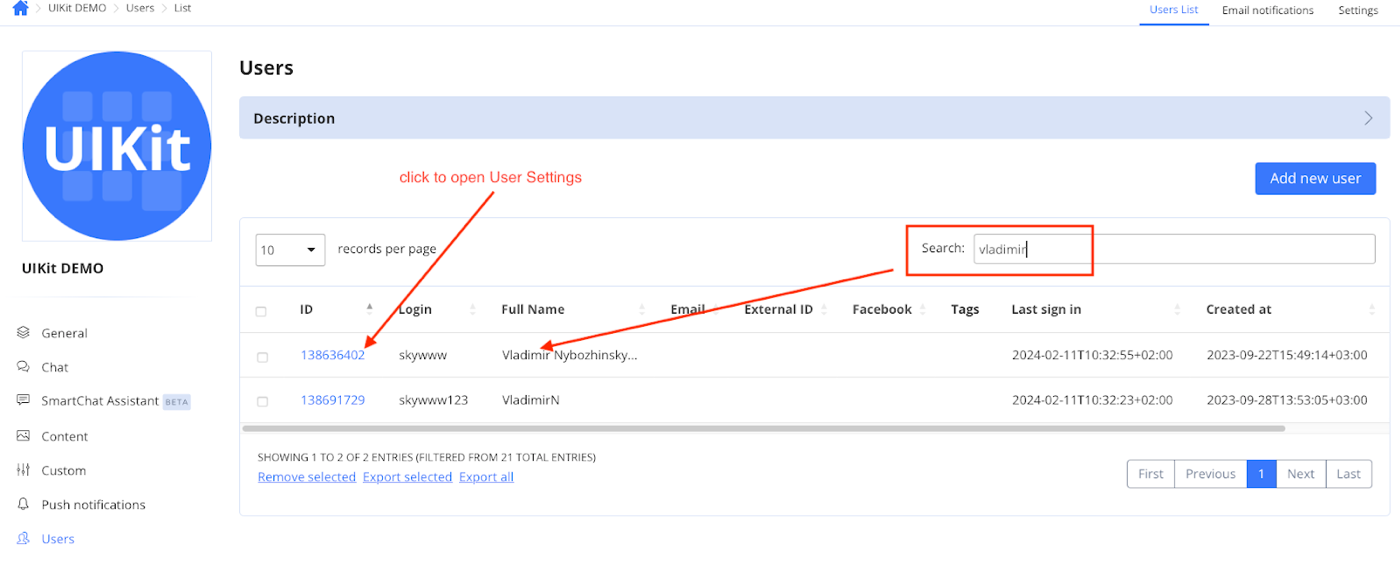
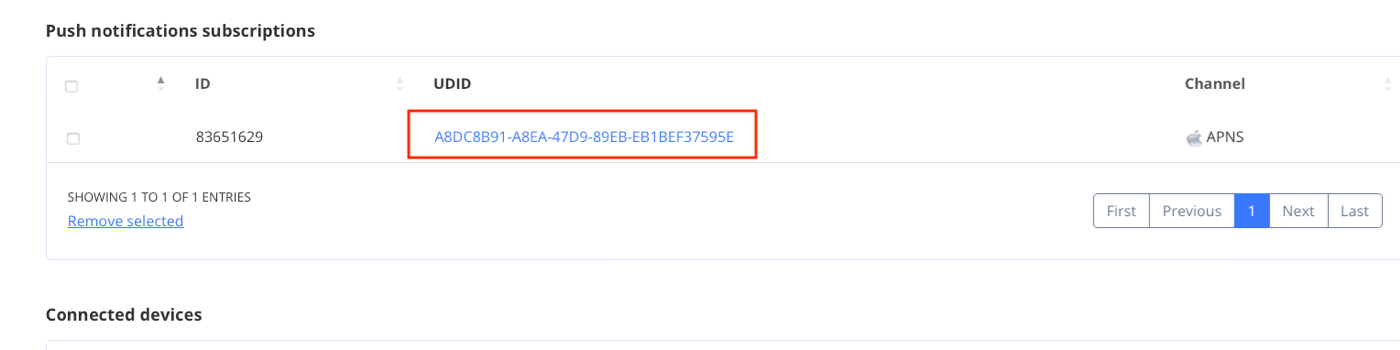
At the bottom of this page, in the Push Notification Subscriptions section, you will see a saved subscription that the server will use to send you push notifications through the APNS service:
Please note: We must also delete this subscription when the User logs out of QuickBlox.
Congratulations! Now let’s move on to sending and receiving push notifications.
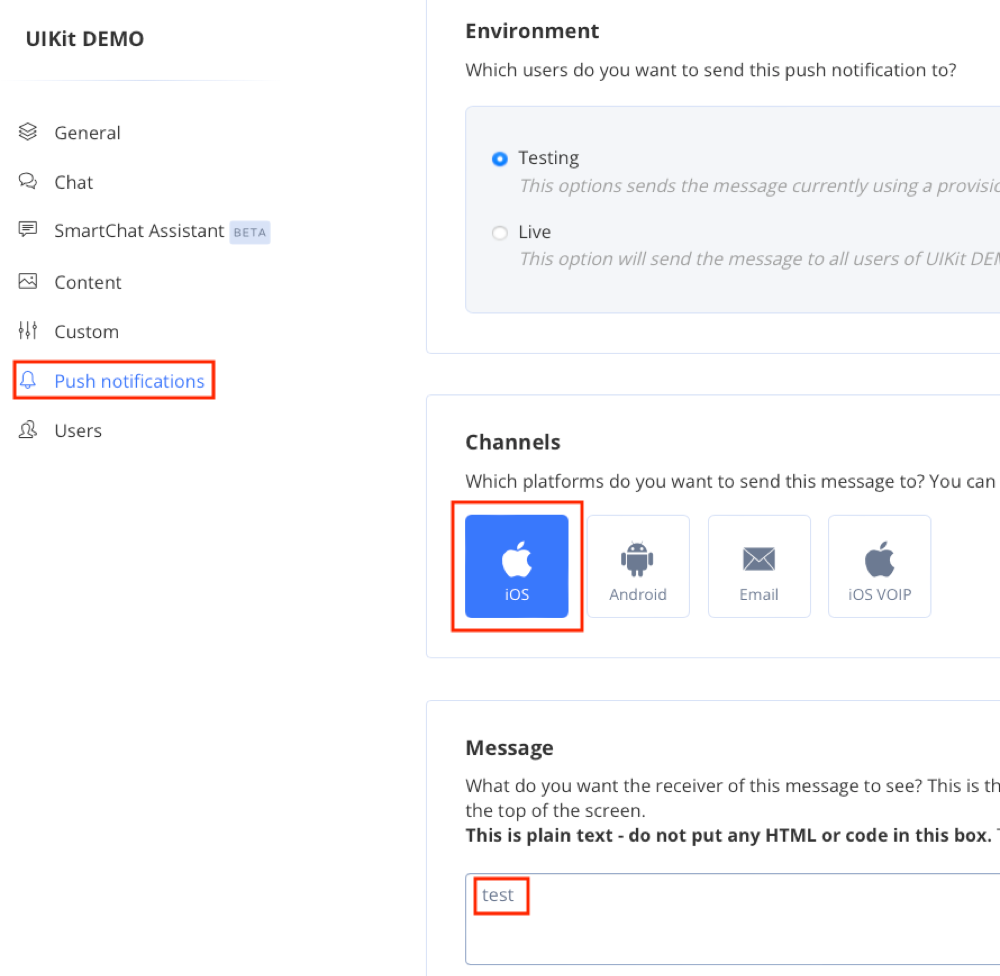
First, let’s go to our QuickBlox admin panel and open the Push Notifications tab.
Let’s take a closer look at the Required settings for sending push notifications from the admin panel.
The first parameter is Environment:
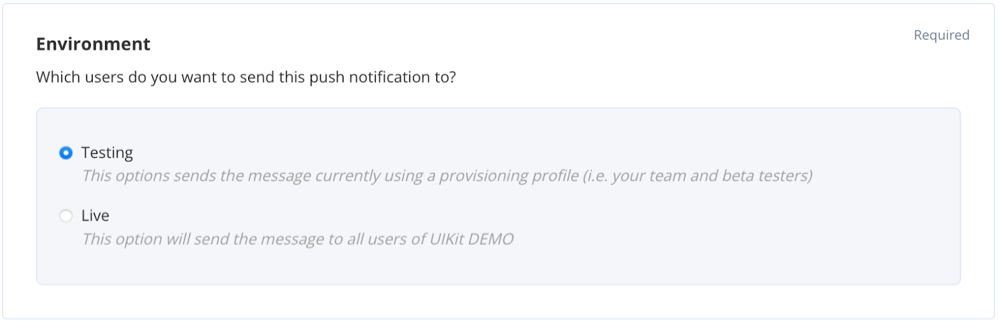
This allows you to configure which users of your application will receive the push notification:

When selecting this option, the push notification will be sent only to those users who are added to a provisioning profile and beta testers whom you added to take part in testing your application in Testflight.
Of course, this item should be selected if your application is already in production and distributed through the AppStore and you do not want these push notifications to come to ordinary users of your application.
To send a push notification to all users of your application, select the Live option:

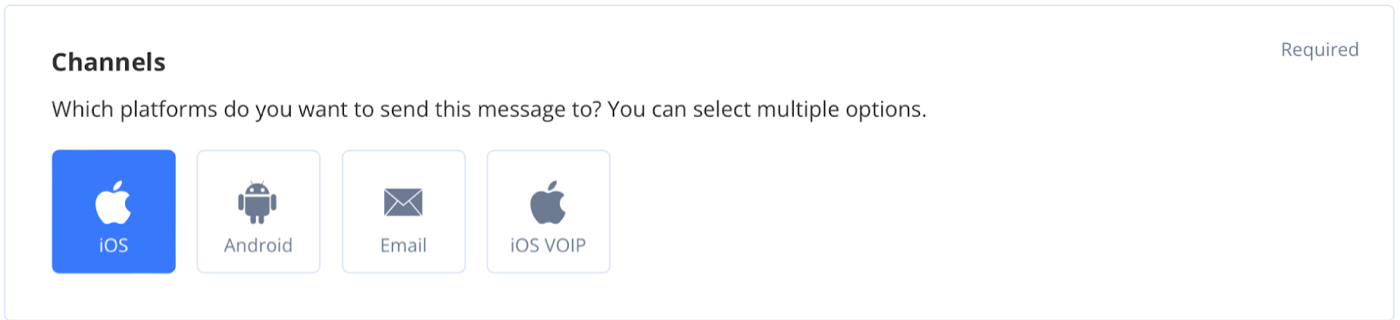
The Channels option allows you to select which platforms you want to send this message to. You can also choose multiple options, such as iOS, Voip iOS and Android.
Since we are currently setting up sending Push notifications for iOS, we will select iOS:
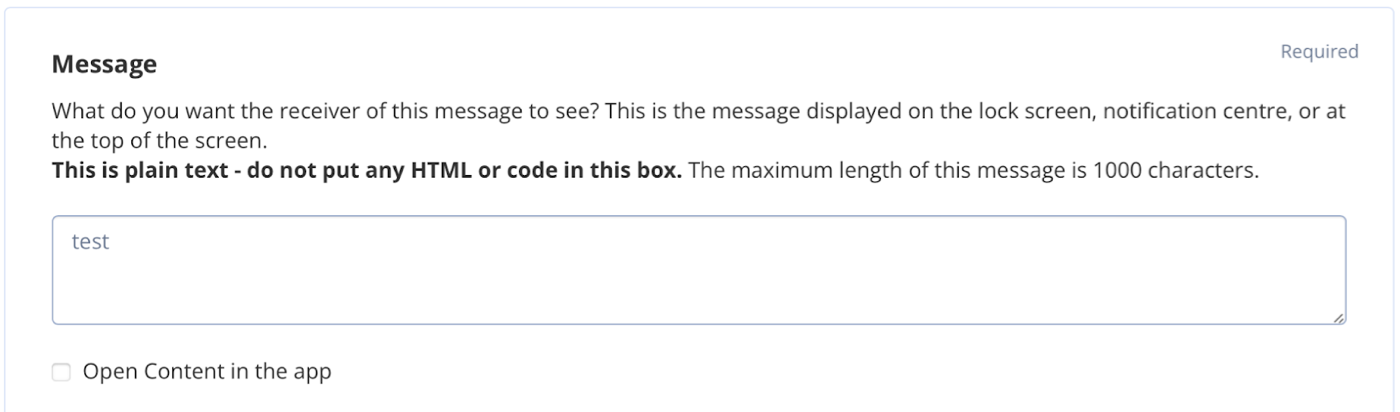
The Message parameter allows you to send plain text in a Push notification with a maximum length of 1000 characters. Let this be a “test”:
Okay, we have selected all the required parameters required to send Push notifications. There are also several optional parameters on this page that you can use.
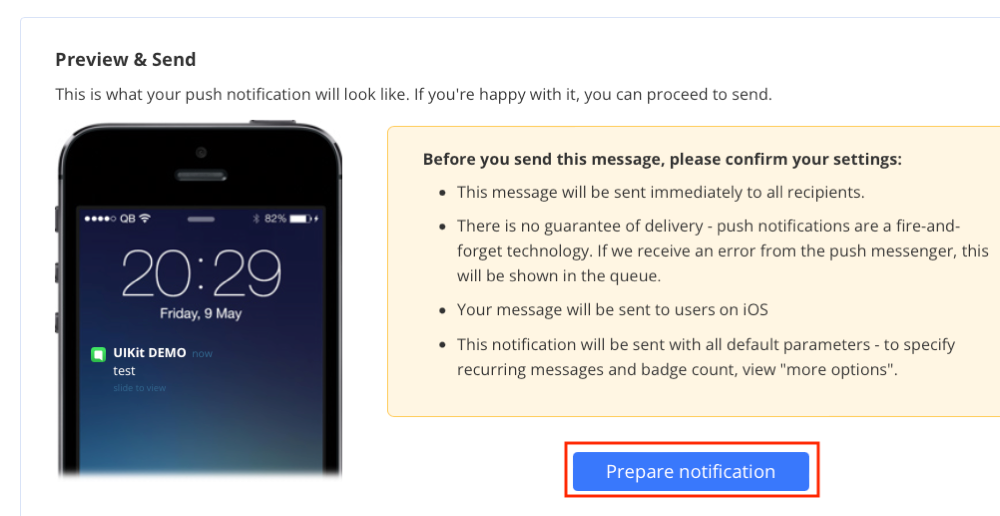
This is the result we got:
Next, at the bottom of the tab, you need to click the “Prepare notifications” button.
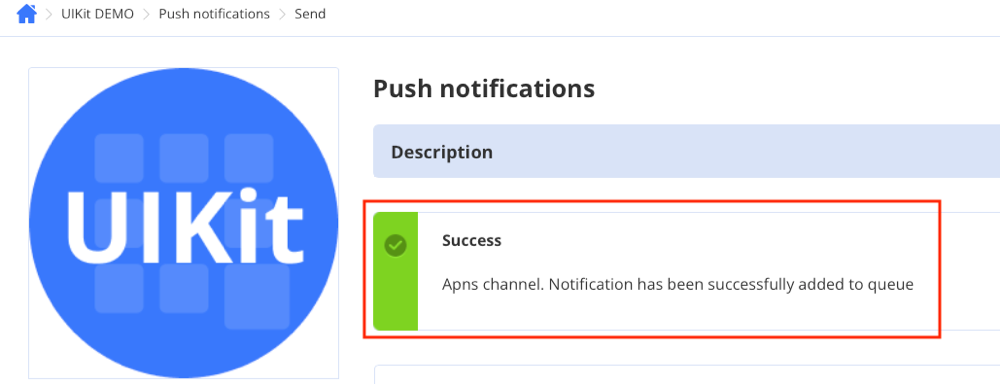
If you have done everything and configured it correctly, a push notification will be sent to your device and at the top of the tab you will see the following picture:
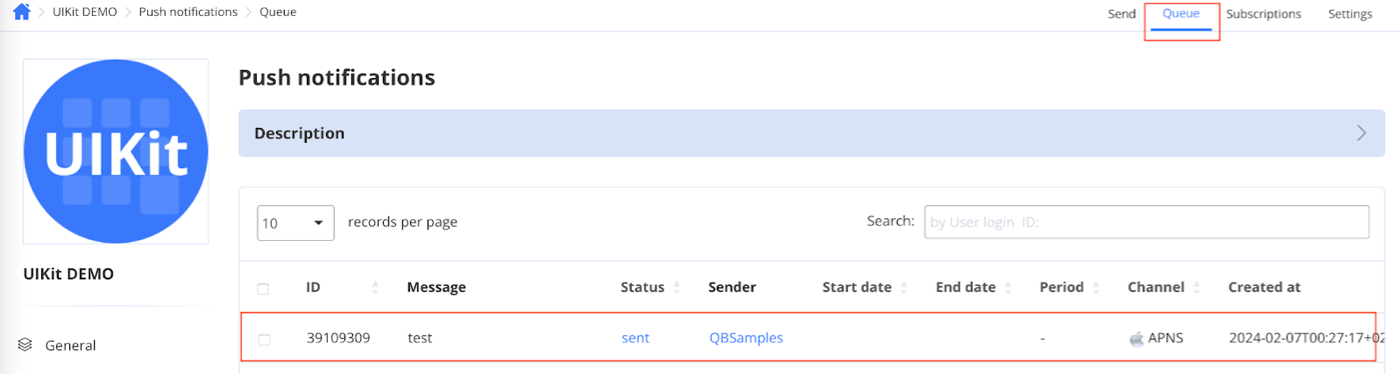
Then go to the “Queue” item and note that the test message should appear in the table:
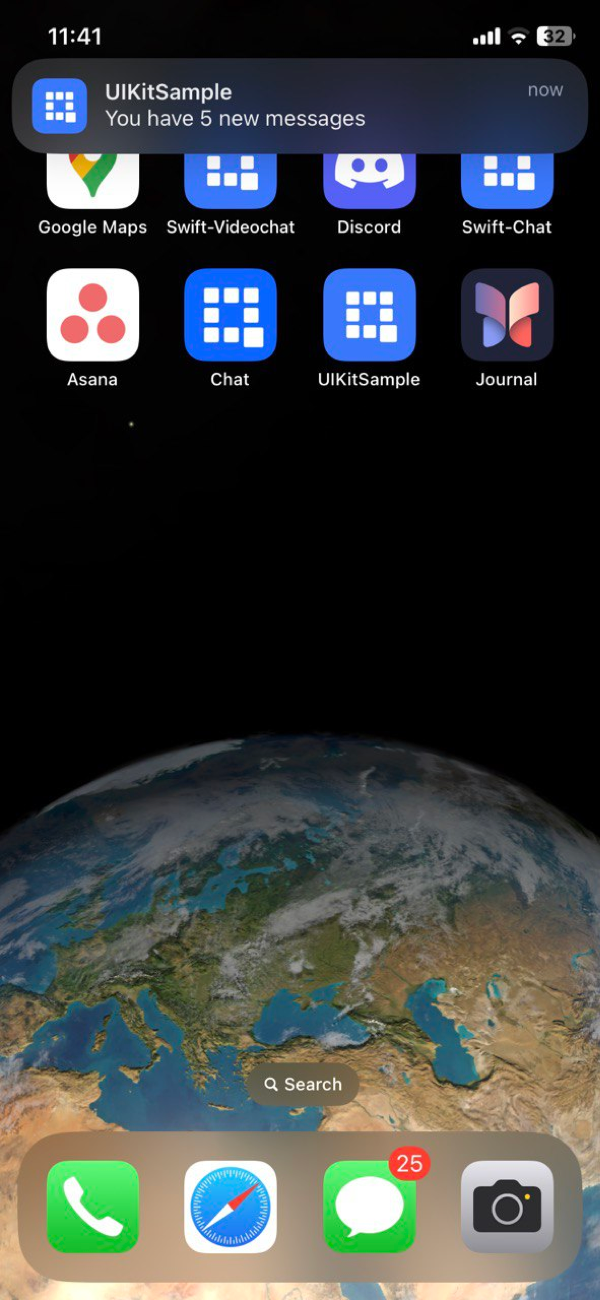
Also, push notification should arrive on your device:
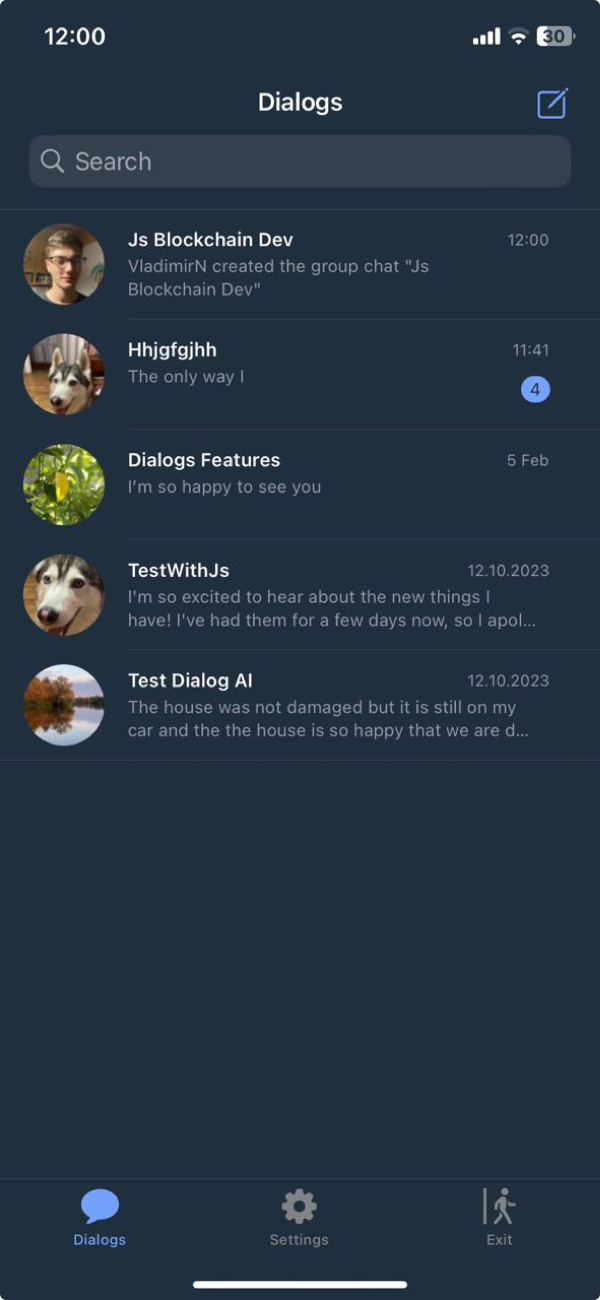
When you click on the received push notification, your application will wake up and a screen with dialogs will open:
The next step is to try sending and receiving push notifications between two real devices.
To do this, install your application on two devices and create a group or private dialogue. On one of the devices, move the application to the background and on the other device write a message in the joint chat.
When sending a message, the QuickBlox server will by default check whether the chat participant is online or offline, and if the chat participant is offline, then a Push notification will be sent to them.
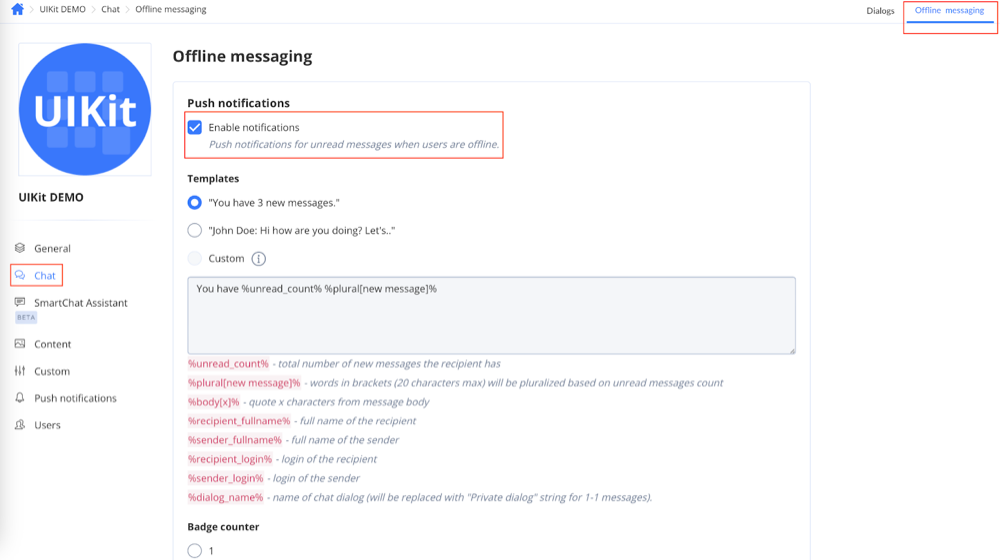
You can configure this server functionality in the admin panel on the “Chat” page and by opening the “Offline messaging” item.
The “Enabled Notifications” checkbox is responsible for automatically sending push notifications:
Conclusion
In this article, we started to look at setting up sending and receiving push notifications using QuickBlox. The QuickBlox iOS SDK provides the ability to interact with subscriptions, such as creating, receiving and deleting user subscriptions, as well as disabling automatic push notifications and setting them to be sent manually. In the following articles, we will take a closer look at a more advanced implementation of the functionality for sending push notifications, and will also demonstrate best practices in this matter. Stay tuned!
Have Questions? Need Support?
Join the QuickBlox Developer Discord Community, where you can share ideas, learn about our software, & get support.
Join QuickBlox Discord
 AI Agent — automate conversations and workflows. Now available on Free plan


