Push notifications have radically altered the way we engage with mobile applications, enhancing user experience by providing real-time updates and alerts. For Android messaging apps, integrating push notifications is indispensable, offering timely notifications for new messages, updates, or events, even when the app is not actively in use. Leveraging the power of push notifications not only keeps users informed but also ensures active engagement and retention.
In this tutorial, we’ll explore how to seamlessly integrate push notifications into your Android messaging app using the QuickBlox platform. Divided into two parts, the first section will guide you through preparing your app for push notifications, utilizing Firebase for streamlined implementation and configuring the necessary data and files in both your application and admin panel. In the second part, we’ll delve into the actual implementation process, ensuring your app delivers timely and relevant notifications to users’ devices.
Part 1: Preparing your App
First of all, you need to create a new project in the Firebase console and modify settings to your application and Quickblox Admin panel.
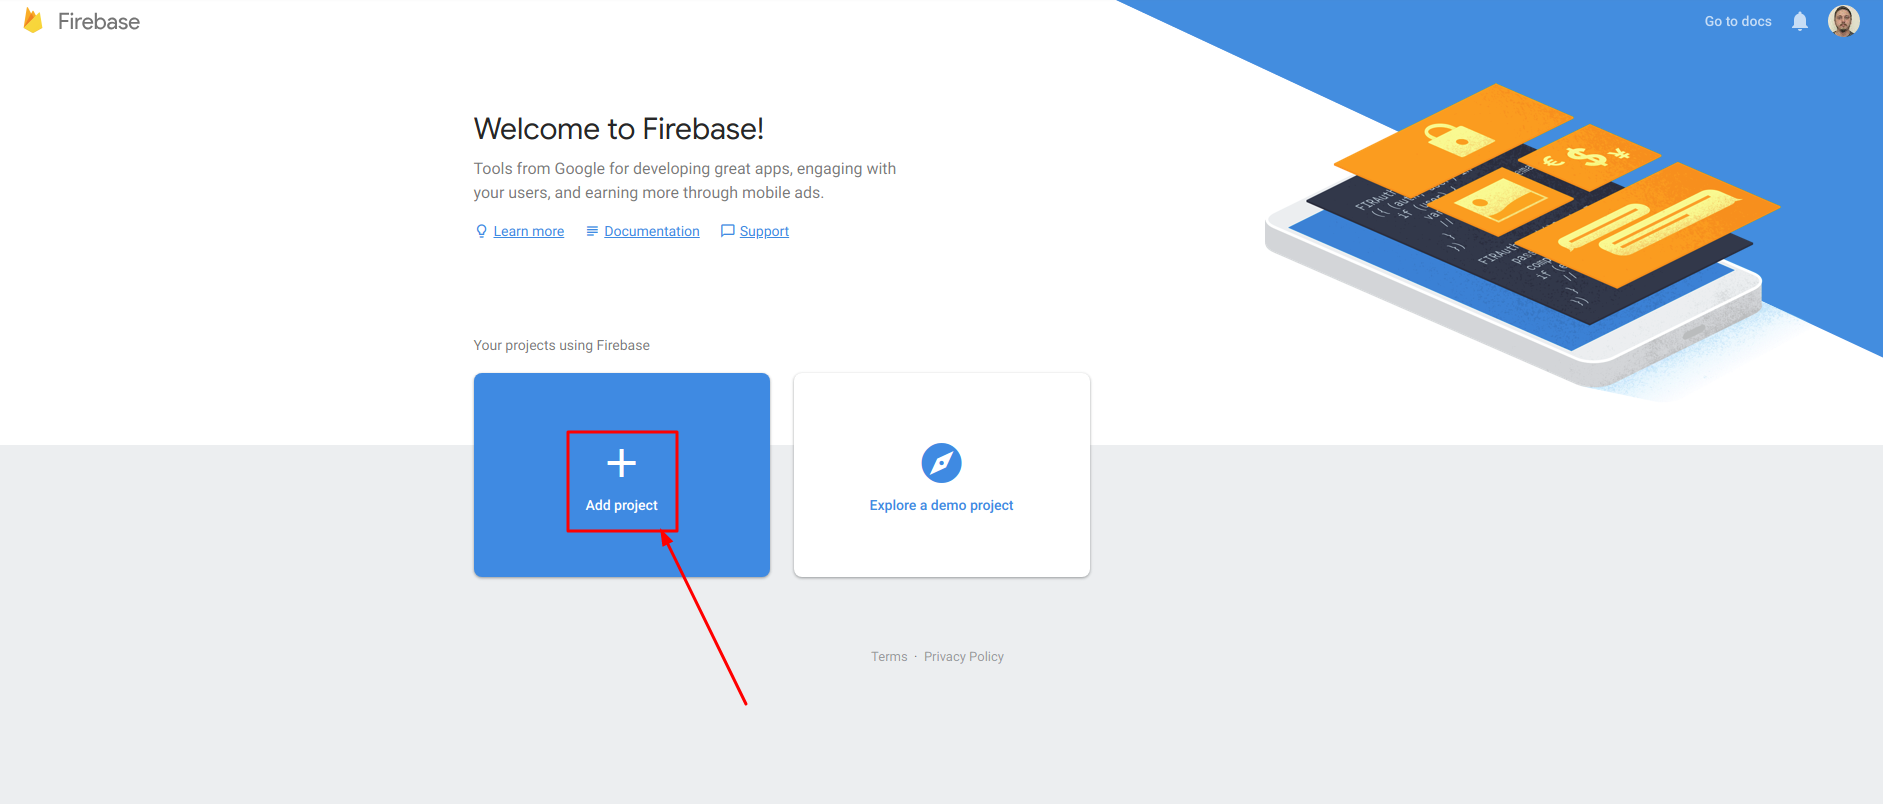
Open the Firebase admin console (URL: https://console.firebase.google.com).
Click Add project.
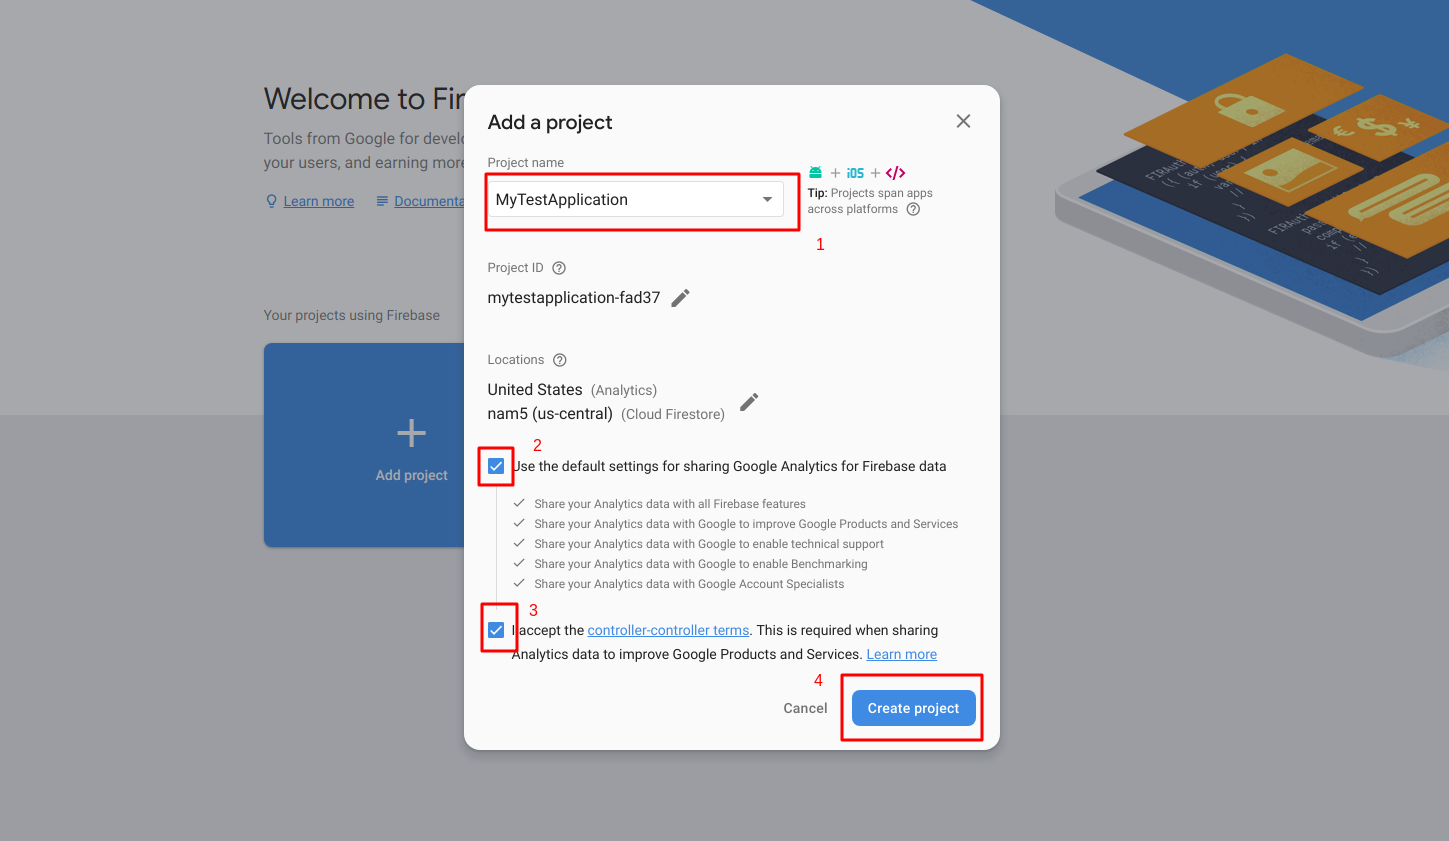
Enter the name of your project in the Project name field. In the same window, mark the checkboxes to use the default settings for sharing Google Analytics for Firebase data, and accept the related controller-controller terms. Click Create project to proceed.
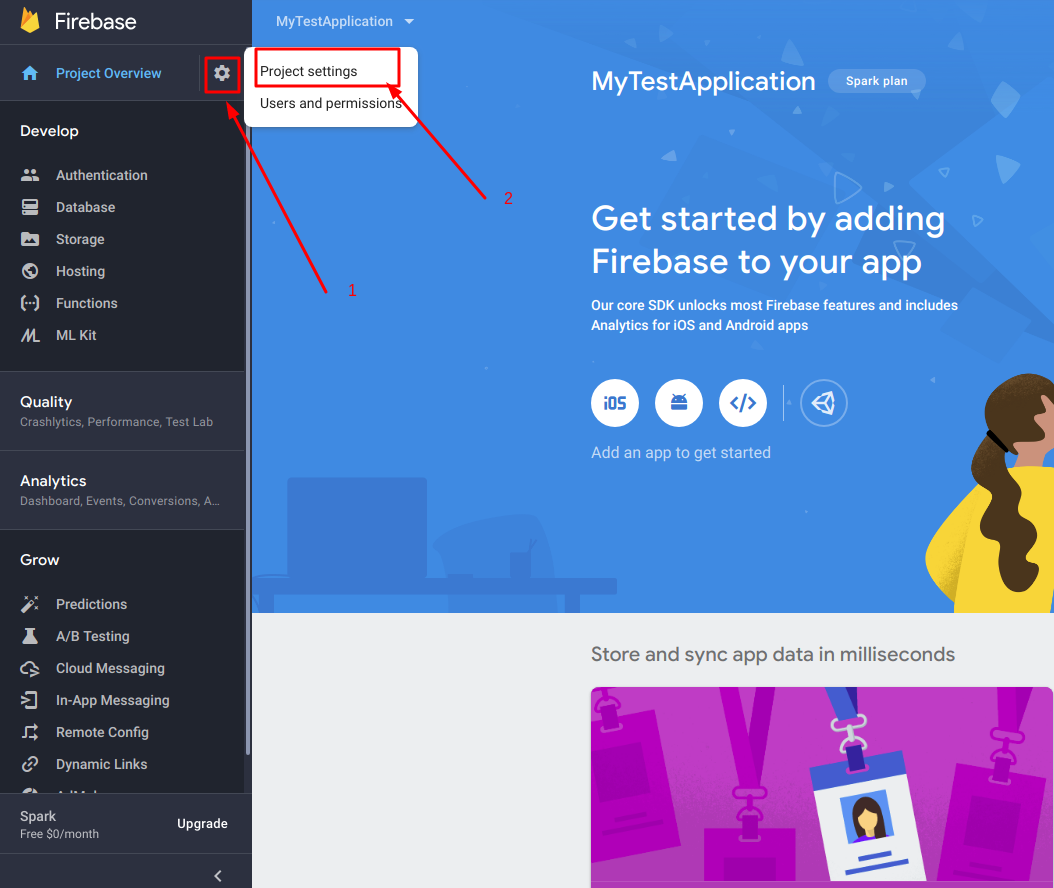
On the project page, click the Settings icon next to Project Overview and select Project Settings.
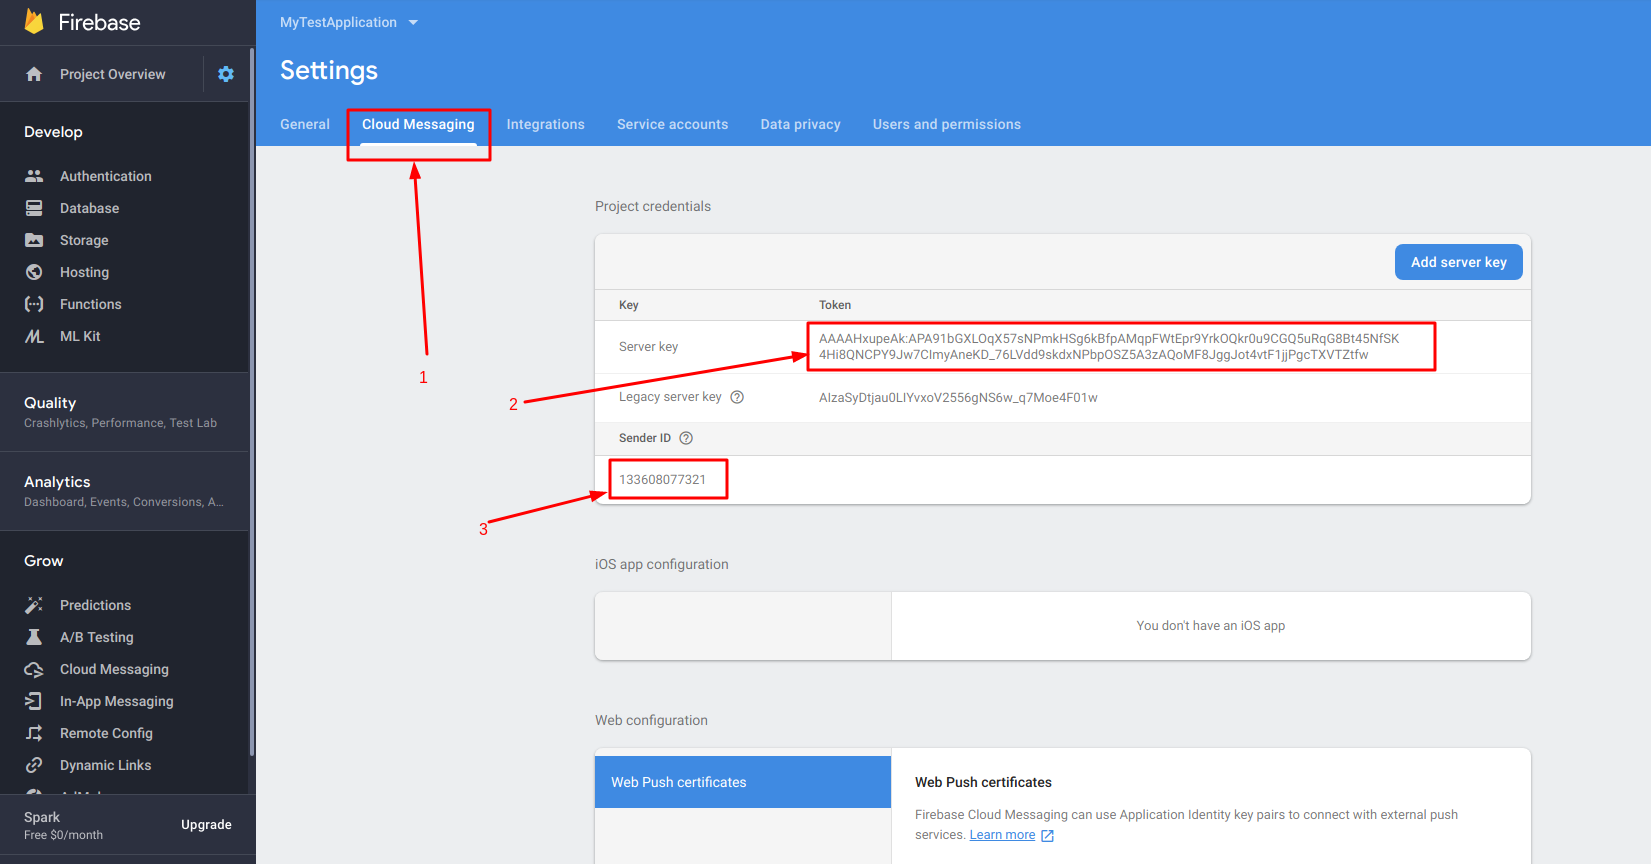
On the Settings page, select the Cloud Messaging tab.
Copy the string in the Token field and the Sender ID.
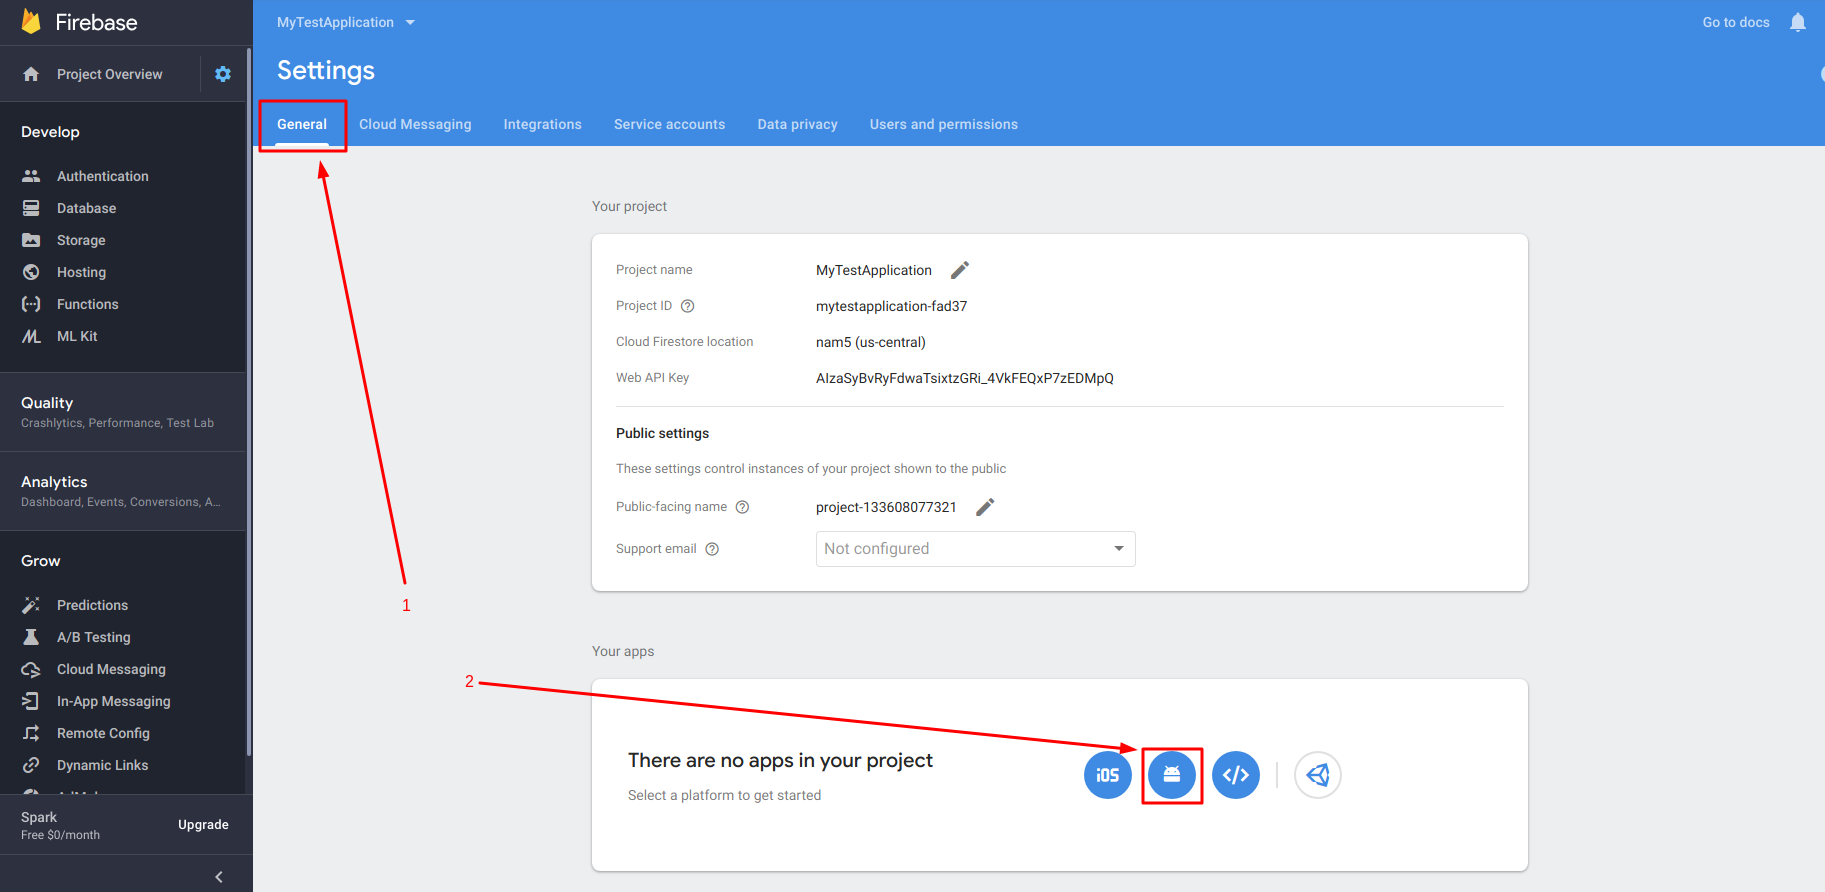
Select the General tab containing the basic information of your project and click the Android icon to add a new Android app to your project.
Now you will need to configure the Android app data to connect it to Firebase.
In the Register app section, enter your package name and click Register app to register the application with Firebase.
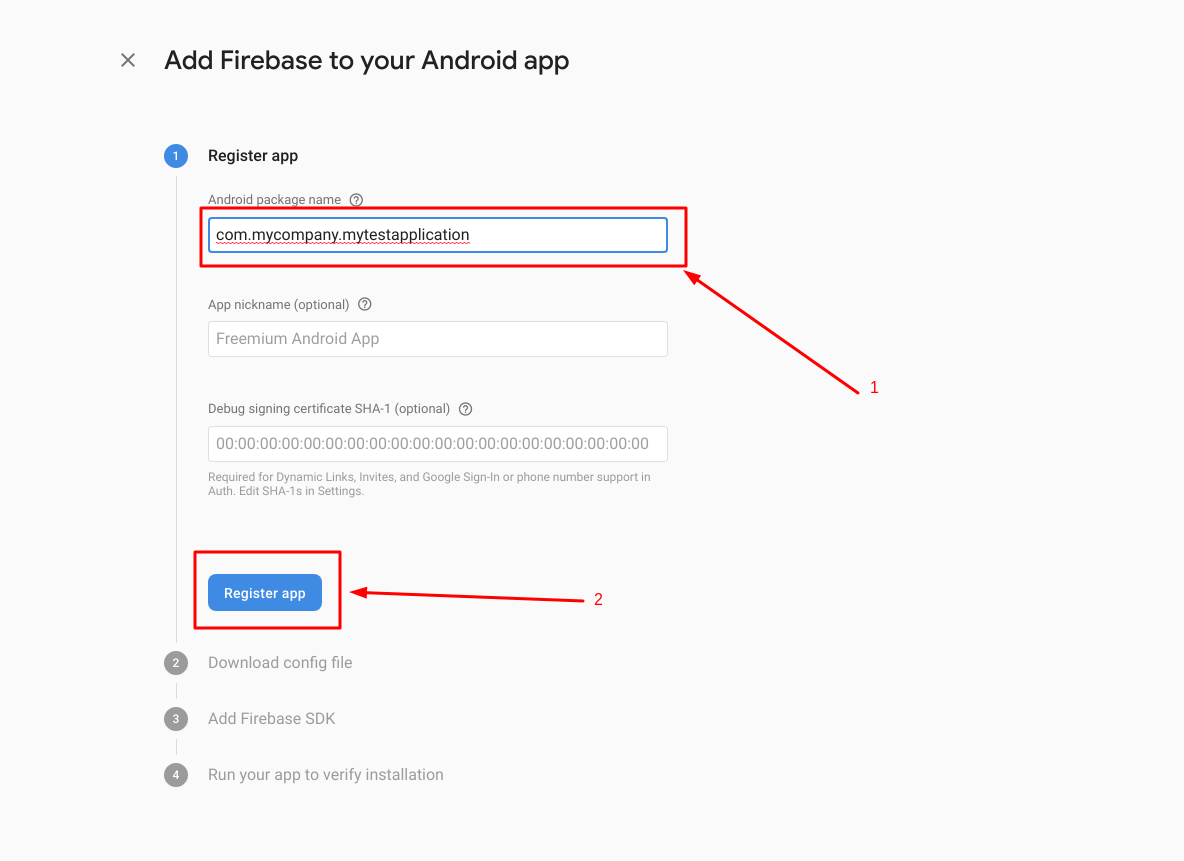
You can find the Android package name in your gradle app file in the applicationId field. Copy the package name and paste into the Android package name field.
In the Download config file section, click Download google-services.json and, once the file downloading is complete, follow the instructions to store it in the root directory of your Android project.
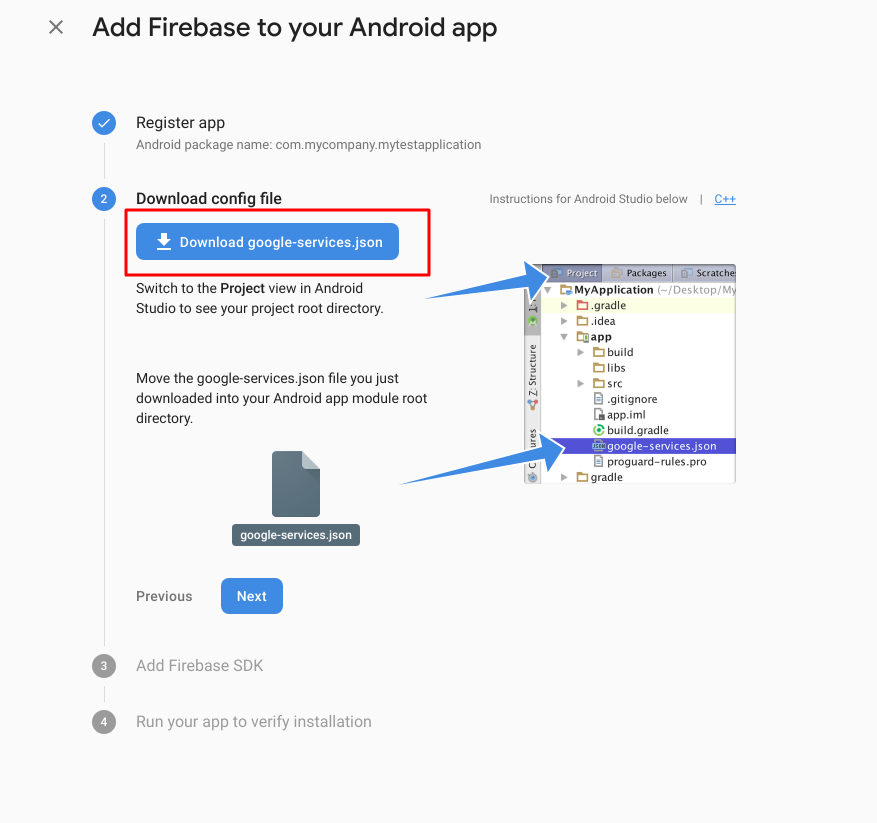
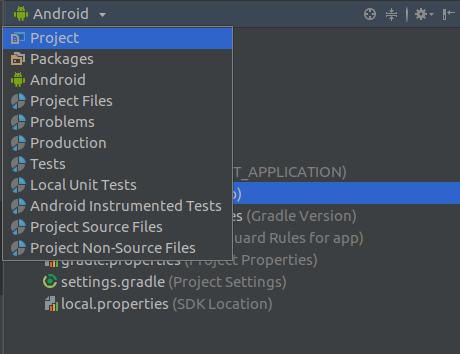
Switch to Android Studio and open the Project section.
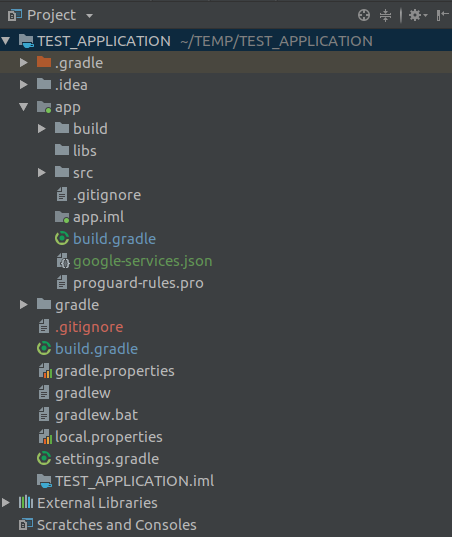
Move the google-services.json file you just downloaded to the root directory of the app package. Switch back to the FCM console and click Next.
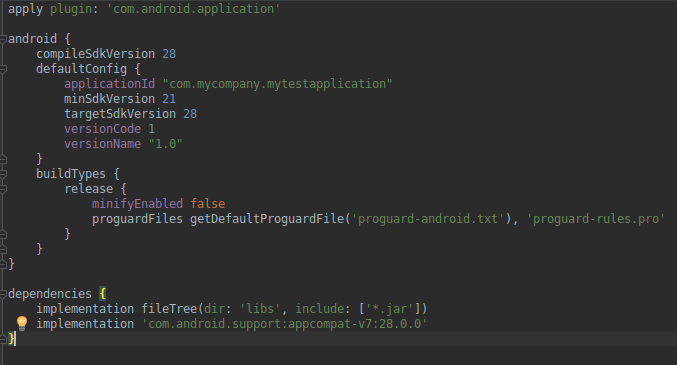
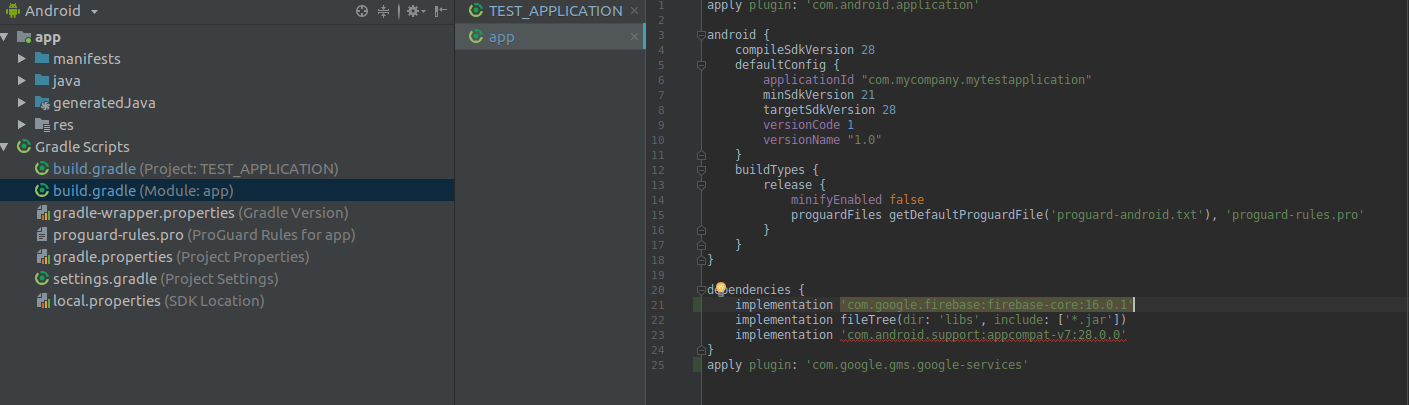
In the Add Firebase SDK section, copy the dependencies and add them to the gradle file. You will need to modify the build.gradle files both at the Project and App levels.
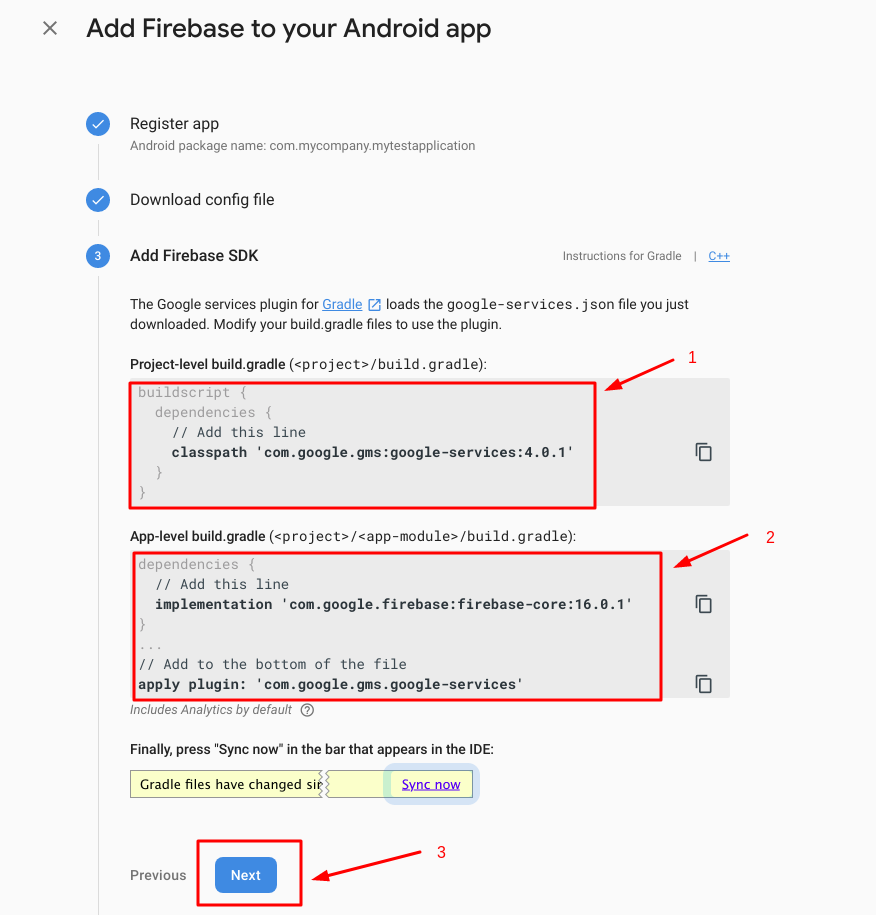
Switch to Android Studio and add the dependencies you copied to the build.gradle files for the Project and App.
Project build.gradle file:

App build.gradle file:
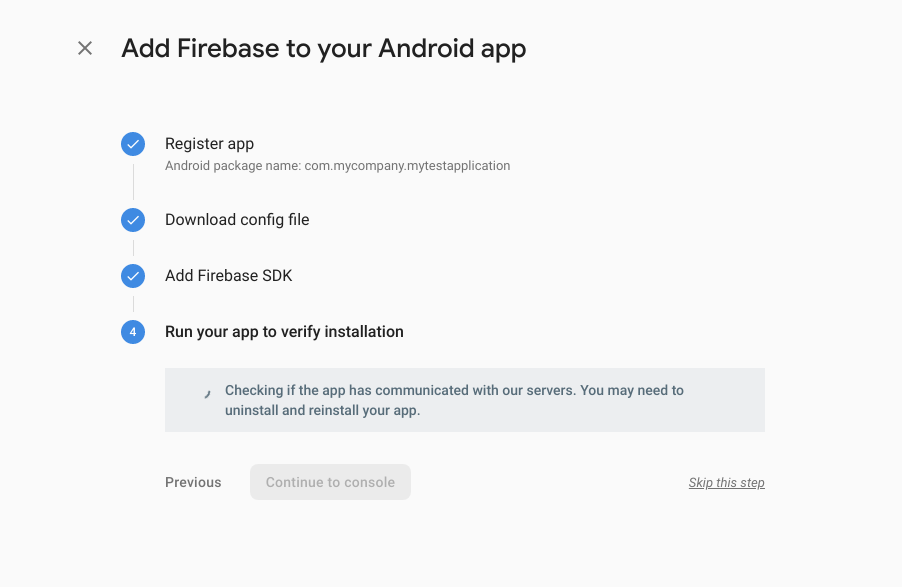
Switch back to the FCM console and click Next. The console will display the “Checking…” message showing that it checks whether your app has established communication with the server.
Important: In order to complete synchronization, the new app version has to be built/deployed to the device. A couple of attempts might be required. Please make sure that the old version is removed from the device.
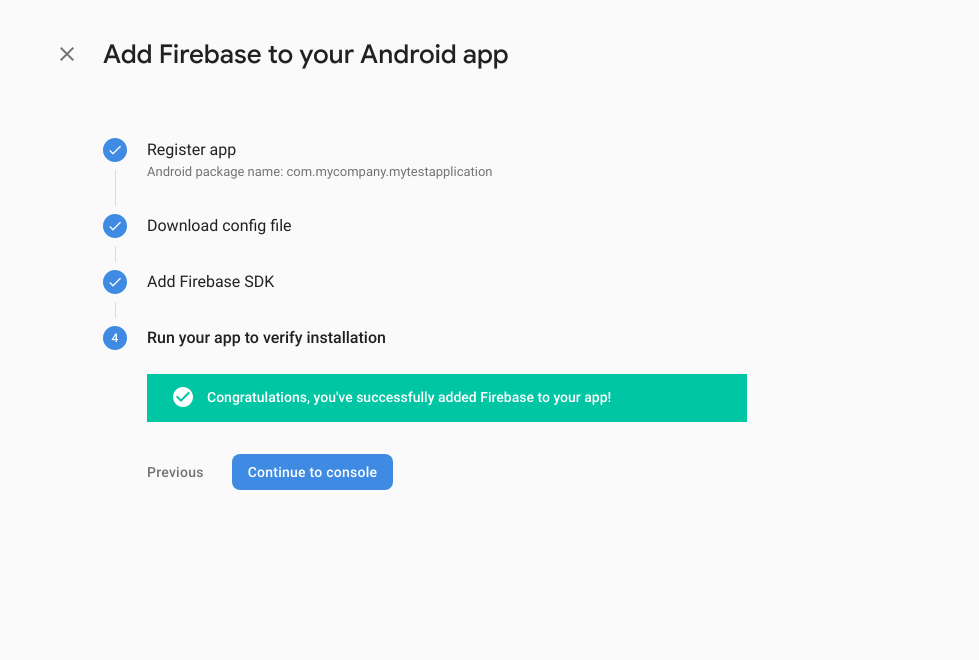
Once the synchronization has completed successfully, the console shows the confirmation message.
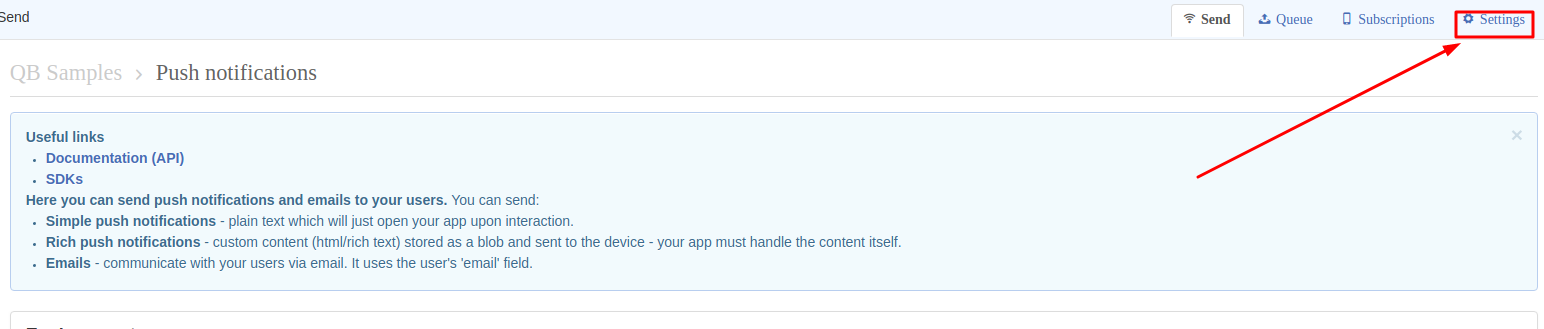
Login to your QuickBlox admin console (https://admin.quickblox.com) and select Push notifications.
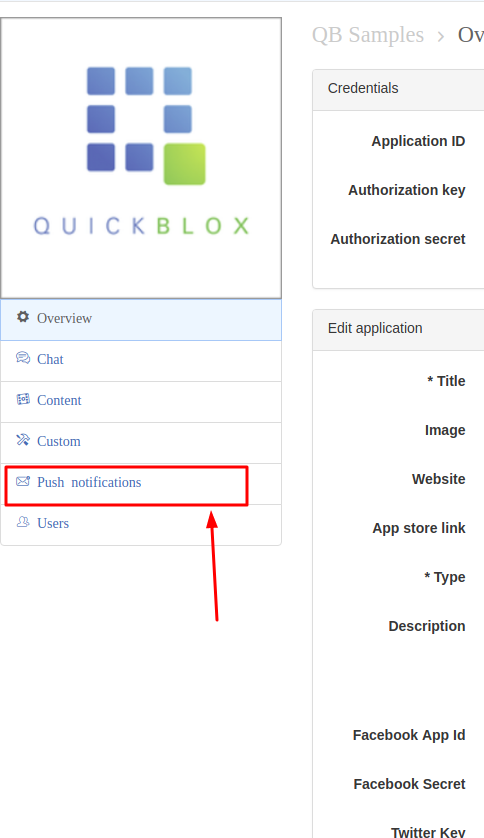
In the top right corner, choose Settings.
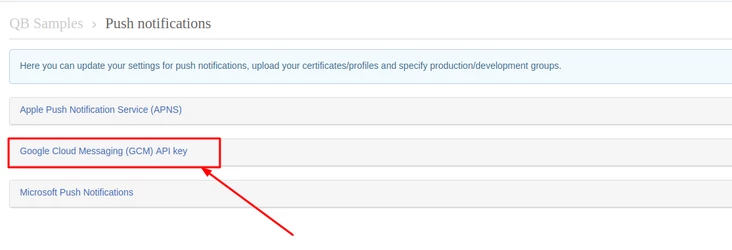
Expand the Google Cloud Messaging (GCM) API key section.
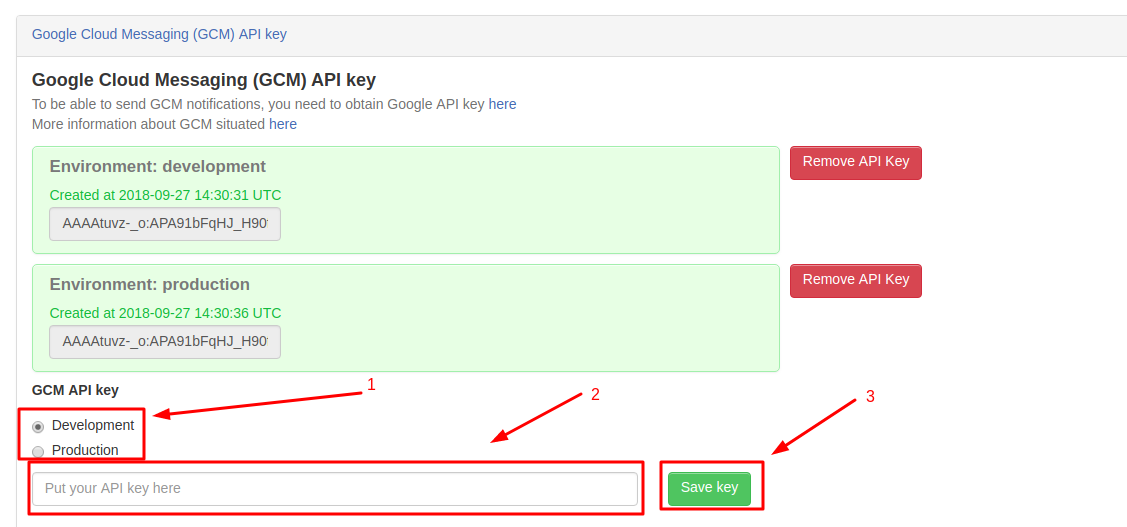
Insert the GCM API key for the Development and Production environment. Select Development and enter the Token value you copied from the FCM console. Click Save key.
Repeat the same steps for the Production environment. The new API keys will appear in the Environment: development and Environment: production sections.
Mission accomplished! You have now successfully set up the necessary data and files in your application and admin panel to implement push notifications.
Part 2: Implementing Push Notifications
Now that the first stage is completed, you’re ready to create a class for received push notifications.
First of all, you should add a class that extends QBFcmPushListenerService. In the example below, it is called PushListenerService.
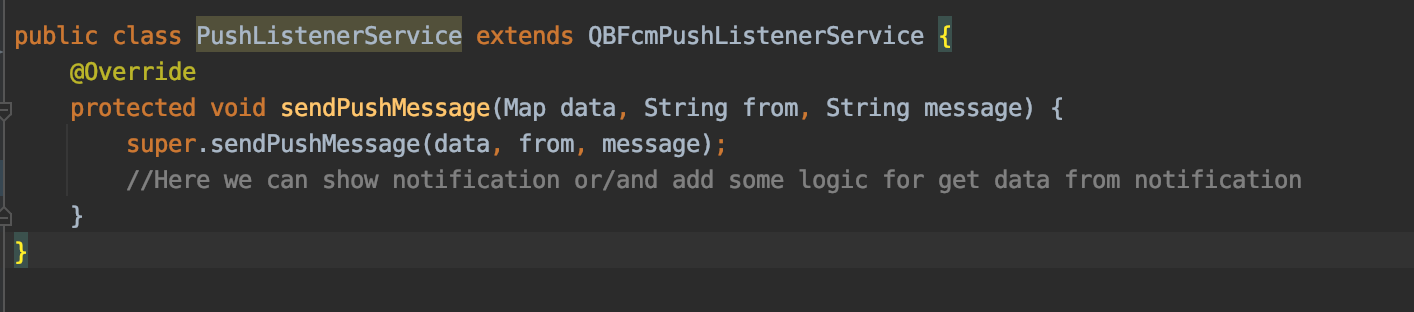
In a callback sendPushMessage you can add custom logic for handling the received message.
For example, you can add a class to show notifications with information with static methods.
import android.app.Activity;
import android.app.Notification;
import android.app.NotificationChannel;
import android.app.NotificationManager;
import android.app.PendingIntent;
import android.content.Context;
import android.content.Intent;
import android.graphics.Color;
import android.media.RingtoneManager;
import android.net.Uri;
import android.os.Build;

import androidx.annotation.DrawableRes;
import androidx.annotation.RequiresApi;
import androidx.core.app.NotificationCompat;

public class NotificationUtils {
    private static final String CHANNEL_ONE_ID = "com.quickblox.samples.ONE";// The id of the channel.
    private static final String CHANNEL_ONE_NAME = "Channel One";

    public static void showNotification(Context context, Class<? extends Activity> activityClass,
                                        String title, String message, @DrawableRes int icon,
                                        int notificationId) {
        NotificationManager notificationManager =
                (NotificationManager) context.getSystemService(Context.NOTIFICATION_SERVICE);

        if (Build.VERSION.SDK_INT >= Build.VERSION_CODES.O) {
            createChannelIfNotExist(notificationManager);
        }
        Notification notification = buildNotification(context, activityClass, title, message, icon);

        notificationManager.notify(notificationId, notification);
    }

    @RequiresApi(api = Build.VERSION_CODES.O)
    private static void createChannelIfNotExist(NotificationManager notificationManager) {
        if (notificationManager.getNotificationChannel(CHANNEL_ONE_ID) == null) {
            int importance = NotificationManager.IMPORTANCE_HIGH;
            NotificationChannel notificationChannel = new NotificationChannel(CHANNEL_ONE_ID,
                    CHANNEL_ONE_NAME, importance);
            notificationChannel.enableLights(true);
            notificationChannel.setLightColor(Color.BLUE);
            notificationChannel.setShowBadge(true);
            notificationChannel.setLockscreenVisibility(Notification.VISIBILITY_PUBLIC);
            notificationManager.createNotificationChannel(notificationChannel);
        }
    }

    private static Notification buildNotification(Context context, Class<? extends Activity> activityClass,
                                                  String title, String message, @DrawableRes int icon) {
        Uri defaultSoundUri = RingtoneManager.getDefaultUri(RingtoneManager.TYPE_NOTIFICATION);

        return new NotificationCompat.Builder(context, CHANNEL_ONE_ID)
                .setSmallIcon(icon)
                .setContentTitle(title)
                .setContentText(message)
                .setAutoCancel(true)
                .setSound(defaultSoundUri)
                .setContentIntent(buildContentIntent(context, activityClass, message))
                .build();
    }

    private static PendingIntent buildContentIntent(Context context, Class<? extends Activity> activityClass, String message) {
        Intent intent = new Intent(context, activityClass);
        intent.putExtra(FcmConsts.EXTRA_FCM_MESSAGE, message);
        intent.addFlags(Intent.FLAG_ACTIVITY_CLEAR_TOP);
        return PendingIntent.getActivity(context, 0, intent, PendingIntent.FLAG_UPDATE_CURRENT);
    }
}
And call static method showNotification to show notifications like in the code below.
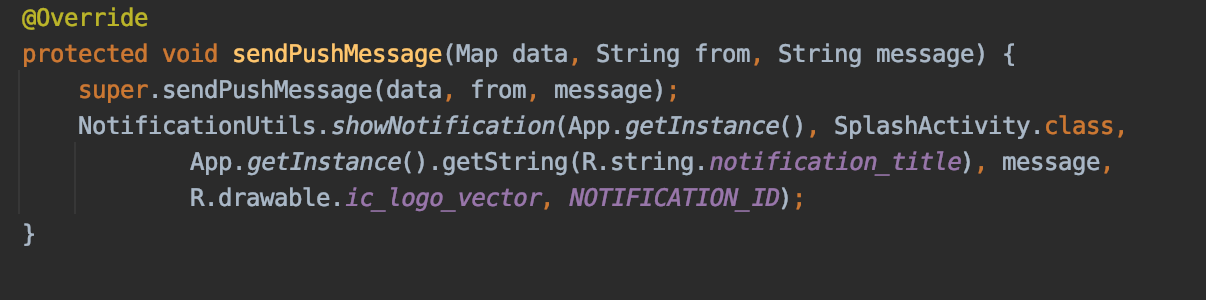
Of course, instead of App.getInstance you should pass a Context and instead of SplashActivity.class you should pass any Activity class from your application.
notification_title is your text from String resource which you can show in a notification message in a title space. You should use a drawable icon to show a picture in a notification message.
Next, you should add the following changes in the AndroidManifest.xml file.
Register PushListenerService and register QBFcmPushInstanceIDService.
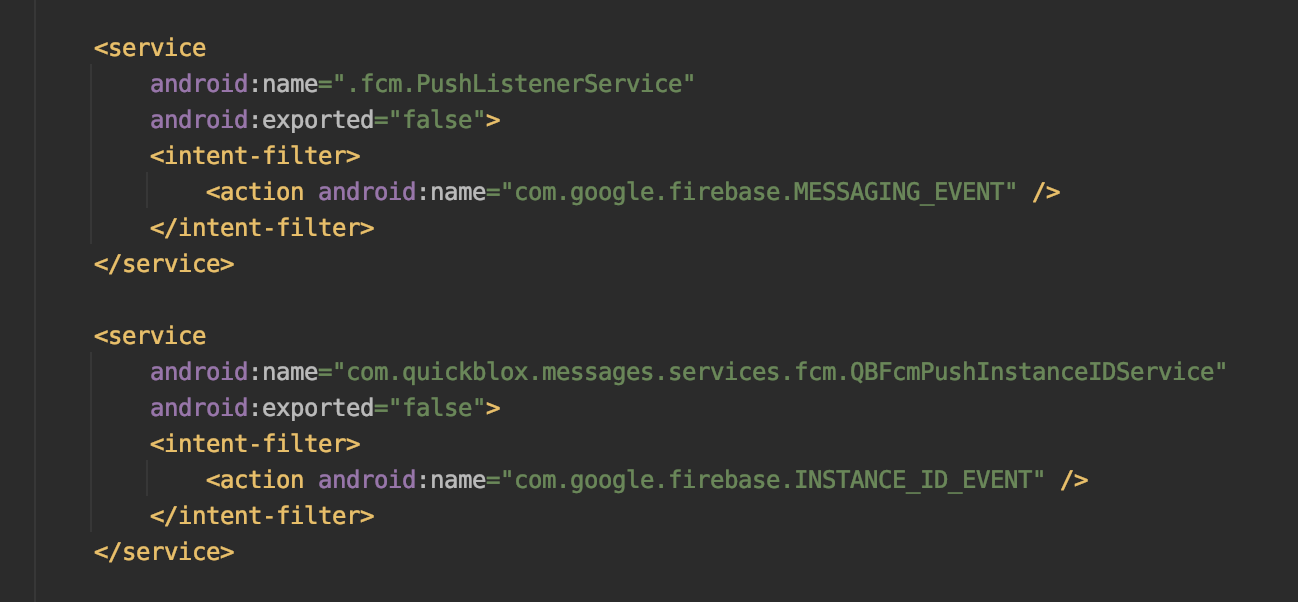
You’re done !
Now that you’ve implemented these steps, your App is ready to receive and display push notifications. Got more questions? Contact support.
Want to learn more about building Android Apps? Check out our other tutorials:
How to Launch Android Chat an Webrtc Video Conferencing Samples
How to Build an Android Chat Application with Kotlin using QuickBlox SDK
Have Questions? Need Support?
Join the QuickBlox Developer Discord Community, where you can share ideas, learn about our software, & get support.
Join QuickBlox Discord
 AI Agent — automate conversations and workflows. Now available on Free plan