In an era where data is the new oil, ensuring communication security is paramount. As developers, it’s essential to be aware of the best practices to implement when working with communication platforms like QuickBlox, to ensure your data remains private and protected. This article aims to illustrate some vital tips and best practices for security while leveraging QuickBlox’s real-time chat and video calling SDK.
Managing Application Credentials & Authentication
When you create an application on the QuickBlox dashboard, you’ll receive application credentials that you can use to connect your application with the QuickBlox servers.
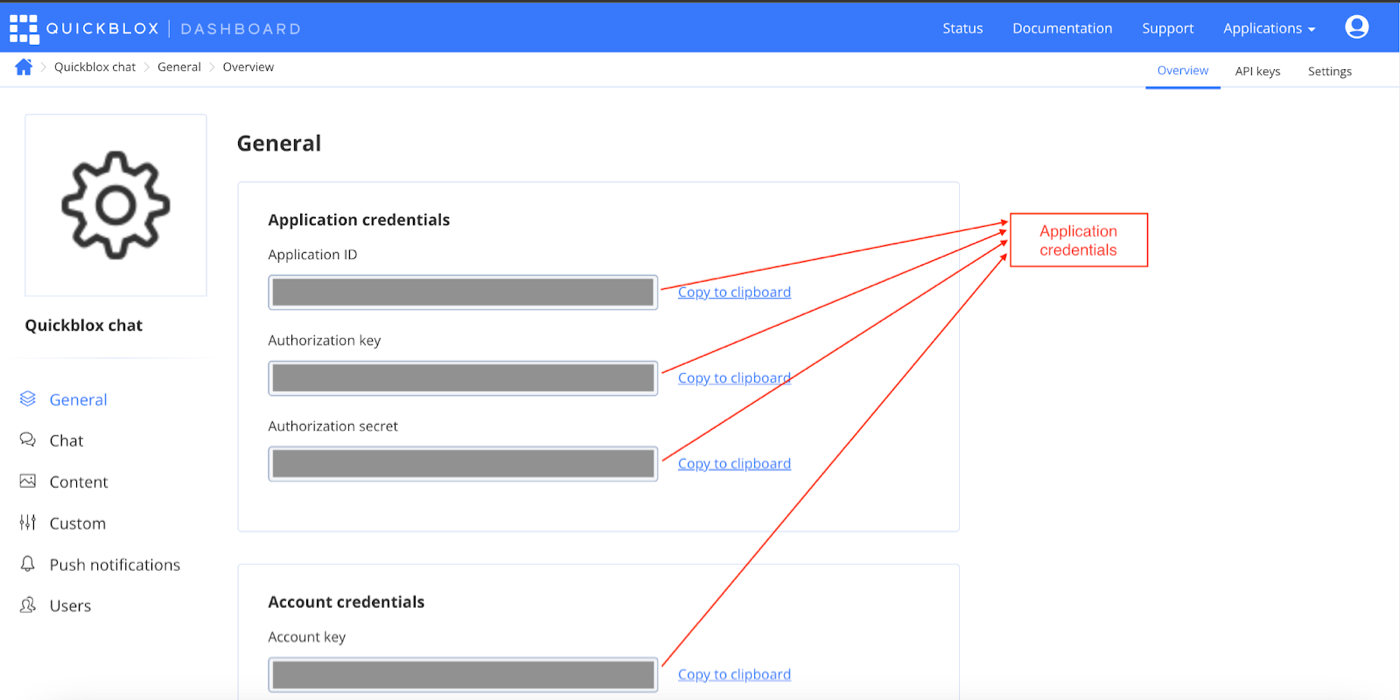
It’s critical that you do not expose your app credentials by any means.
A common mistake that developers often make is that they store these tokens on their client side applications, but this exposes them to security breaches. For security best practice, credentials MUST be stored on the server side.
Let’s take a look at both these approaches:
- Storing tokens and managing authentication on the Server (Recommended for production).
- Storing tokens and managing authentication on the Client side (Good for dev, POCs, MVPs but not recommended for production).
Note: Although this article only includes snippets for Web, we have attached appropriate links for the other platforms.
Storing tokens and managing authentication on the Server (Recommended for production)
It’s critical that you store credentials and manage authentication on the server side, and that you initialize the client application with the session token. This is the QuickBlox recommended way.
We do not recommend using the client end for storing application credentials or managing authentication, as the client application can be compromised by reverse engineering or decompiling the application.
Let’s see how to implement this:
Server Side Steps
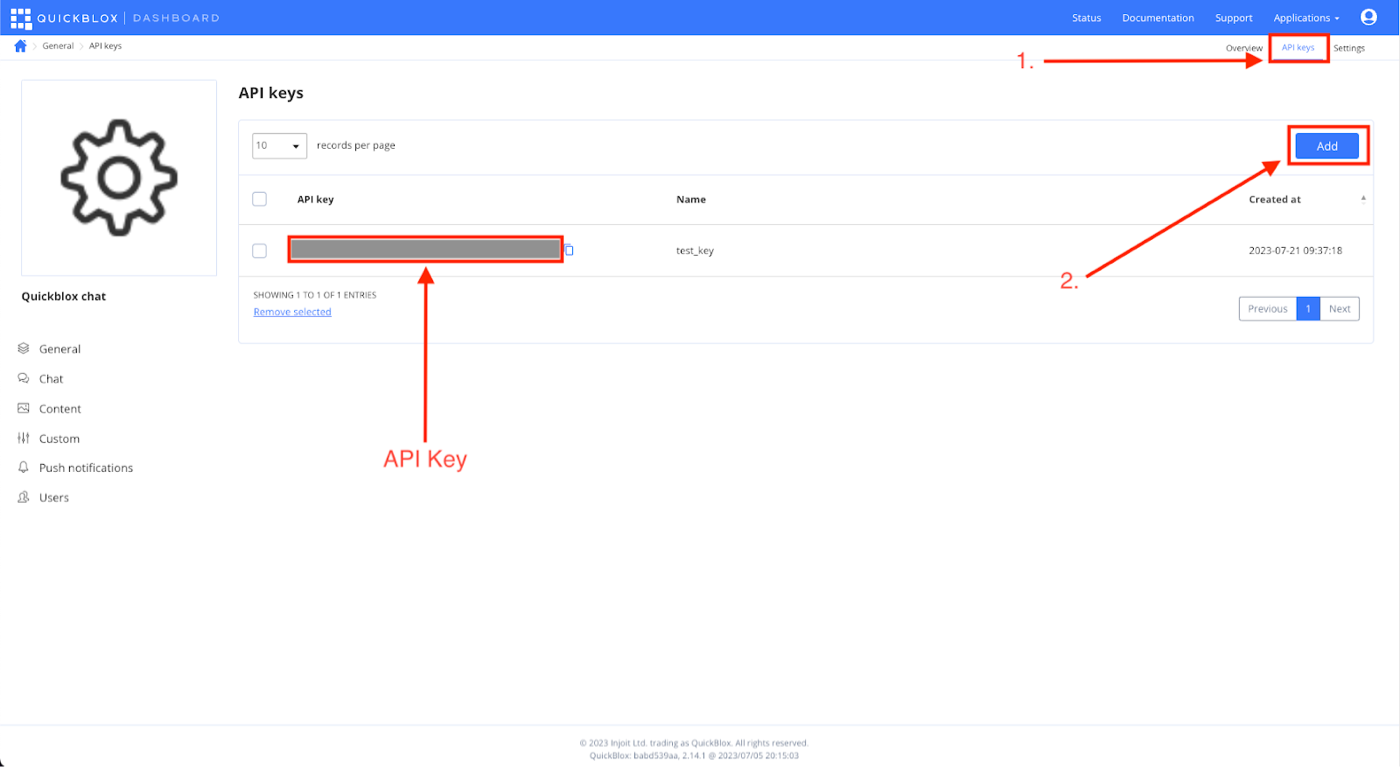
1. Create API key on the QuickBlox dashboard.
- Head over to the QuickBlox dashboard.
- Select the application for which you want to generate the API key.
- Click on the API Keys section from the top right menu.
- Click on the Add button and enter the name of the API key.
Make sure to store this API key securely on your server
2. Create the user with API Key.
- To register a new user, you must create a user on the QuickBlox server. To do this you can use the API key and call the create user QuickBlox API from your server.
import axios from 'axios';

const options = {
  method: 'POST',
  url: 'https://api.quickblox.com/users.json',
  headers: {
    accept: 'application/json',
    Authorization: 'ApiKey {your_api_key}',
    'content-type': 'application/json'
  },
  data: {user: {login: 'USER_LOGIN', email: 'USER_EMAIL', password: 'USER_PASSWORD'}}
};

axios
  .request(options)
  .then(function (response) {
    console.log(response.data);
  })
  .catch(function (error) {
    console.error(error);
  });
You can also pass more parameters here, like full_name, phone, etc. Read more about the API and its parameters here.
If the API returns success with code 201, it means the user is created.
3. Create User session with API Key
- Once you have the user created on the QuickBlox server, you need to create a session for that user, so that you can send the session on your frontend application and log the user in.
import axios from 'axios';

const options = {
  method: 'POST',
  url: 'https://api.quickblox.com/users/user_id/tokens',
  headers: {accept: 'application/json', Authorization: 'ApiKey {your_api_key}'}
};

axios
  .request(options)
  .then(function (response) {
    console.log(response.data);
  })
  .catch(function (error) {
    console.error(error);
  });
If the API returns success with code 201, that means the session is created and you will receive the session token, you can pass this token to the client side now.
You can read more about the API here.
Client Side Steps
1. Initialize SDK with App ID and Account Key
Now that you have the application credentials stored safely on our backend, you can initialize the frontend SDK with just the APP ID and Account Key (it’s safe to store them on the client side).
Let’s see how you can do that:
var appId = YOUR_APP_ID;
var accountKey = YOUR ACCOUNT KEY;
var config = { debug: false };

QB.initWithAppId(appId, accountKey, config);
To initialize the SDK with the App ID and Account key on other platforms, please see the relevant guide below:
Android: https://docs.quickblox.com/docs/android-setup#initialize-quickblox-sdk-without-authorization-key-and-secret
IOS: https://docs.quickblox.com/docs/ios-setup#initialize-quickblox-sdk-without-authorization-key-and-secret
Web: https://docs.quickblox.com/docs/js-setup#initialize-quickblox-sdk-without-authorization-key-and-secret
React Native: https://docs.quickblox.com/docs/react-native-setup#initialize-quickblox-sdk-without-authorization-key-and-secret
Flutter: https://docs.quickblox.com/docs/flutter-setup#initialize-quickblox-sdk-without-authorization-key-and-secret
2. Set session into SDK
Once you initialize the SDK, you need to start the user session with the token that you received from our backend. This token will then be used by the API calls made by the SDK.
Make sure that you are on the latest version of the respective platform SDK that you are using, since this method was introduced in newer versions of the SDK.
QB.startSessionWithToken(sessionToken, function(err, mySession){
	if (err){
    	console.log('Error in start session with token');
	} else {
    	console.log('session data: ', mySession);
	}
});
To set the session into the SDK on other platforms, see the relevant guide below:
Android: https://docs.quickblox.com/docs/android-authentication#set-existing-session
IOS: https://docs.quickblox.com/docs/ios-authentication#set-existing-session
Web: https://docs.quickblox.com/docs/js-authentication#set-existing-session
React Native: https://docs.quickblox.com/docs/react-native-authentication#set-existing-session
Flutter: https://docs.quickblox.com/docs/flutter-authentication#set-existing-session
Voila! It’s done. Now you have a strong security flow implemented.
Storing tokens and managing authentication on the Client side
You may want to use this approach when you want to build MVPs, POCs, demos or for your side projects.
1. Initialize QuickBlox SDK and create a session.
//App Credentials.
var APPLICATION_ID = YOUR_APP_ID;
var AUTH_KEY = YOUR_AUTH_KEY;

//Need to treat and store this in a secure manner
var AUTH_SECRET = YOUR_AUTH_SECRET;
var ACCOUNT_KEY = YOUR_ACCOUNT_KEY;

var CONFIG = { debug: true };


//Initialize the SDK
QB.init(APPLICATION_ID, AUTH_KEY, AUTH_SECRET, ACCOUNT_KEY, CONFIG);
To initialize the QuickBlox SDK on other platforms, see the relevant guide below:
Android: https://docs.quickblox.com/docs/android-quick-start#initialize-quickblox-sdk
IOS: https://docs.quickblox.com/docs/ios-quick-start#initialize-quickblox-sdk
Web: https://docs.quickblox.com/docs/js-quick-start#initialize-quickblox-sdk
React Native: https://docs.quickblox.com/docs/react-native-quick-start#initialize-quickblox-sdk
Flutter: https://docs.quickblox.com/docs/flutter-quick-start#initialize-quickblox-sdk
2. Register new User:
Before you log in a user, you must create the user on the QuickBlox dashboard
To create a user on QuickBlox, you can use the below function.
//Create an application session.
QB.createSession(function(error, result) {
 // callback function
});

var params = {
  login: login,
  password: "password",
  full_name: "Full name"
};

QB.users.create(params, function(error, result) {
  if (error) {
    done.fail("Create user error: " + JSON.stringify(error));
  } else {
  }
});
Once the user is created, you can now login using the credentials.
To register the user on other platforms, see relevant guide below:
Android: https://docs.quickblox.com/docs/android-authentication#sign-up-user
IOS: https://docs.quickblox.com/docs/ios-authentication#sign-up-user
Web: https://docs.quickblox.com/docs/js-authentication#sign-up-user
React Native: https://docs.quickblox.com/docs/react-native-authentication#sign-up-user
Flutter: https://docs.quickblox.com/docs/flutter-authentication#sign-up-user
3. Login existing User:
var params = { login: "login", password: "password" };

// or through email
// var params = {email: 'login@login.com', password: 'password'};
QB.login(params, function(error, result) {
  // callback function
});
Remember, however, that there is a problem with this approach.
The application credentials can be compromised, because no matter if you store them in plain text, inside .env files, or encrypt/obfuscate it, you cannot guarantee 100% security.
If these credentials are compromised, it’s easy for the attacker to get access to your database and other services.
To login the user on other platforms, see the relevant guide below:
Android: https://docs.quickblox.com/docs/android-authentication#log-in-user
IOS: https://docs.quickblox.com/docs/ios-authentication#log-in-user
Web: https://docs.quickblox.com/docs/js-authentication#log-in-user
React Native: https://docs.quickblox.com/docs/react-native-authentication#log-in-user
Flutter: https://docs.quickblox.com/docs/flutter-authentication#log-in-user
Authenticating with a Custom Identity Provider
In addition to the 2 methods for managing credentials and authentication outlined above, there is one other method that can be used with Custom Identity Provider (CIdP). This method is especially useful when you have an existing user base and you want to integrate it with QuickBlox.
QuickBlox CIdP allows you to delegate authentication to an external service. In this case, user credentials and password management are handled by Identity Provider (IdP).
When CIdP is enabled and configured, users can log in to QuickBlox API with a token generated by a service external to QuickBlox.
Let’s take a look at how CIdP works:
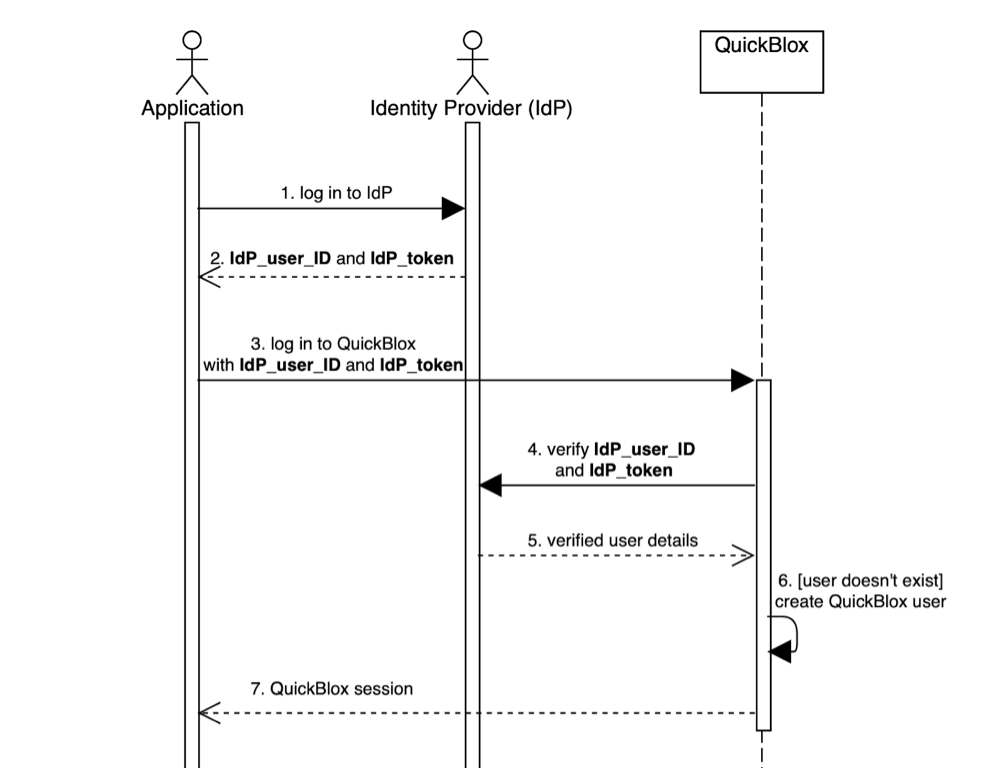
CIdP Workflow
Application: web or mobile application that integrates QuickBlox.
Identity provider (IdP): service that authenticates and verifies user credentials. The service is external to QuickBlox.
IdP_user_ID: user ID in external service.
IdP_token: access token to external service.
Note: This is an Enterprise feature, but can be enabled on a QuickBlox Shared Cloud account as well, by request.
Configure session privacy permissions
Now that you have secure authentication in place, you might also want to configure the permissions for your tokens. Using these permissions you can control what can be accessed using an application session token and the user session token.
To access these settings:
- Head over to the QuickBlox dashboard.
- Select the application for which you want to generate the API key.
- Click on the Settings section from the top right menu.
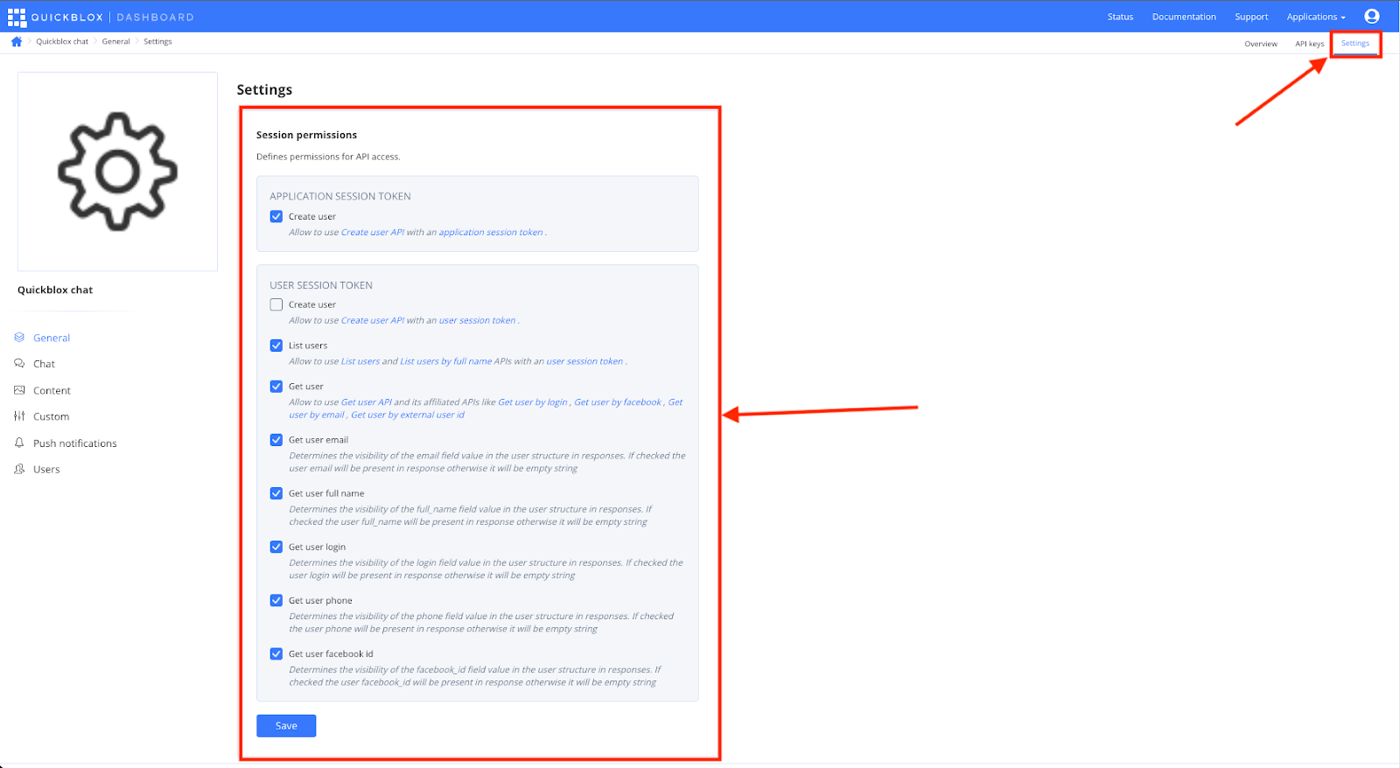
- By default, for development simplicity everything is allowed, but for the production environment it is recommended to set up a more restrictive configuration.
- It’s important to disable the possibility to create users with the application session. Although this is handy to have during development, it’s recommended to disable for the production application.
- Set which fields can be retrieved by other users within the system. Certain data is considered sensitive like email, full name, phone number, login (basically any data that allows someone to to identify a person, e.g. same data is used on public profile in social network).
- After setting the required permissions, click the Save button to save the settings.
Read more about setting permissions here.
Conclusion
QuickBlox is committed to providing secure communication for its customers. By adhering to the best practices outlined in this article, you can safeguard sensitive data, protect user privacy, and prevent unauthorized access to your application’s communication channels.
Have Questions? Need Support?
Join the QuickBlox Developer Discord Community, where you can share ideas, learn about our software, & get support.
Join QuickBlox Discord