If you build mobile applications for the Android platform then you are no doubt already familiar with Android Studio, a popular tool and the official Integrated Development Environment (IDE) for Android app development.
Equally, you’ve likely heard of Github and Git. Git is a free and open-source, distributed version control system that lets you manage and track changes in files used in programming. GitHub, is one of many cloud-based hosting services that allows you to manage your Git repositories. Github enables collaborative project development, as multiple programmers can work on project code together. Developers can track and control code changes made by others and, if necessary, return to a state of code before any given change was made, making it an extremely helpful tool.
Android Studio has a user interface that makes it incredibly easy to work with Git without any additional software. In this article, we will show how to clone a repository and work with it using Android Studio and basic Git commands.
Make sure you have a Github account and Android Studio installed and then read on to discover the best way to work with these tools.
Glossary
Before we get started, here are some useful terms worth understanding:
Branch – Branches allow you to work on new features, fix bugs, or develop new ideas in an isolated space within your repository. Branches are needed to isolate development work, so that other branches in the repository are not affected. The existence of branches means that developers can work together on a project and not interfere with each other’s work.
Commit – A commit is like a snapshot (copy) of your repository at specific times. Commits include metadata in addition to the contents and message, like the author, timestamp, and more. The commit history allows you to track changes and if a mistake was made, you can easily find and return to the commit where it happened.
Repository – A repository is a central location where data for your project is stored and managed. A repository contains all of your project’s files and tracks and saves a history of all changes made to files in a project.
The local repository exists on the local machine and can be seen only by the local user.
The remote repository is stored in the cloud, and its local copies are located on the computers of developers. When a developer makes changes to the local version, it can be synchronized with the remote one.
Step 1: Cloning a repository
First you need to open Android Studio.
- Press the More Actions command (3-dot icon) on the top row.
- Select from the drop-down list “Get from Version Control.”

Then you need to copy the repository URL that you wish to use from Github.
Go to GitHub and select the project you want to clone and copy the repository URL. For example GitHub – QuickBlox Android Samples. QuickBlox code samples for Android provide an efficient way to add chat or video calling functionality to your application, saving you time from having to code from scratch.
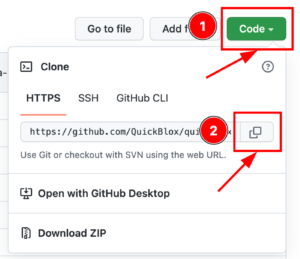
- Press the “Code” button.
- Press the Copy URL icon button.
Now return to Android Studio to clone the repository.
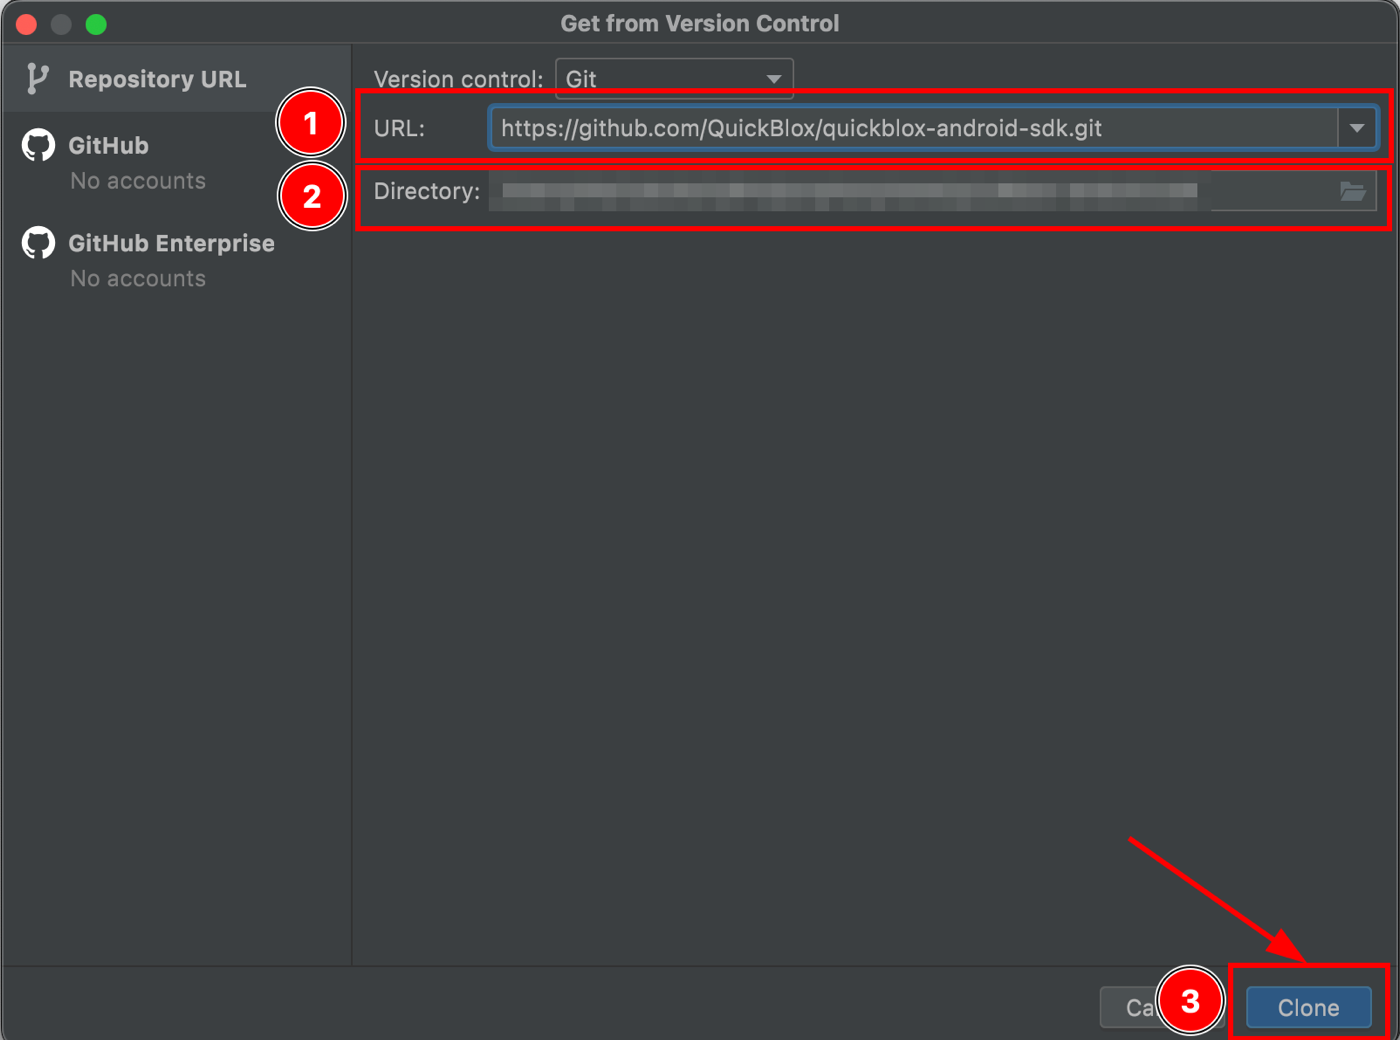
- Insert the URL of the repository that you want to clone.
- Select the directory where the repository will be cloned.
- Press the “Clone” button.
Step 2. Create A New Branch
Now you need to create a new branch where you will work on the code. This is a copy of your workspace in which you can fully work and make changes without affecting the code in the branch from which the copy was made. This allows you to isolate the workflow and not interfere with other developers working on this project.
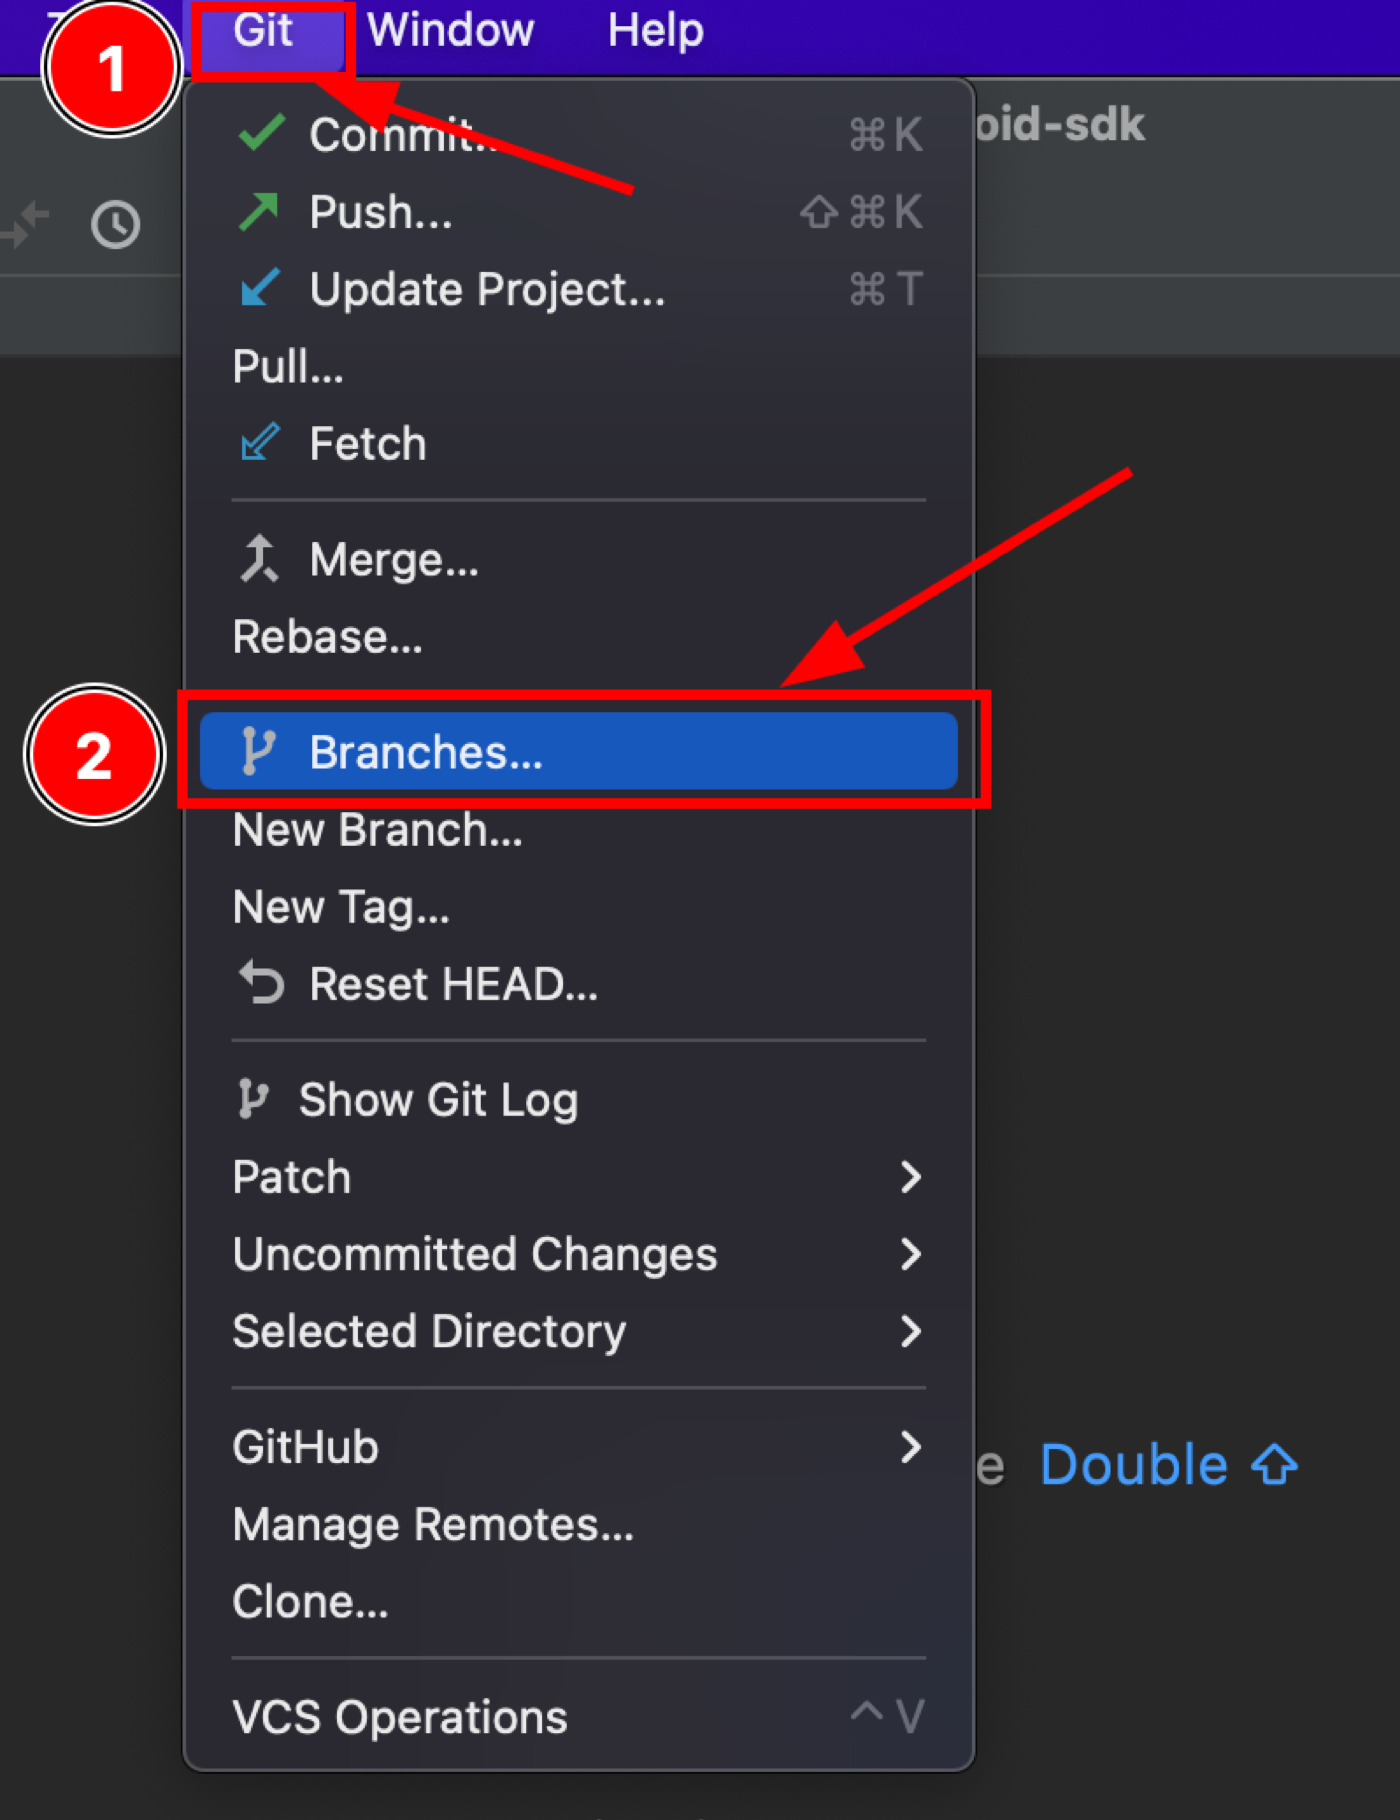
- Press “Git.”
- Select from the drop-down list “Branches.”
This window contains a list of all local and remote branches.
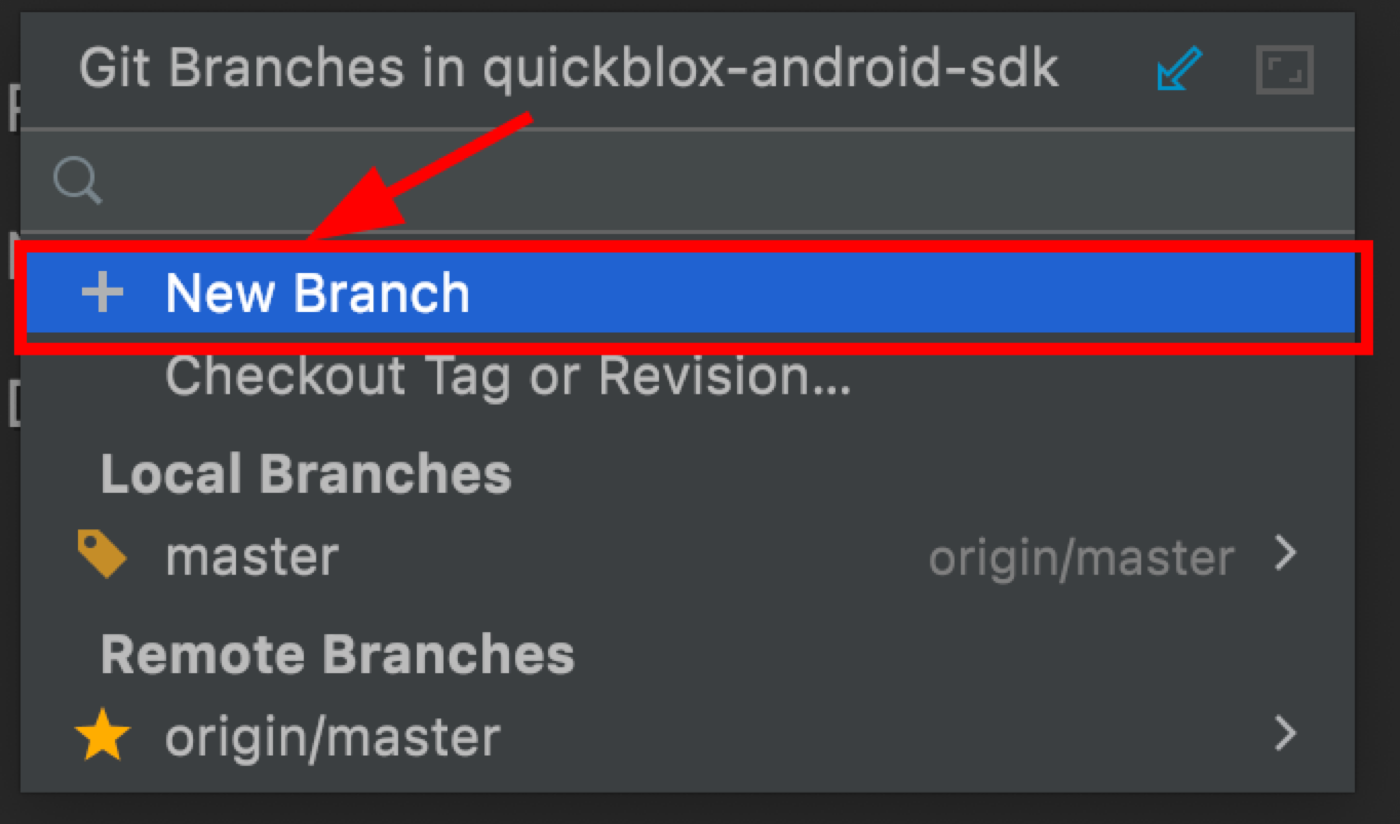
Press “New Branch”
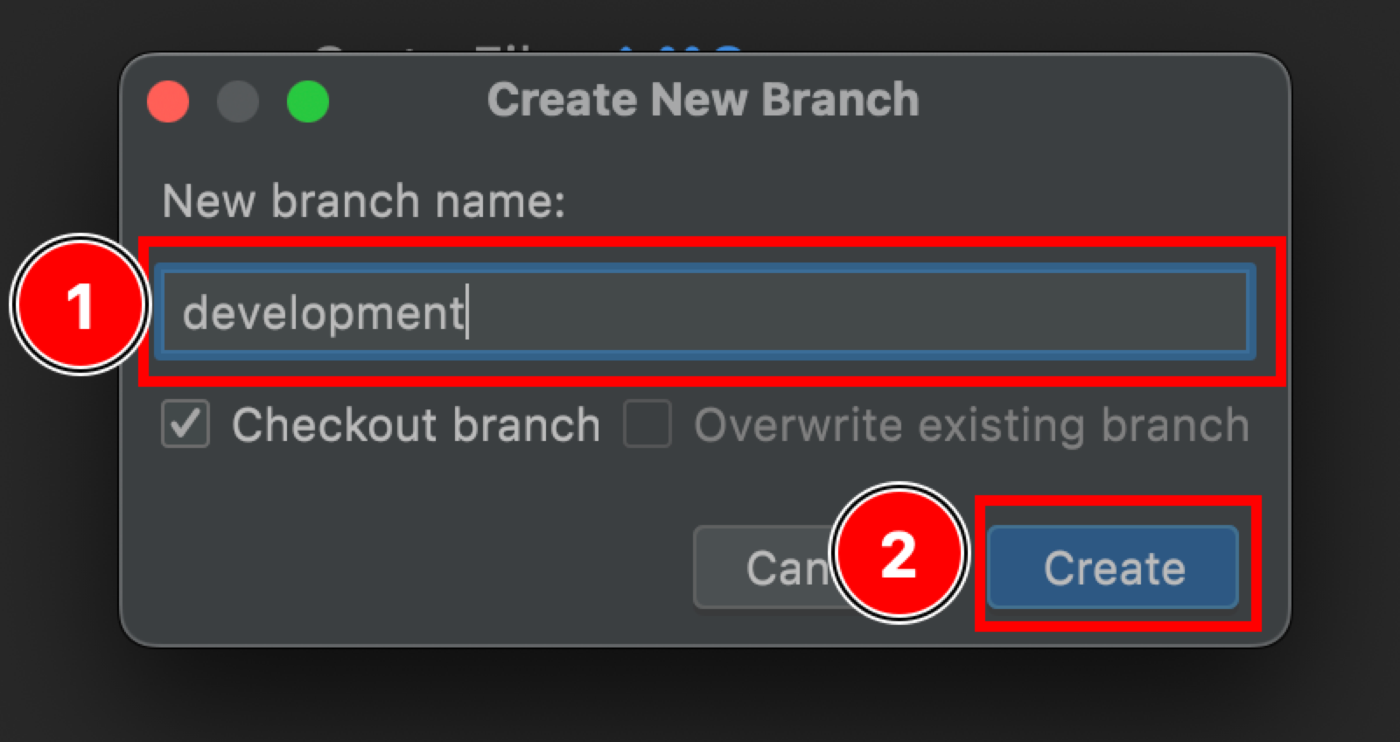
- Enter the name of the new branch.
- Press the “Create” button.
After that, Android Studio will automatically switch to the new branch.
Step 3. Switch branches
To switch between branches you need to go to the window with the list of branches.
- Press the “Git” button.
- Select from the drop-down list “Branches.”
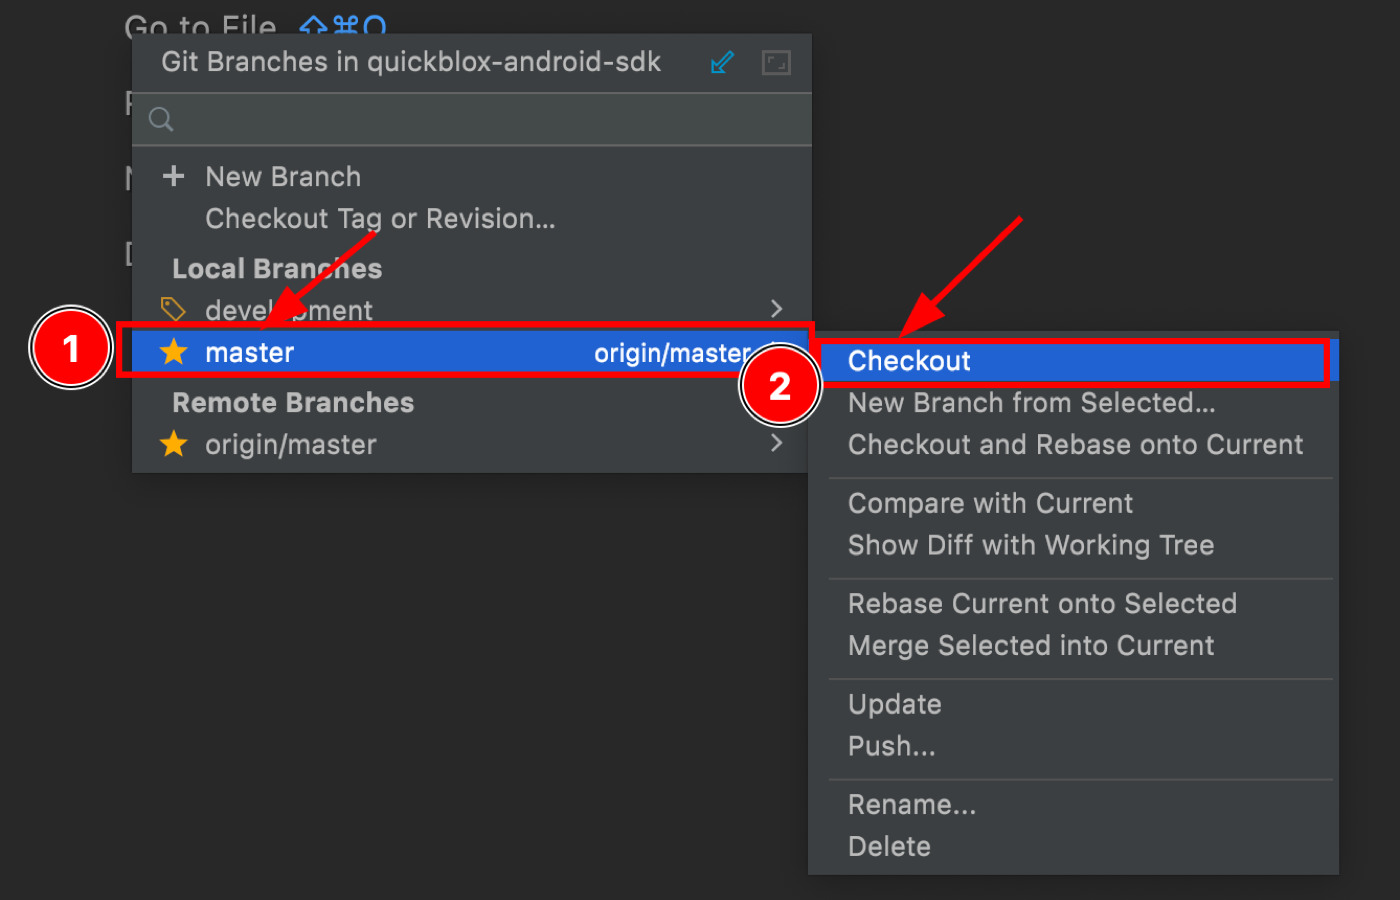
- Select a branch from the list and click on it.
- Select “Checkout” from the drop-down list.
This allows you to change the workspace to the branch of your choice.
Step 4. The Commit Command
This is the command to write indexed changes to a Git repository. It saves (writes) states of the branch on the Git project timeline. The “Commit” command should be used after changing something in the project. For example, we have added a new file with the name “Example.java”, and after that, we can save changes to the local repository branch with the commit command.
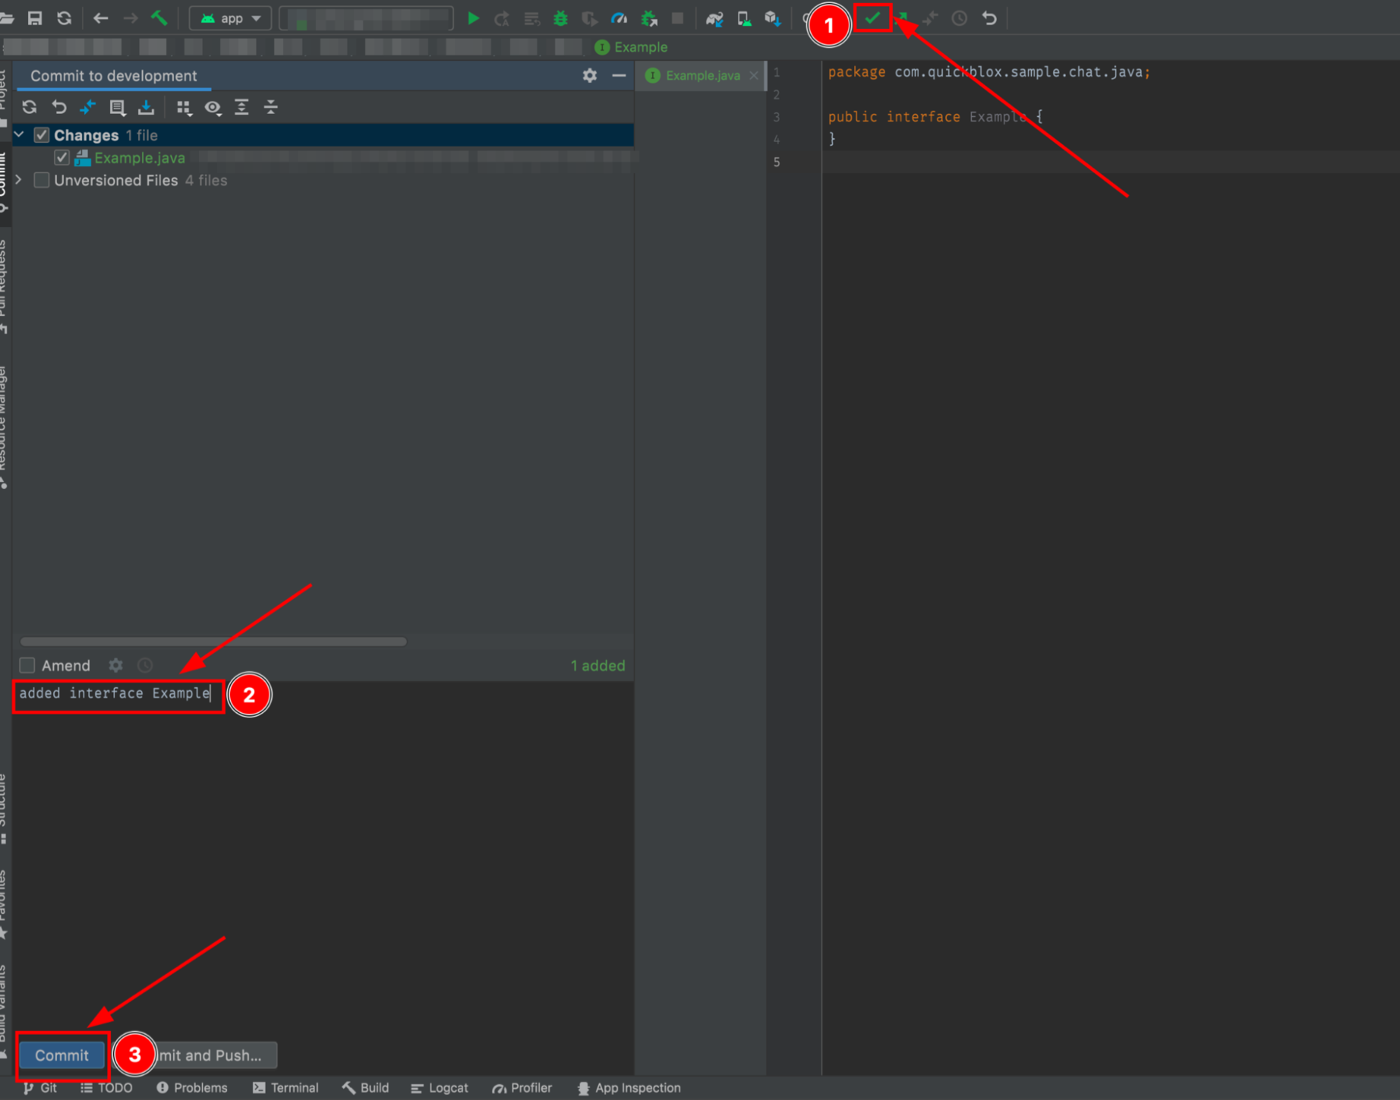
- Press the Commit command (green tick icon) on the toolbar.
- Provide a brief summary of the changes that were added to this commit.
- Press the “Commit” button.
Step 5. The Push Command
The “Push” command will send the local repository branch to the remote repository. It should be used after changes have been committed to a local repository branch. The “push” command can send one or more commits.
Storing data in a remote repository allows you to access content from any computer and other developers who are working on the project can download and apply the actual code to their local repository and stay in sync with the team.
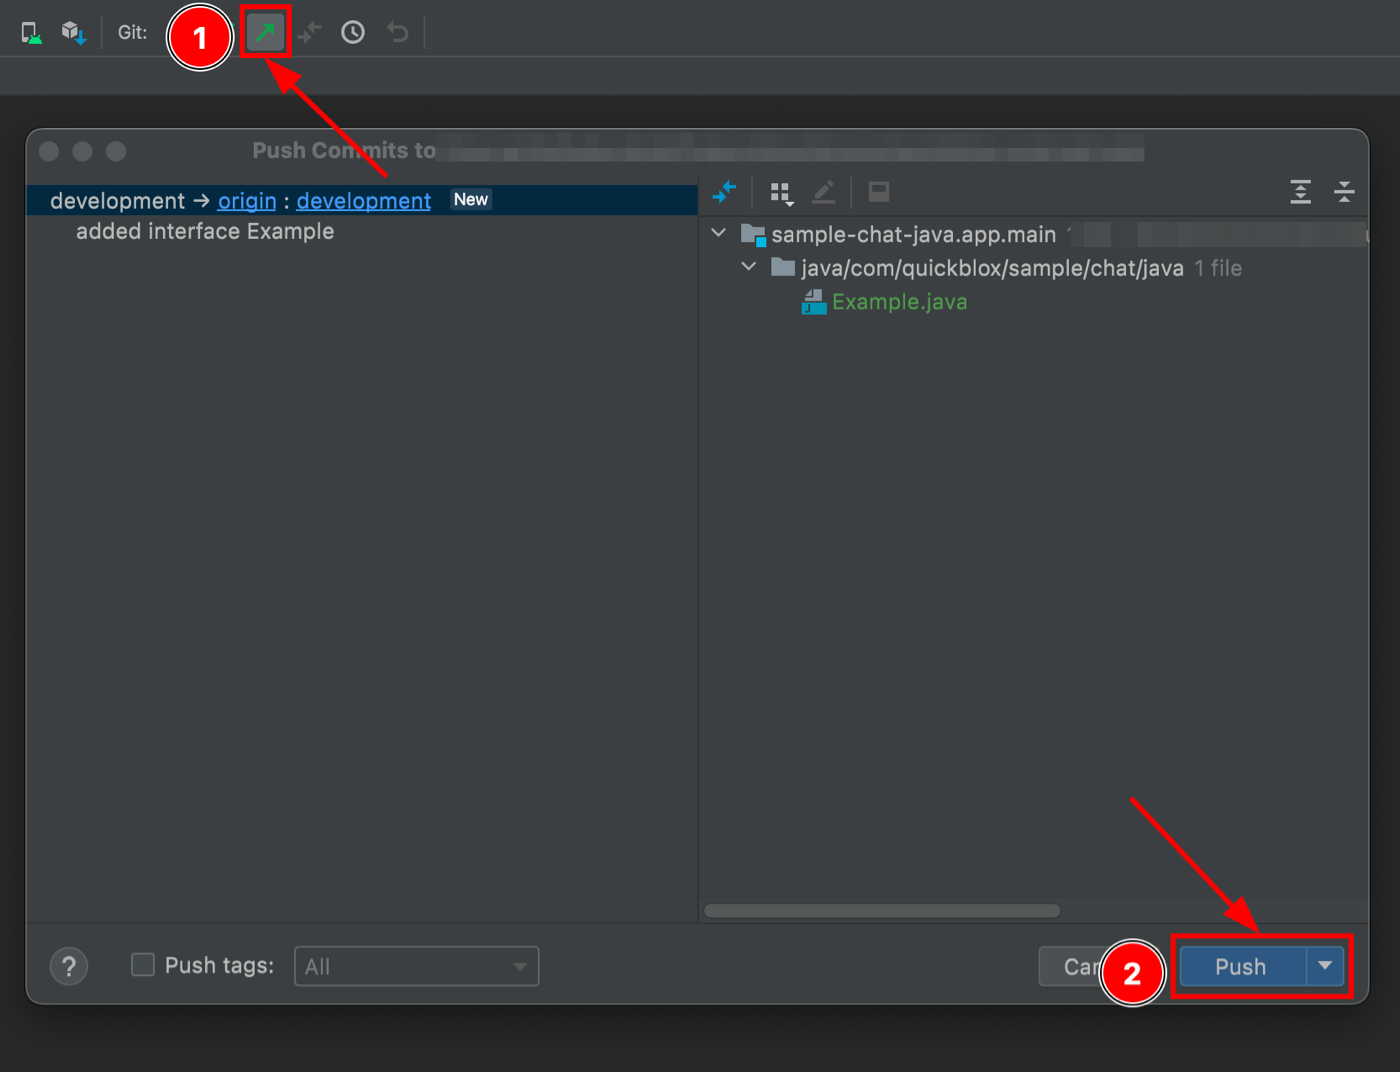
- Press the Push command (green arrow icon) on the toolbar.
- Press the “Push” button.
Step 6. The Pull Command
The “Pull” command is used to retrieve and download content from a remote repository branch and update the local repository branch with that content. This command can be used, for example, if another developer has made changes to the branch code and pushed the changes to a remote repository. For you to have the actual code locally, you need to synchronize your local repository branch with the remote repository branch. After the “Pull” command, the local repository branch will be the same as on the remote.
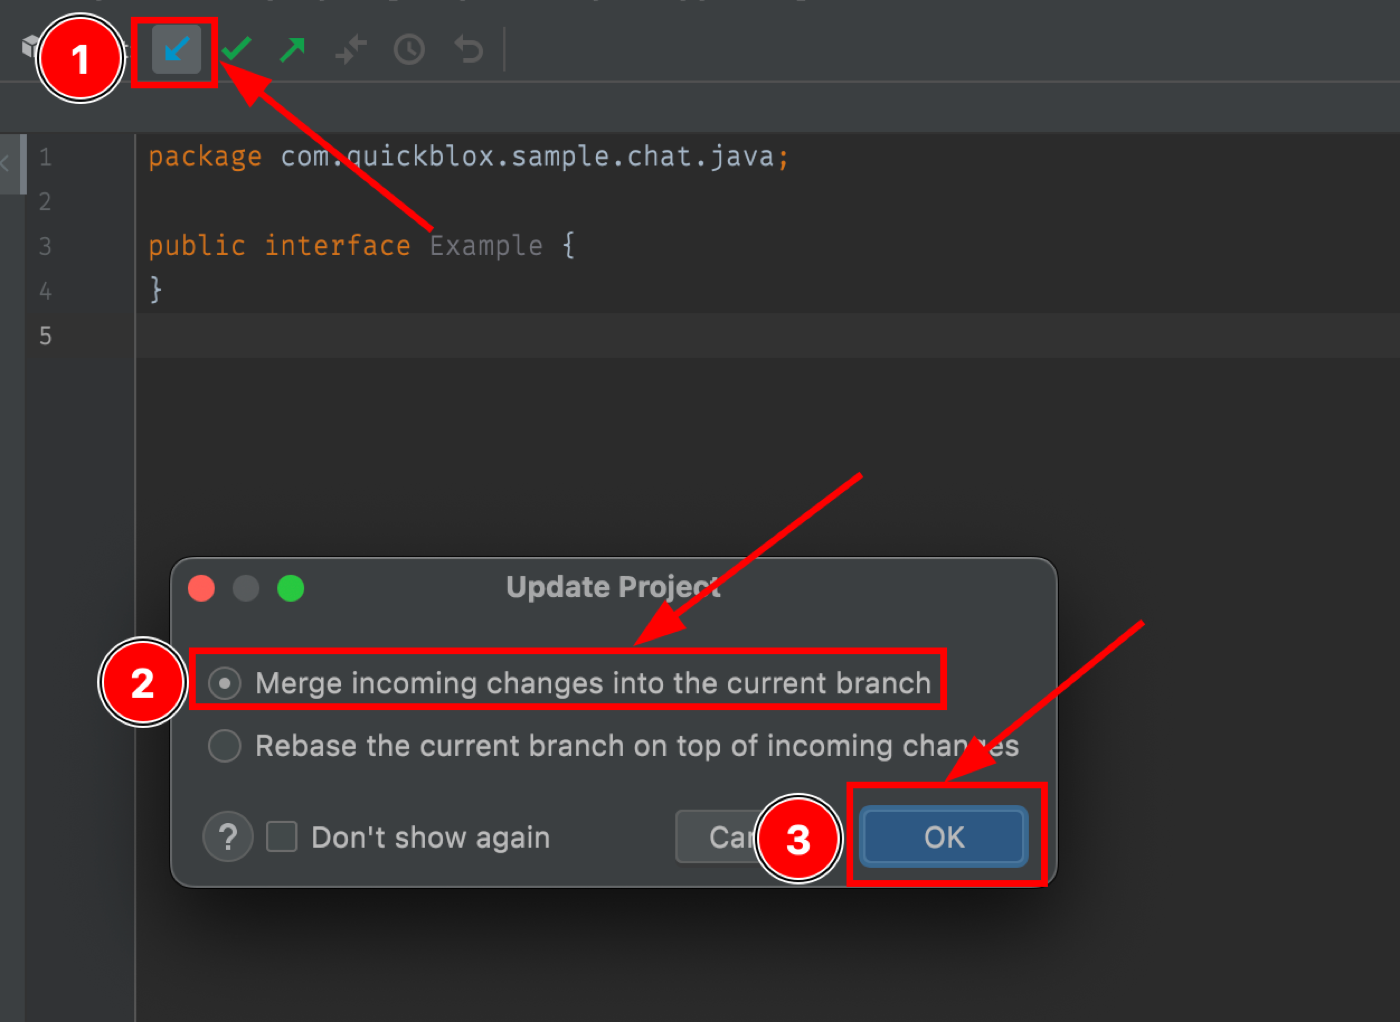
- Press the Update Project command (blue arrow icon) on the toolbar.
- Select “Merge incoming changes into the current branch.”
- Press the “OK” button.
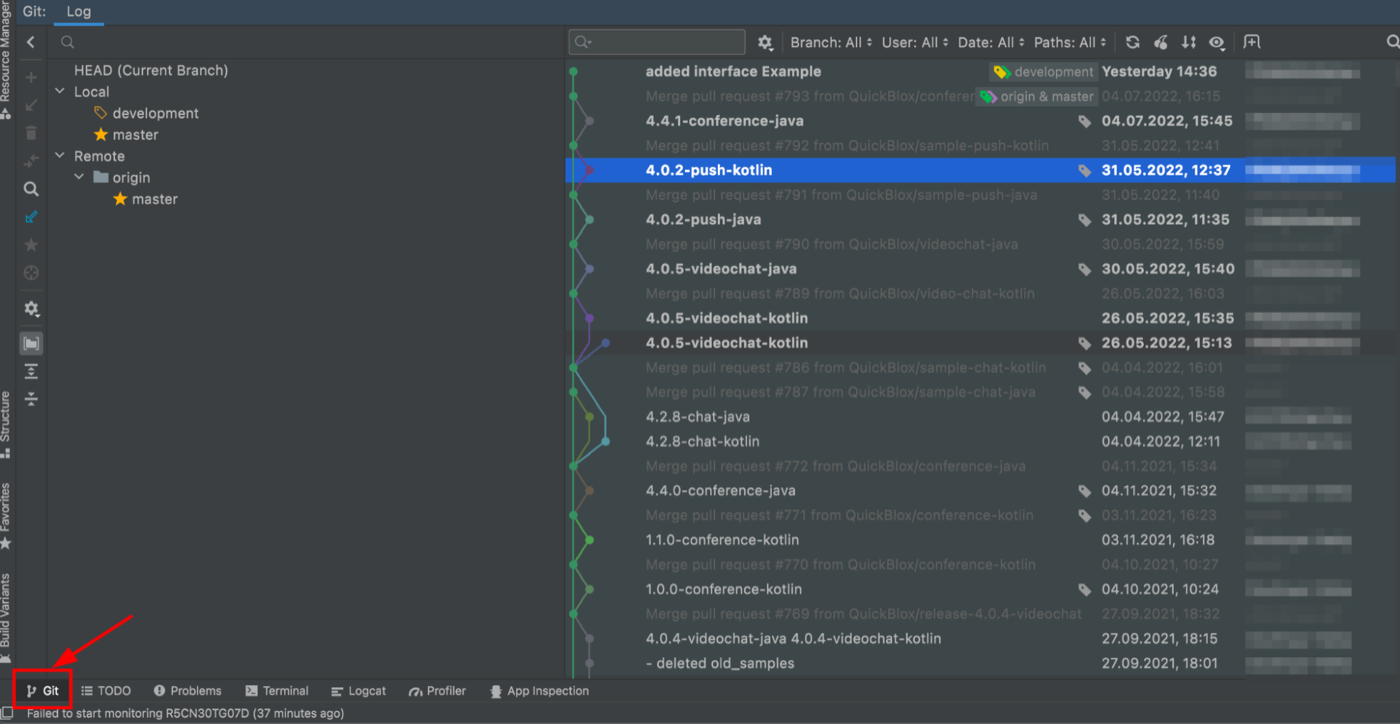
Step 7. Using the Log
You can see the history of commits by pressing on the Git in the lower left-hand corner. Here you can find when and by whom the commit was made and what changes were made.
Conclusion
Android Studio has native integration with Git and GitHub to allow most actions via the Android Studio UI. This makes it much easier to track and manage your Git work, which saves development time. We hope that this article will help you learn how to use basic Git commands with Android Studio so that you can clone a repository and work easily with Git. Happy coding!
Learn more about How to Launch Android Chat and WebRTC Video Conferencing Samples
Learn more about: How to Build An Android Chat App with Kotlin using QuickBlox SDK
Have Questions? Need Support?
Join the QuickBlox Developer Discord Community, where you can share ideas, learn about our software, & get support.
Join QuickBlox Discord
 AI Agent — automate conversations and workflows. Now available on Free plan


Thank you for this guide
We’re glad you found it helpful. Please share what other guides you would like to see.