Summary: This tutorial empowers Android developers to implement phone number authentication within their QuickBlox apps. Learn how to leverage a secure verification process to enhance user security and build trust with your user base. We’ll guide you through the steps involved, ensuring a seamless user experience alongside robust login security.
Table of Contents
Introduction
Ensuring the security and integrity of user data is paramount for any developer. As the use of mobile applications continues to skyrocket, so does the importance of implementing robust authentication mechanisms. Quickblox, a powerful platform for integrating real-time communication features into Android applications, offers a seamless solution for developers seeking to enhance security without sacrificing user experience.
In this tutorial, we’ll demonstrate how to implement phone number authentication in Quickblox Android apps using the Firebase console. Leveraging the simplicity and ubiquity of phone numbers as a means of identity verification, this method not only streamlines the user registration process but also bolsters the overall security of your application.
Phone Number Authentication & Firebase
Phone number authentication provides security and ease of use for users. A phone number helps verify the user’s identity and ensures that only registered users can access the application. IT’s also a convenient method as users won’t need to remember passwords or other credentials. To implement this form of authentication, you’ll be using Firebase. Firebase Authentication offers a convenient interface for user authentication via phone numbers, making the identity verification process fast and easy.
Looking for an alternative authentication method? Check out, A Guide to Email-Password Authentication for Android Apps
Let’s get started!
1. Create a Project in Android Studio
Before you can start your authentication integration, you first need to create a basic project for your Android application.
To set up your project you’ll use Android Studio, which is the official Integrated Development Environment (IDE) for Android.
Here’s a step-by-step guide to creating a new project in Android Studio:
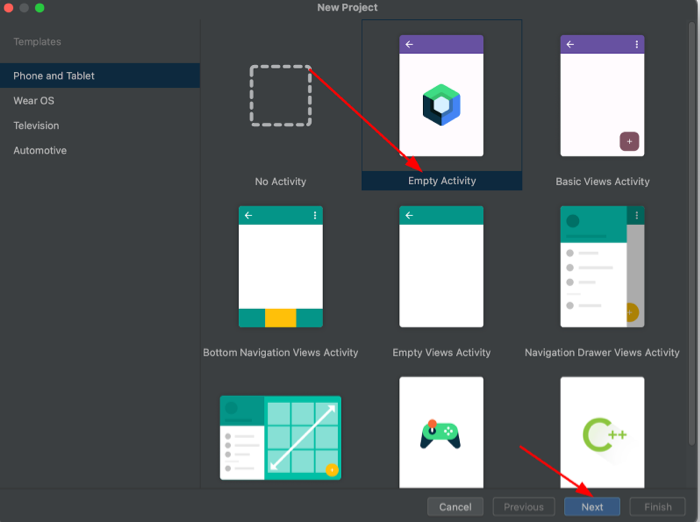
- Open Android Studio on your computer.
- Click on “New Project” from the welcome screen.

- Choose the “Empty Activity” template and click “Next.”
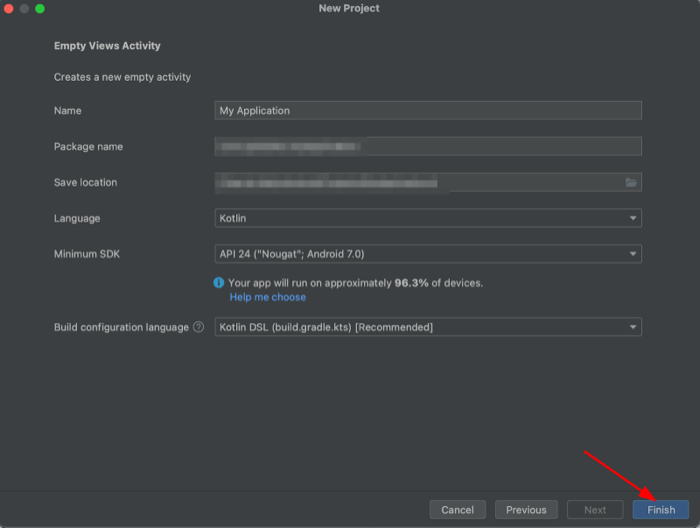
- Enter the name of your application, the package name (e.g., com.example.myapp), and the location to save your project.
- Select the language (Java or Kotlin) and the minimum SDK version for your app.
- Click “Finish” to create your project.
This structured approach ensures that your Android project begins on a solid foundation, setting the stage for seamless integration of authentication features and overall application development.
2. Create a Project in the Firebase Console
Next you’ll create a project in the Firebase console. Firebase offers a convenient platform for managing your project, including authentication, database, hosting, and more. Let’s walk through the steps to create a project:
- Open the Firebase console in your browser.
- Click on the “Add project” button or select an existing project if one already exists.
- Enter the name of your project and select your country/region.
- Click the “Continue” button and wait for the project creation process to complete.
Next you’ll need to configure various Firebase services according to your application’s needs. To do this you will navigate to the “Project settings” section in the Firebase console and configure each Firebase service, such as authentication, database, hosting, and others, according to your requirements.
Let’s look in more detail now at how to configure authentication.
3. Authenticate with Firebase on Android using a Phone Number
You’re now ready to set up phone number authentication in your Android project using Firebase Authentication. You can find a comprehensive description of the process of integrating and configuring Firebase Authentication using phone numbers in the official Firebase Authentication documentation.
3.1. Add logic for obtaining a Firebase token
A Firebase token is a unique identifier generated by Firebase Authentication that verifies the identity of a user signed into your app. It serves as proof of authentication and is required to access Firebase services securely.
By requiring Firebase tokens for access, Firebase Authentication enhances the security of your application, mitigating risks associated with unauthorized access and data breaches.
Firebase tokens streamline the user experience by enabling seamless authentication and access to Firebase services without the need for repetitive login procedures. Furthermore, Firebase tokens integrate seamlessly with Firebase services, allowing for efficient management of user authentication and access control within your Android project.
To obtain a Firebase token in your Android project, follow these steps:
- Create callback functions that process the results of a request to send a verification code.
- Send a verification code.
- Sign in the user and get the Firebase token.
By following these steps, you can successfully obtain a Firebase token in your Android project and utilize it for secure authentication and access to Firebase services.
Now we’ll provide you with some code snippets you’ll need for some additional functionality.
3.2. Create callback functions that process the results of a request to send a verification code
This code demonstrates the use of callbacks to handle the results of Firebase phone number authentication requests.
The callbacks is an instance of the PhoneAuthProvider.OnVerificationStateChangedCallbacks class, where methods are defined to handle different scenarios:
- onVerificationCompleted: invoked upon successful completion of authentication, when the phone number can be automatically verified or the verification code is received.
- onVerificationFailed: invoked upon a failed authentication attempt due to an invalid request or other issues.
- onCodeSent: invoked after sending an SMS with the verification code to the specified phone number.
These methods enable effective handling of Firebase phone number authentication request results and interaction with the user based on the current authentication process status.
private val callbacks = object : PhoneAuthProvider.OnVerificationStateChangedCallbacks() {
   override fun onVerificationCompleted(credential: PhoneAuthCredential) {
       // This callback will be invoked in two situations:
       // 1 - Instant verification. In some cases the phone number can be instantly
       //     verified without needing to send or enter a verification code.
       // 2 - Auto-retrieval. On some devices Google Play services can automatically
       //     detect the incoming verification SMS and perform verification without
       //     user action.

       signInWithPhoneAuthCredential(credential)
   }

   override fun onVerificationFailed(exception: FirebaseException) {
       // This callback is invoked in an invalid request for verification is made,
       // for instance if the the phone number format is not valid.

       when (exception) {
           is FirebaseAuthInvalidCredentialsException -> {
               // Invalid request
           }

           is FirebaseTooManyRequestsException -> {
               // The SMS quota for the project has been exceeded
           }

           is FirebaseAuthMissingActivityForRecaptchaException -> {
               // reCAPTCHA verification attempted with null Activity
           }
       }

       // Show a message and update the UI
   }

   override fun onCodeSent(verificationId: String, token: PhoneAuthProvider.ForceResendingToken) {
       // The SMS verification code has been sent to the provided phone number, we
       // now need to ask the user to enter the code and then construct a credential
       // by combining the code with a verification ID.

       // Save verification ID so we can use them later
       storedVerificationId = verificationId
   }
}
3.3. Send a verification code
Send a verification code to the user’s phone by initiating phone number sign-in. Present the user with an interface prompting them to enter their phone number. It’s essential to inform users that they might receive an SMS message for verification, and standard rates may apply. Then, use the PhoneAuthProvider.verifyPhoneNumber method to request Firebase to verify the user’s phone number. For example:
private fun sendVerificationCode(phoneNumber: String) {
   val fireBaseAuth = FirebaseAuth.getInstance()
   val options = PhoneAuthOptions.newBuilder(fireBaseAuth)
       .setPhoneNumber(phoneNumber) // Phone number to verify
       .setTimeout(60L, TimeUnit.SECONDS) // Timeout and unit
       .setActivity(this) // Activity (for callback binding)
       .setCallbacks(callbacks) // OnVerificationStateChangedCallbacks
       .build()
   PhoneAuthProvider.verifyPhoneNumber(options)
}
3.4. Sign in the user and get Firebase token
- createPhoneAuthCredential(verificationId: String, code: String): This method creates credentials for authentication using a phone number, using the verification ID and code obtained from SMS. It returns a PhoneAuthCredential object.
- getFireBaseTokenFromFireBaseUser(firebaseUser: FirebaseUser?): This method retrieves a Firebase token from a Firebase user. It returns the Firebase token obtained from the FirebaseUser object. If the FirebaseUser object is null, it returns null. It uses an asynchronous task to fetch the token.
- signInWithPhoneAuthCredential(credential: PhoneAuthCredential): This method signs in the user using the credentials provided by the PhoneAuthCredential object. It updates the user interface according to the sign-in result. Upon successful sign-in, it launches an asynchronous task to retrieve the Firebase token.
- createCredentialAndSignIn(verificationId: String, code: String): This method creates credentials for authentication using a phone number with the specified verification ID and code, and then signs in the user using the created credentials.
private fun createPhoneAuthCredential(verificationId: String, code: String): PhoneAuthCredential {
        return PhoneAuthProvider.getCredential(verificationId, code)
    }

    private fun getFireBaseTokenFromFireBaseUser(firebaseUser: FirebaseUser?): String? {
        // Task to get Firebase token from Firebase user

        val task = firebaseUser?.getIdToken(false) ?: return null
        return Tasks.await(task, 10, TimeUnit.SECONDS).token
    }

    private fun signInWithPhoneAuthCredential(credential: PhoneAuthCredential) {
        FirebaseAuth.getInstance().signInWithCredential(credential)
            .addOnCompleteListener(this) { task ->
            if (task.isSuccessful) {
                // Sign in success, update UI with the signed-in user's information

                val firebaseUser = task.result?.user
                GlobalScope.launch(Dispatchers.IO) {
                    val token = getFireBaseTokenFromFireBaseUser(firebaseUser)
                }

            } else {
                // Sign in failed, display a message and update the UI
                if (task.exception is FirebaseAuthInvalidCredentialsException) {
                    // The verification code entered was invalid
                }
                // Update UI
            }
        }
    }

    private fun createCredentialAndSignIn(verificationId: String, code: String) {
        val credential = createPhoneAuthCredential(verificationId, code)
        signInWithPhoneAuthCredential(credential)
    }
After the user receives the verification code and enters it, you need to call the createCredentialAndSignIn method to verify the code and sign the user in. This method takes two parameters: verificationId, which is the identifier obtained during phone number verification initialization, and code, which represents the code entered by the user. Inside the createCredentialAndSignIn method, a PhoneAuthCredential object is created using the provided verification ID and code, and then the signInWithPhoneAuthCredential method is called to authenticate the user using Firebase Authentication services. If the verification is successful, the user is signed in.
4. Create a project in the QuickBlox admin panel
Next you’ll need to create a project in the QuickBlox admin panel. This step is necessary to start using QuickBlox functionality when developing real-time applications.
- Sign-up for a QuickBlox account if you don’t already have one. You can sign in with either your Google or GitHub account.
- To create an app, click the ‘New app‘ button.
- Input the necessary information about your organization into the corresponding fields and click ‘Add‘.
- To get your Application ID, Authorization Key, Authorization Secret, and Account Key go to the ‘Overview‘ section of your app in the Dashboard. Don’t forget to ensure that you securely store your app credentials for future utilization within your application.
For a more detailed description of getting started on QuickBlox, read our official documentation.
5. Working with Authorization Server
An Authorization Server serves as an intermediary entity that manages authentication and authorization processes on behalf of a client application. In our scenario, the Authorization Server will facilitate the establishment of a secure connection between Firebase and QuickBlox, ensuring seamless data exchange.
The Authorization Server will play a pivotal role in acquiring a QuickBlox token using the credentials associated with your QuickBlox application. These credentials are supplied to the Authorization Server for authentication purposes and to gain access to the QuickBlox API.
Further information regarding the the Authorization Server can be found here.
5.1. Example of Integrating OkHttp with the Authorization Server
Various methodologies can be employed to interface with the Authorization Server and facilitate data exchange between Firebase and QuickBlox. One common approach is leveraging libraries such as Retrofit or OkHttp, offering convenient utilities for managing network requests and handling responses.
The subsequent example illustrates the integration of the OkHttp library with the Authorization Server.
Within the RestSource class, the getQBTokenFromAuthServer method is defined to dispatch a request to the Authorization Server, aiming to acquire a QuickBlox token based on the provided Firebase token.
The buildRequestBody method is responsible for crafting the request body, encapsulating the Firebase token in JSON format. Subsequently, the buildAuthorizationRequest function constructs a Request object destined for the Authorization Server, specifying the URL and content type.
Furthermore, the buildClient method instantiates an OkHttp client with timeout configurations.
Upon receiving a response from the Authorization Server, the parseAnswerFrom function is invoked to extract the QuickBlox token from the JSON response.
This illustration showcases a straightforward approach to interface with an Authorization Server using OkHttp in Kotlin.
class RestSource {
   fun getQBTokenFromAuthServer(firebaseToken: String): String {
       try {
           val requestBody = buildRequestBody(firebaseToken)
           val request = buildAuthServerRequest(requestBody)

           val response = buildClient().newCall(request).execute()

           val isNotSuccessfulResponse = response.isSuccessful
           if (isNotSuccessfulResponse) {
              // Handle error
           }

           val body = response.body?.string()
           if (body?.isBlank() == true) {
               throw Exception("The response without answer content")
           }

           return parseAnswerFrom(body!!)
       } catch (exception: Exception) {
           throw Exception("${exception.message}")
       }
   }

   private fun buildRequestBody(firebaseToken: String): RequestBody {
       val requestJsonObject = JSONObject()
       requestJsonObject.put("access_token", firebaseToken)

       val body: RequestBody = requestJsonObject.toString().toRequestBody()

       return body
   }

   private fun buildAuthServerRequest(requestBody: RequestBody): Request {
       val request = Request.Builder().url("https://api-url/session/phone")
           .addHeader("Content-Type", "application/json")
       request.post(requestBody)

       return request.build()
   }

   private fun buildClient(): OkHttpClient {
       val clientBuilder: OkHttpClient.Builder =
           OkHttpClient.Builder()
                  .connectTimeout(20,TimeUnit.SECONDS)
                  .writeTimeout(20, TimeUnit.SECONDS)
                  .readTimeout(20, TimeUnit.SECONDS)


       return clientBuilder.build()
   }


   private fun parseAnswerFrom(body: String): String {
       val json = JSONObject(body)
       val session = (json.get("session") as JSONObject)
       val token = session.get("token")

       val result = token.toString()

       return result
   }
}
5.2 Authorization in QuickBlox
After obtaining the QuickBlox token from the Authorization Server, it is necessary to use it for authentication in the QuickBlox Android SDK. For this purpose, you can use the signInToQuickBloxWithFireBaseToken method, which takes the Firebase token as a parameter and returns a QuickBlox session object upon successful authentication.
private fun signInToQuickBloxWithFireBaseToken(fireBaseToken: String): QBSession? {
    try {
        // Obtaining the QuickBlox token from the auth server
        val qbToken = RestSource().getQBTokenFromAuthServer(fireBaseToken)

        // Authenticating in QuickBlox using the obtained token
        return QBAuth.startSessionWithToken(qbToken).perform()
    } catch (exception: Exception) {
        // Handling possible errors
        // Handle error
        return null
    }
}
This method sends the Firebase token to the Authorization Server to obtain the QuickBlox token and then uses it for authentication in QuickBlox. Upon successful authentication, the method returns a QuickBlox session object, which can be used for subsequent requests to the QuickBlox API. If an error occurs during authentication, the method returns `null`, and the error can be handled accordingly.
Conclusion
In this article, we discussed the key steps in creating authentication for Android mobile applications using phone numbers. Starting from creating a project in Android Studio and configuring it in the Firebase Console, we proceeded to implement authentication via Firebase using phone numbers and interacting with an Authorization Server for secure data exchange between Firebase and QuickBlox.
The use of Firebase and QuickBlox technologies not only provides straightforward and convenient user authentication but also ensures security and efficient interaction between various components of the application.
The steps outlined in this article provide developers with a reliable set of tools for successfully integrating phone number-based authentication into their mobile applications, contributing to the creation of a convenient and secure user experience.
Have Questions? Need Support?
Join the QuickBlox Developer Discord Community, where you can share ideas, learn about our software, & get support.
Join QuickBlox Discord
 AI Agent — automate conversations and workflows. Now available on Free plan