 AI Agent — automate conversations and workflows. Now available on Free plan

How to Build In-App Chat in a React Web Application
 Last Update: Jun 18, 2026

If you need to add real-time 1:1 chat to a React + TypeScript app, the QuickBlox JavaScript SDK lets you do it with a single npm install. No backend server, no signaling layer to wire up, no message broker to operate. By the end of this tutorial, you’ll have a working page where two authenticated users exchange private messages in real time. This is the same primitive that powers in-app support chat, peer-to-peer messaging in marketplaces, customer-to-agent conversations, and patient-to-provider flows in healthcare, fintech, and education products.
This tutorial uses Vite as the build tool — it’s the default for new React projects in 2025–2026. — and displays a Webpack alternative in the project-setup section so you can choose the one your team is already using.
Prerequisites
Before starting, make sure you have:
-
Node.js 18+ installed —
node --version -
npm —
npm --version(or: yarn / pnpm — any package manager works) -
A QuickBlox account — Sign up
-
Working knowledge of: React function components, hooks (
useState,useEffect,useReducer,useContext), TypeScript basics, async/await
Time: ~45 minutes
The QuickBlox JS SDK needs an HTTP origin for its real-time connection — the dev server provided by Vite or Webpack handles that automatically, so you won’t need a separate static server.
How It Works
Adding QuickBlox to a React app means walking through a short sequence of setup steps before the first message can fly. You register an application in the QuickBlox Dashboard and copy out the four keys it gives you, then hand those keys to the SDK so it knows which project to talk to. Next you sign the user in by passing a login and password; QuickBlox checks the credentials and returns a temporary token that authenticates every request after that. With the user signed in, the app opens a real-time chat connection that stays open in the background and delivers incoming messages to the browser the moment they arrive. The final piece is a small handler function you attach to the SDK: it runs every time a new message comes in. Once all five pieces are in place, the app can send and receive freely.
A conversation in QuickBlox is called a dialog — a container for messages between a fixed set of users. This tutorial uses a private dialog, which is a conversation between two users. You don’t need to create it in advance: when one user sends the first message to another, the server creates the dialog between them and assigns it an ID that you later use to load the history.
In a React application, the integration is typically organized into several small layers: thin service modules that wrap SDK calls in Promises, custom hooks that own the side effects, a Context + reducer that holds shared state across components, and presentational components that render the UI based on that state. This is the same React architecture you’d use for any data-fetching app — QuickBlox just happens to be the data source.
Create your QuickBlox application
Sign in to the QuickBlox Dashboard and create a new application. The Dashboard is QuickBlox’s web UI for managing applications, users, and credentials. You’ll return to it whenever you add users or look up keys.
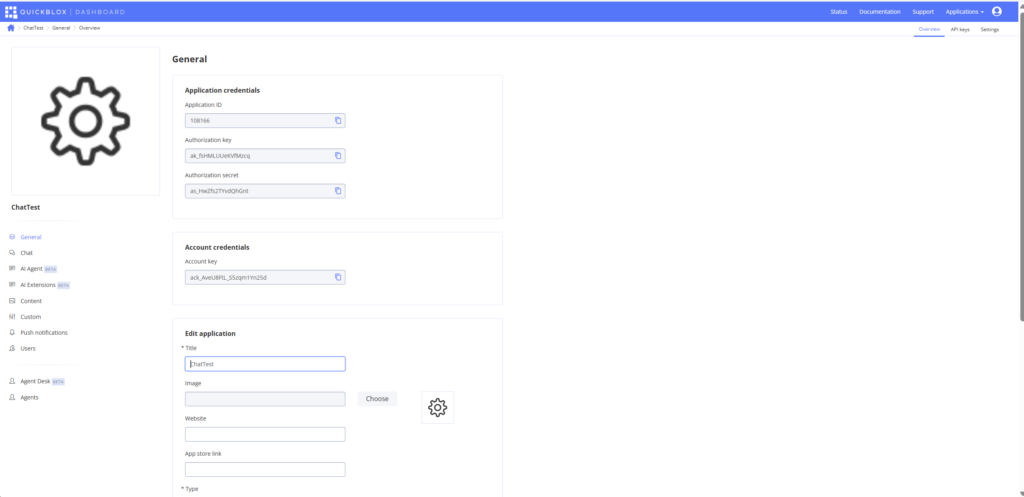
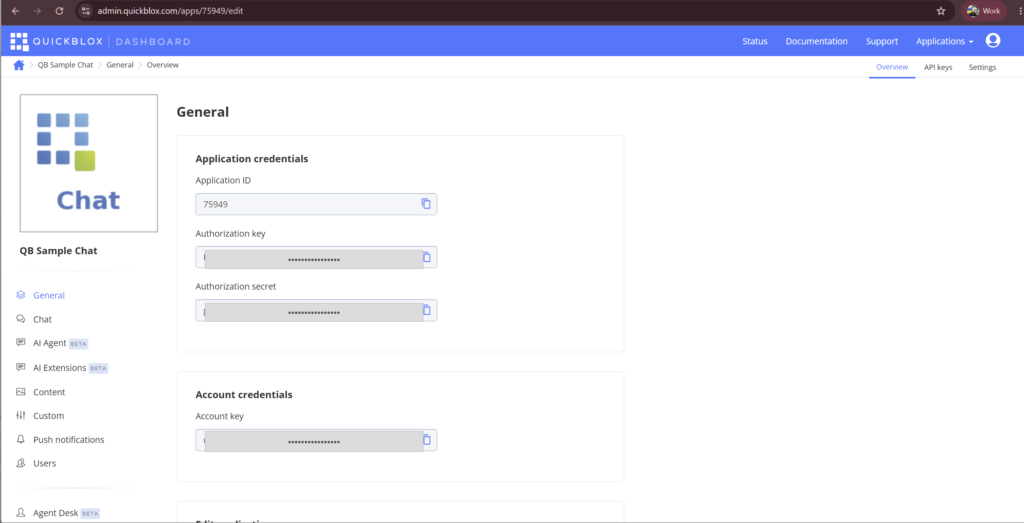
On the Overview tab of the new application, copy these four values — together they’re called your App Credentials:
-
Application ID (a number)
-
Authorization Key
-
Authorization Secret
-
Account Key (shown on the same Overview tab as the three values above)
Keep these somewhere you can paste from when you set up the project. The Authorization Secret in particular gives anyone who has it the ability to authenticate as any user in your app, so treat it like a password.
Create two test users
Still in the Dashboard, open the Users tab on your app and click Add new user.
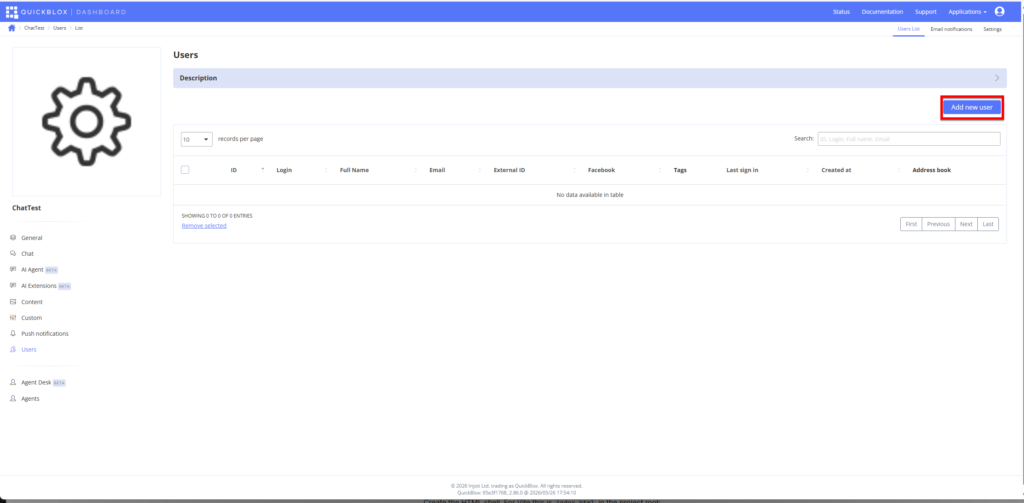
Create two users — for example:
-
User A — login
artik, passwordpassword123 -
User B — login
artimed, passwordpassword123
Note the numeric ID column for each user — you’ll need both IDs when you set up the project so that each user can open a dialog with the other.
Two test users are the minimum for a meaningful chat — one sends, the other receives, and both happen from the same project folder once everything is wired up.
Set up the project
The project has a simple structure. All main source files are located in the src/ folder in the GitHub repository:
in-app-chat-react/
├── index.html
├── package.json
├── tsconfig.json
├── vite.config.ts
└── src/
├── main.tsx
├── App.tsx
├── config.ts
├── types/
│ └── quickblox.ts
├── services/
│ ├── auth.ts
│ └── chat.ts
├── context/
│ ├── QuickBloxContext.tsx
│ ├── reducer.ts
│ └── types.ts
├── hooks/
│ ├── useAuth.ts
│ ├── useDialog.ts
│ ├── useMessages.ts
│ └── useChatListeners.ts
├── components/
│ ├── LoginScreen.tsx
│ ├── ChatScreen.tsx
│ ├── Conversation.tsx
│ ├── MessageList.tsx
│ └── MessageInput.tsx
└── styles/
└── App.css
The CSS file is plain layout boilerplate — copy src/styles/App.css from the GitHub repo into src/styles/App.css. The rest of the files you’ll create in this tutorial.
Set up with Vite
Create a project folder, initialize npm, and install React and Vite:
mkdir in-app-chat-react && cd in-app-chat-react
npm init -y
npm install react@19.0.0 react-dom@19.0.0
npm install --save-dev vite@6.0.7 @vitejs/plugin-react@4.3.4 typescript@5.7.3 \
@types/react@19.0.0 @types/react-dom@19.0.0 @types/node@20.17.19
Install the QuickBlox SDK as a regular npm dependency:
npm install quickblox@2.23.0[Output]
added 4 packages, and audited 5 packages in 2sThe SDK is a CommonJS package that runs in the browser, on Node.js, and on React Native — it ships shims for the platforms it doesn’t need. In a browser bundler those shims become dead branches, but Vite still tries to resolve them at build time and fails with Failed to resolve import “nativescript-xmpp-client“. The fix is one line in vite.config.ts: alias both shim packages to a tiny empty module.
Create src/empty-shim/index.js:
// Stub for the NativeScript/Node platform shims that QuickBlox SDK
// declares as dependencies but only requires on those platforms. In the
// browser they're dead-branched after Utils.getEnv() — but bundlers still
// try to resolve them at build time.
module.exports = {}
Create vite.config.ts:
import { fileURLToPath, URL } from 'node:url'
import { defineConfig } from 'vite'
import react from '@vitejs/plugin-react'

const emptyShim = fileURLToPath(new URL('./src/empty-shim/index.js', import.meta.url))

export default defineConfig({
  plugins: [react()],
  resolve: {
    alias: {
      'nativescript-xmpp-client': emptyShim,
      'node-xmpp-client': emptyShim,
    },
  },
  server: {
    port: 3007,
    host: true,
  },
  preview: {
    port: 3007,
  },
})
Create tsconfig.json:
{
  "compilerOptions": {
    "target": "ES2020",
    "lib": ["DOM", "DOM.Iterable", "ES2020"],
    "module": "ESNext",
    "moduleResolution": "bundler",
    "strict": true,
    "jsx": "react-jsx",
    "esModuleInterop": true,
    "skipLibCheck": true,
    "forceConsistentCasingInFileNames": true,
    "resolveJsonModule": true,
    "isolatedModules": true,
    "noEmit": true,
    "baseUrl": "./src",
    "types": ["vite/client"]
  },
  "include": ["src/**/*", "vite.config.ts"]
}
Open package.json and replace the scripts block with Vite commands and set “type“: “module“:
{
  "name": "in-app-chat-react",
  "private": true,
  "type": "module",
  "scripts": {
    "start": "vite",
    "build": "vite build",
    "preview": "vite preview"
  }
}
Add credentials and the test users
Create src/config.ts and paste your App Credentials in. This is the only file with secrets — keep it out of version control if you push the project somewhere:
// Configuration — App Credentials from the QuickBlox Dashboard.
// Overview → appId, authKey, authSecret
// Account Settings → accountKey

export const QB_CONFIG = {
  appId: 0, // Application ID — a number
  authKey: 'YOUR_AUTH_KEY',
  authSecret: 'YOUR_AUTH_SECRET',
  accountKey: 'YOUR_ACCOUNT_KEY',

  // Two test users. The page reads ?user=A or ?user=B from the URL and
  // pre-fills the login form. Each profile carries the OTHER user's id as
  // opponentId, so two tabs (?user=A and ?user=B) automatically point at
  // each other and the 1:1 chat works without editing this file.
  users: {
    A: { login: 'YOUR_USER_A_LOGIN', password: 'YOUR_USER_A_PASSWORD', opponentId: 0 },
    B: { login: 'YOUR_USER_B_LOGIN', password: 'YOUR_USER_B_PASSWORD', opponentId: 0 },
  } as Record<string, { login: string; password: string; opponentId: number }>,

  messagesPerPage: 50,
}

export const DIALOG_TYPE = {
  PUBLIC: 1,
  GROUP: 2,
  PRIVATE: 3,
} as const
Substitute your real values from the Dashboard’s Overview tab, then fill in the two users you created on the Users tab: each profile’s login and password is for that user, and each profile’s opponentId is the other user’s numeric ID.
Let’s see how to work with the SDK’s own types. Create src/types/quickblox.ts. The QuickBlox package ships its own quickblox.d.ts with the full set of shapes — QBUser, QBSession, QBChatDialog, QBChatMessage and so on, each with every field the API can return. For a 1:1 chat we only read a few of those fields, so instead of importing the full shapes we declare narrow versions in this file (QBUser, QBSession, QBDialog, QBMessage) that list only what we actually use. The same file also defines AppMessage — our own app-level shape for a message in React state and in the chat UI (with isOwn, a single dialogId, and dateSent as a unix-seconds number). We convert a raw SDK message to AppMessage once when history loads and once when a real-time message arrives; the rest of the app works with AppMessage only. QBListResult<T> is a small generic wrapper for paginated list responses — the SDK does not export a generic version, so we describe it here once.
export interface QBUser {
  id: number
  login: string
}

export interface QBSession {
  id: number
  token: string
  user_id: number
  created_at: string
  updated_at: string
}

export interface QBDialog {
  _id: string
  type: 1 | 2 | 3
  name: string
  user_id: number
  occupants_ids: number[]
  last_message?: string
  last_message_date_sent?: number
  updated_at: string
}

export interface QBMessage {
  _id?: string
  id?: string
  chat_dialog_id: string
  dialog_id?: string
  message: string
  body?: string
  sender_id: number
  recipient_id?: number | null
  date_sent: number
  extension?: Record<string, unknown>
}

export interface QBListResult<T> {
  items: T[]
  total_entries?: number
  limit?: number
  skip?: number
}

// Message as carried through React state — same shape as a chat bubble needs.
export interface AppMessage {
  id: string
  dialogId: string
  senderId: number
  body: string
  dateSent: number
  isOwn: boolean
}
The project folder, package.json, config.ts, and the types are in place. The next step initializes the SDK and renders the page shell.
Initialize the SDK
Two things have to happen before any chat code can run: the HTML shell has to mount React, and the SDK has to be initialized with your App Credentials inside a service module so the rest of the app can import it.
Create the HTML shell. For Vite this is index.html in the project root:
<!DOCTYPE html>
<html lang="en">
<head>
<meta charset="UTF-8" />
<meta name="viewport" content="width=device-width, initial-scale=1.0" />
<title>QuickBlox Web Chat — React</title>
</head>
<body>
<div id="root"></div>
<script type="module" src="/src/main.tsx"></script>
</body>
</html>
The <script type="module" src="/src/main.tsx"></script> line is what Vite uses to find the React entry.
Create src/main.tsx (Vite) — the React mount point:
import React from 'react'
import { createRoot } from 'react-dom/client'

import { App } from './App'
import './styles/App.css'

const container = document.getElementById('root')
if (!container) throw new Error('#root element missing in index.html')

createRoot(container).render(<App />)
Create src/services/auth.ts — the SDK initialization happens inside the login function, on every sign-in, so the credentials reach the SDK only when the user clicks Sign in:
// Auth service — wraps QB.init / QB.createSession / QB.chat.connect.
// Direct mode: the browser knows appId + authKey + authSecret + accountKey
// and runs the full login flow itself.

import QB from 'quickblox'

import { QB_CONFIG } from '../config'
import type { QBSession, QBUser } from '../types/quickblox'

export interface LoginResult {
  user: QBUser
  session: QBSession
}

export function login({
  login: username,
  password,
}: {
  login: string
  password: string
}): Promise<LoginResult> {
  return new Promise((resolve, reject) => {
    console.log('[Init] QB.init — sending App Credentials, appId:', QB_CONFIG.appId)
    QB.init(
      QB_CONFIG.appId,
      QB_CONFIG.authKey,
      QB_CONFIG.authSecret,
      QB_CONFIG.accountKey,
      { debug: false },
    )
    console.log('[Init] QB.init — done, global QB object is ready')

    // Authentication and chat-connect logic is added in the next section.
  })
}

export function logout(): Promise<void> {
  return new Promise((resolve) => {
    try {
      QB.chat.disconnect()
    } catch {
      // disconnect can throw if already disconnected — safe to ignore
    }
    if (QB.service) {
      QB.destroySession(() => resolve())
    } else {
      resolve()
    }
  })
}
Create the minimal shell src/App.tsx and the empty Context — full implementations land in the next sections:
import React from 'react'

import { LoginScreen } from './components/LoginScreen'

export function App() {
  return <LoginScreen />
}
Create a placeholder src/components/LoginScreen.tsx so the app compiles:
import React from 'react'

export function LoginScreen() {
  return <section className="screen screen--login"><div className="card"><h1>Web Chat</h1></div></section>
}
Start the dev server:
npm start[Output]
VITE v6.0.7 ready in 318 ms
➜ Local: http://localhost:3007/
➜ Network: use --host to expose
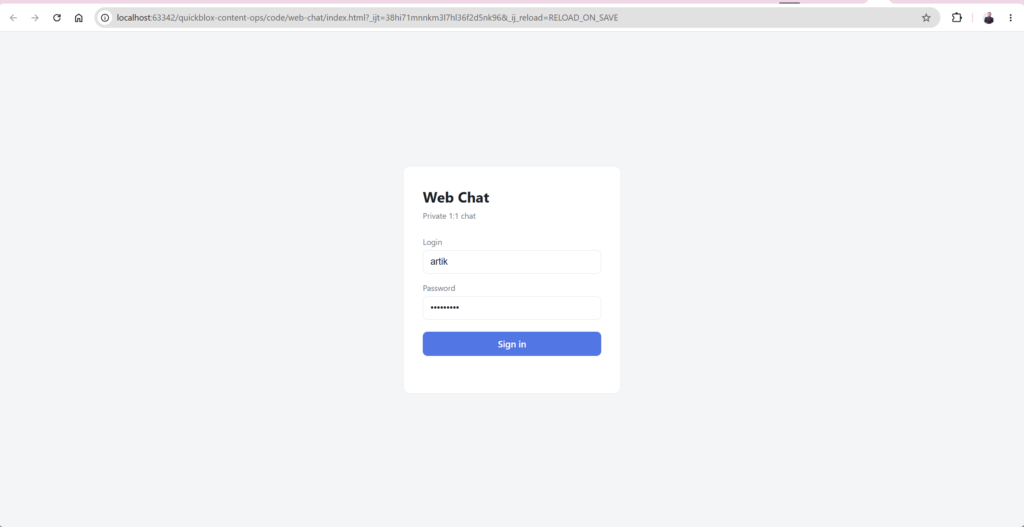
Open http://localhost:3007/?user=A. The page renders the empty card — the inputs and the SDK initialization arrive in the next section.
This is the first verifiable checkpoint. If the page is blank and the browser console shows Failed to resolve import “nativescript-xmpp-client“, the alias in vite.config.ts wasn’t picked up — restart the dev server. If you see Error: #root element missing in index.html, the <div id="root"></div> is missing from the HTML shell.
Log in and connect to chat
Add the authentication and chat-connect logic to the login Promise in src/services/auth.ts, replacing the // Authentication and chat-connect logic placeholder:
console.log('[Auth] QB.createSession — sending login:', username)
QB.createSession(
  { login: username, password },
  (err: unknown, session: QBSession) => {
    if (err) {
      console.error('[Auth] QB.createSession — failed:', err)
      return reject(err)
    }

    console.log('[Auth] QB.createSession — received session, user_id:', session.user_id)
    const user: QBUser = { id: session.user_id, login: username }

    console.log('[Chat] QB.chat.connect — sending userId:', user.id)
    QB.chat.connect({ userId: user.id, password }, (connectErr: unknown) => {
      if (connectErr) {
        console.error('[Chat] QB.chat.connect — failed:', connectErr)
        return reject(connectErr)
      }

      console.log('[Chat] QB.chat.connect — connected, ready to send and receive')
      resolve({ user, session })
    })
  },
)
Authentication runs in two SDK calls, performed in order. First, the user is authenticated against the QuickBlox REST API, which returns the user’s numeric ID — this is done by calling QB.createSession, taking the user’s login and password. Then, the persistent real-time channel is opened using that returned ID — this is the role of QB.chat.connect, taking an object with userId and password. The password field accepts either the user’s actual password or a session token; this tutorial uses the password for simplicity. In production you’d authenticate on a backend and pass a session token to the client instead; a separate article covers that pattern — see Next Steps.
Now create the Context — it holds the current user, session, dialog, and messages, and is read by every component that renders chat. Create src/context/types.ts:
import type { AppMessage, QBDialog, QBSession, QBUser } from '../types/quickblox'

export interface ChatState {
  user: QBUser | null
  session: QBSession | null
  dialog: QBDialog | null
  messages: AppMessage[]
}

export type ChatAction =
| { type: 'auth/logged-in'; user: QBUser; session: QBSession }
| { type: 'auth/logged-out' }
| { type: 'dialog/set'; dialog: QBDialog | null }
| { type: 'messages/set'; messages: AppMessage[] }
| { type: 'messages/append'; message: AppMessage }

export const initialChatState: ChatState = {
  user: null,
  session: null,
  dialog: null,
  messages: [],
}
Create src/context/reducer.ts:
import { initialChatState, type ChatAction, type ChatState } from './types'

export function chatReducer(state: ChatState, action: ChatAction): ChatState {
  switch (action.type) {
    case 'auth/logged-in':
    return { ...state, user: action.user, session: action.session }

    case 'auth/logged-out':
    return initialChatState

    case 'dialog/set':
    return { ...state, dialog: action.dialog }

    case 'messages/set':
    return { ...state, messages: action.messages }

    case 'messages/append':
    // Dedupe by id — guards against double-render if a message arrives
    // both via the listener and a local echo.
    if (state.messages.some((m) => m.id === action.message.id)) return state

    return { ...state, messages: [...state.messages, action.message] }

    default:
    return state
  }
}
Create src/context/QuickBloxContext.tsx:
import React, {
  createContext,
  useContext,
  useMemo,
  useReducer,
  type Dispatch,
  type ReactNode,
} from 'react'

import { chatReducer } from './reducer'
import { initialChatState, type ChatAction, type ChatState } from './types'

interface QuickBloxContextValue {
  state: ChatState
  dispatch: Dispatch<ChatAction>
}

const QuickBloxContext = createContext<QuickBloxContextValue | null>(null)

export function QuickBloxProvider({ children }: { children: ReactNode }) {
  const [state, dispatch] = useReducer(chatReducer, initialChatState)
  const value = useMemo(() => ({ state, dispatch }), [state])

  return (
    <QuickBloxContext.Provider value={value}>
    {children}
    </QuickBloxContext.Provider>
  )
}

export function useQuickBloxContext(): QuickBloxContextValue {
  const ctx = useContext(QuickBloxContext)
  if (!ctx) {
    throw new Error('useQuickBloxContext must be used inside <QuickBloxProvider>')
  }

  return ctx
}
Create src/hooks/useAuth.ts — a thin hook that calls authService.login and dispatches auth/logged-in on success. The hook also owns isAuthenticating and error so the LoginScreen doesn’t have to:
import { useCallback, useState } from 'react'

import { useQuickBloxContext } from '../context/QuickBloxContext'
import * as authService from '../services/auth'

interface UseAuthResult {
  isAuthenticating: boolean
  error: string | null
  login: (args: { login: string; password: string }) => Promise<void>
  logout: () => Promise<void>
}

function formatError(err: unknown): string {
  if (!err) return 'Unknown error'
  if (typeof err === 'string') return err
  const anyErr = err as { message?: string; detail?: string }
  if (anyErr.detail) return anyErr.detail
  if (anyErr.message) return anyErr.message
  try { return JSON.stringify(err) } catch { return 'Unknown error' }
}

export function useAuth(): UseAuthResult {
  const { dispatch } = useQuickBloxContext()
  const [isAuthenticating, setIsAuthenticating] = useState(false)
  const [error, setError] = useState<string | null>(null)

  const login = useCallback(
    async (args: { login: string; password: string }) => {
      setIsAuthenticating(true)
      setError(null)
      try {
        const { user, session } = await authService.login(args)
        dispatch({ type: 'auth/logged-in', user, session })
      } catch (err) {
        setError(formatError(err))
        throw err
      } finally {
        setIsAuthenticating(false)
      }
    },
    [dispatch],
  )

  const logout = useCallback(async () => {
    await authService.logout()
    dispatch({ type: 'auth/logged-out' })
  }, [dispatch])

  return { isAuthenticating, error, login, logout }
}Replacesrc/components/LoginScreen.tsx with the real form. The ?user=A / ?user=B URL parameter pre-fills the login from QB_CONFIG.users[key], so two tabs open as two different users without editing config.ts:
import React, { useEffect, useState, type FormEvent } from 'react'

import { QB_CONFIG } from '../config'
import { useAuth } from '../hooks/useAuth'

function profileFromUrl(): { login: string; password: string } | null {
  const key = (new URLSearchParams(window.location.search).get('user') || '').toUpperCase()
  const profile = QB_CONFIG.users[key]
  return profile ? { login: profile.login, password: profile.password } : null
}

export function LoginScreen() {
  const { login, isAuthenticating, error } = useAuth()
  const [loginName, setLoginName] = useState('')
  const [password, setPassword] = useState('')

  useEffect(() => {
    const profile = profileFromUrl()
    if (profile) {
      setLoginName(profile.login)
      setPassword(profile.password)
      document.title = `Web Chat — ${profile.login}`
    }
  }, [])

  const onSubmit = async (e: FormEvent) => {
    e.preventDefault()
    if (!loginName || !password) return
    try { await login({ login: loginName, password }) } catch { /* surfaced via useAuth().error */ }
  }

  return (
    <section className="screen screen--login">
    <div className="card">
    <h1>Web Chat</h1>
    <p className="muted">Private 1:1 chat</p>

    <form onSubmit={onSubmit}>
    <label>
    <span>Login</span>
    <input type="text" value={loginName} onChange={(e) => setLoginName(e.target.value)} autoComplete="username" required />
    </label>
    <label>
    <span>Password</span>
    <input type="password" value={password} onChange={(e) => setPassword(e.target.value)} autoComplete="current-password" required />
    </label>

    <button type="submit" className="btn-primary" disabled={isAuthenticating}>
    {isAuthenticating ? 'Signing in…' : 'Sign in'}
    </button>

    {error ? <div className="error">{error}</div> : null}
    </form>
    </div>
    </section>
  )
}
Finally, update src/App.tsx to wrap the tree in QuickBloxProvider and switch between LoginScreen and the chat screen based on state.user:
Open http://localhost:3007/?user=A. The login screen renders with User A’s login and password pre-filled from config.ts — the inputs are visible and you can press Sign in, but the page won’t switch yet because the ChatScreen doesn’t exist. The next section adds it.
Open DevTools and click Sign in. The console shows the SDK call chain:
[Output]
[Init] QB.init — sending App Credentials, appId: 75949
[Init] QB.init — done, global QB object is ready
[Auth] QB.createSession — sending login: artik
[Auth] QB.createSession — received session, user_id: 134849380
[Chat] QB.chat.connect — sending userId: 134849380
[Chat] QB.chat.connect — connected, ready to send and receive// your code here
Seeing a real user_id (not zero, not your placeholder) means the credentials reached QuickBlox and authenticated. If you instead see HTTP 401 (“Required session does not exist”), check that the order of calls is QB.init → QB.createSession → QB.chat.connect; the default session expiry is two hours after the last request.
After Sign in succeeds, dispatch({ type: 'auth/logged-in', ... }) flips state.user to a non-null value, and the <Shell> re-renders <ChatScreen /> — but the ChatScreen component itself is still missing. Add it in the next section.
Create a dialog and load its history
A dialog has to exist before any messages can be sent into it. QB.chat.dialog.create with type: 3 makes a private dialog between exactly two users — the caller and one other, identified by their numeric ID in occupants_ids. If a private dialog between those two users already exists, the SDK returns it instead of creating a duplicate. This call is safe to make on every sign-in.
Create src/services/chat.ts — Promise wrappers over the callback-based QB.chat.* API:
Create src/hooks/useDialog.ts — a hook that opens the private dialog and loads its history once the user is logged in:
import { useCallback, useEffect } from 'react'

import { useQuickBloxContext } from '../context/QuickBloxContext'
import * as chatService from '../services/chat'
import type { AppMessage, QBMessage } from '../types/quickblox'

function toAppMessage(raw: QBMessage, myUserId: number, dialogId: string): AppMessage {
  const id = raw._id ?? raw.id ?? String(raw.date_sent)
  return {
    id,
    dialogId,
    senderId: raw.sender_id,
    body: raw.message ?? raw.body ?? '',
    dateSent: raw.date_sent,
    isOwn: raw.sender_id === myUserId,
  }
}

// Opens (or creates) the private 1:1 dialog with the given opponent and
// loads its history. Runs once after sign-in.
export function useDialog(opponentId: number | null): void {
  const { state, dispatch } = useQuickBloxContext()

  const open = useCallback(async () => {
    if (!state.user || opponentId == null) return

    const dialog = await chatService.getOrCreatePrivateDialog(opponentId)
    dispatch({ type: 'dialog/set', dialog })

    const result = await chatService.listMessages(dialog._id)
    const items = result.items ?? []
    // API returns newest first; flip to chronological (oldest first).
    const chrono = items.slice().reverse()
    const messages = chrono.map((raw) => toAppMessage(raw, state.user!.id, dialog._id))
    dispatch({ type: 'messages/set', messages })
  }, [dispatch, state.user, opponentId])

  useEffect(() => {
    if (state.user && !state.dialog && opponentId != null) {
      open().catch((err) => console.error('[Dialog] open failed:', err))
    }
  }, [state.user, state.dialog, opponentId, open])
}
Now create src/components/ChatScreen.tsx. It owns the top bar (user name, logout button), reads the opponent’s id and login from the URL parameter, and renders the conversation:
import React from 'react'

import { QB_CONFIG } from '../config'
import { useQuickBloxContext } from '../context/QuickBloxContext'
import { useAuth } from '../hooks/useAuth'
import { useChatListeners } from '../hooks/useChatListeners'
import { useDialog } from '../hooks/useDialog'

import { Conversation } from './Conversation'

function opponentFromUrl(): number | null {
  const key = (new URLSearchParams(window.location.search).get('user') || '').toUpperCase()
  const profile = QB_CONFIG.users[key]
  return profile ? profile.opponentId : null
}

export function ChatScreen() {
  const { state } = useQuickBloxContext()
  const { logout } = useAuth()
  const opponentId = opponentFromUrl()

  // The opponent's login is the test profile whose own id matches the
  // opponentId we are chatting with.
  const opponentLogin =
  Object.values(QB_CONFIG.users).find((u) => u.opponentId !== opponentId)?.login ?? null

  useChatListeners()
  useDialog(opponentId)

  return (
    <section className="screen screen--chat">
    <header className="topbar">
    <div className="topbar__brand">
    <span className="topbar__title">Web Chat</span>
    </div>
    <div className="topbar__user">
    <span>{state.user?.login}</span>
    <button type="button" className="btn-link" onClick={() => logout()}>
    Logout
    </button>
    </div>
    </header>

    <main className="layout layout--single">
    <Conversation opponentId={opponentId} opponentLogin={opponentLogin} />
    </main>
    </section>
  )
}
Create src/components/Conversation.tsx:
import React from 'react'

import { useQuickBloxContext } from '../context/QuickBloxContext'
import { useMessages } from '../hooks/useMessages'

import { MessageInput } from './MessageInput'
import { MessageList } from './MessageList'

interface Props {
  opponentId: number | null
  opponentLogin: string | null
}

export function Conversation({ opponentId, opponentLogin }: Props) {
  const { state } = useQuickBloxContext()
  const { messages, send } = useMessages(opponentId)

  if (!state.dialog) {
    return (
      <section className="conversation conversation--empty">
      <div className="conversation__placeholder">Opening conversation…</div>
      </section>
    )
  }

  const title = opponentLogin ? `Chat with ${opponentLogin}` : 'Private chat'

  return (
    <section className="conversation">
    <header className="conversation__header">{title}</header>
    <MessageList messages={messages} />
    <MessageInput onSend={send} />
    </section>
  )
}MessageList, MessageInput, useChatListeners, and useMessages are referenced here — MessageList and MessageInput are presentational components added below, the two hooks land in the next section.
Create src/components/MessageList.tsx:
import React, { useEffect, useRef } from 'react'

import type { AppMessage } from '../types/quickblox'

function formatTime(dateSent: number): string {
  const d = new Date(dateSent * 1000)
  const hh = String(d.getHours()).padStart(2, '0')
  const mm = String(d.getMinutes()).padStart(2, '0')
  return `${hh}:${mm}`
}

interface Props {
  messages: AppMessage[]
}

export function MessageList({ messages }: Props) {
  const bottomRef = useRef<HTMLDivElement | null>(null)

  useEffect(() => {
    bottomRef.current?.scrollIntoView({ block: 'end' })
  }, [messages.length])

  return (
    <div className="message-list">
    {messages.map((m) => (
      <div key={m.id} className={'message ' + (m.isOwn ? 'message--own' : 'message--other')}>
      <div className="message__body">{m.body}</div>
      <div className="message__meta">
      <span className="message__time">{formatTime(m.dateSent)}</span>
      </div>
      </div>
    ))}
    <div ref={bottomRef} />
    </div>
  )
}
Create src/components/MessageInput.tsx:
import React, { useState, type FormEvent } from 'react'

interface Props {
  onSend: (body: string) => void
}

export function MessageInput({ onSend }: Props) {
  const [value, setValue] = useState('')

  const handleSubmit = (e: FormEvent) => {
    e.preventDefault()
    const body = value.trim()
    if (!body) return
    onSend(body)
    setValue('')
  }

  return (
    <form className="message-form" onSubmit={handleSubmit}>
    <input type="text" value={value} onChange={(e) => setValue(e.target.value)} placeholder="Type a message…" autoComplete="off" />
    <button type="submit" className="btn-primary">Send</button>
    </form>
  )
}
Reload http://localhost:3007/?user=A and click Sign in. The chat screen renders, the dialog is created, and the history loads. Console output:
[Output]
[Init] QB.init — sending App Credentials, appId: 75949
[Init] QB.init — done, global QB object is ready
[Auth] QB.createSession — sending login: artik
[Auth] QB.createSession — received session, user_id: 134849380
[Chat] QB.chat.connect — sending userId: 134849380
[Chat] QB.chat.connect — connected, ready to send and receive
[Dialog] QB.chat.dialog.create — sending type: 3, occupants_ids: [134804147]
[Dialog] QB.chat.dialog.create — received dialog, _id: 6a212b7022169d5d0ed6d781
[History] QB.chat.message.list — sending params: {"chat_dialog_id":"6a212b7022169d5d0ed6d781","limit":50,"skip":0,"sort_desc":"date_sent","mark_as_read":0}
[History] QB.chat.message.list — received 9 messages
The chat window now shows any prior messages from the history — own messages aligned right (blue bubbles), the opponent’s aligned left (grey).

The dialog _id in your console will be a different 24-character string, but it’s stable across sessions — both User A and User B see the same identifier when they sign in. The occupants_ids array order is server-controlled; don’t rely on it matching the order you sent.
Send and receive messages
The last piece is the bidirectional flow: register a callback that fires whenever a message arrives, and wire up the message form to send. In React, the callback registration lives inside a useEffect so it can be set up after sign-in and cleaned up at logout.
Add the sendMessage function to src/services/chat.ts:
export function sendMessage({
  opponentId,
  dialogId,
  body,
}: {
  opponentId: number
  dialogId: string
  body: string
}): string {
  const message = {
    type: 'chat' as const,
    body,
    extension: {
      save_to_history: 1,
      dialog_id: dialogId,
    },
  }
  console.log('[Realtime] QB.chat.send — sending to user ' + opponentId + ': ' + JSON.stringify(message))
  const id = QB.chat.send(opponentId, message)
  console.log('[Realtime] QB.chat.send — sent (QuickBlox does not echo it back)')

  return id
}
Two things in this code are easy to get wrong, and both are worth naming up front:
-
save_to_history: 1 is not the default. Skip it and the message delivers fine in real time — you’ll only notice it’s gone when the user reloads the page and the history loads empty. Set it on every message you want persisted. -
QuickBlox doesn’t echo your own send back to you.
QB.chat.senddelivers the message to the recipient; the sender’sonMessageListenerdoesn’t fire for their own outgoing message. That’s whyuseMessageswill draw the own bubble locally as soon aschat.sendreturns.
Create src/hooks/useMessages.ts:
import { useCallback } from 'react'

import { useQuickBloxContext } from '../context/QuickBloxContext'
import * as chatService from '../services/chat'
import type { AppMessage } from '../types/quickblox'

interface UseMessagesResult {
  messages: AppMessage[]
  send: (body: string) => void
}

export function useMessages(opponentId: number | null): UseMessagesResult {
  const { state, dispatch } = useQuickBloxContext()

  const send = useCallback(
    (body: string) => {
      if (!state.dialog || !state.user || opponentId == null) return

      const trimmed = body.trim()
      if (!trimmed) return

      const messageId = chatService.sendMessage({
        opponentId,
        dialogId: state.dialog._id,
        body: trimmed,
      })

      // The server does not echo our own 1:1 messages back, so draw it
      // locally. The reducer dedupes by id if it ever does arrive.
      const message: AppMessage = {
        id: messageId,
        dialogId: state.dialog._id,
        senderId: state.user.id,
        body: trimmed,
        dateSent: Math.floor(Date.now() / 1000),
        isOwn: true,
      }
      dispatch({ type: 'messages/append', message })
    },
    [dispatch, state.dialog, state.user, opponentId],
  )

  return { messages: state.messages, send }
}
Create src/hooks/useChatListeners.ts — registers QB.chat.onMessageListener after sign-in and tears it down on logout. The cleanup matters: leaving a listener attached after QB.destroySession is what causes “ghost” messages to render in a logged-out app on next sign-in.
import { useEffect } from 'react'

import QB from 'quickblox'

import { useQuickBloxContext } from '../context/QuickBloxContext'
import type { AppMessage } from '../types/quickblox'

interface IncomingMessage {
  id: string
  dialog_id?: string
  extension?: { dialog_id?: string; [k: string]: unknown }
  body?: string
  type?: string
}

// Attach the 1:1 chat callback once the user is logged in. Must run
// AFTER chat.connect succeeded — listeners assigned earlier would be
// overwritten by the SDK's internal init sequence.
export function useChatListeners(): void {
  const { state, dispatch } = useQuickBloxContext()

  useEffect(() => {
    if (!state.user) return

    const myId = state.user.id

    QB.chat.onMessageListener = (userId: number, message: IncomingMessage) => {
      const dialogId =
      message.dialog_id ?? (message.extension && message.extension.dialog_id) ?? ''
      if (!dialogId) return

      console.log('[Realtime] onMessageListener — received from user', userId, ':', message.body)

      const appMessage: AppMessage = {
        id: message.id,
        dialogId,
        senderId: userId,
        body: message.body ?? '',
        dateSent: Math.floor(Date.now() / 1000),
        isOwn: userId === myId,
      }
      dispatch({ type: 'messages/append', message: appMessage })
    }

    console.log('[Realtime] onMessageListener registered — waiting for incoming messages')

    return () => {
      if (!QB.chat) return
      QB.chat.onMessageListener = null
    }
  }, [state.user, dispatch])
}
Reload http://localhost:3007/?user=A and sign in. The listener registration logs on sign-in, between the chat connect and the dialog creation:
[Output]
[Realtime] onMessageListener registered — waiting for incoming messages
Type a message into the input and press Send. It shows up in the chat window and logs to the console:
[Output]
[Realtime] QB.chat.send — sending to user 134804147: {"type":"chat","body":"Hi artimed","extension":{"save_to_history":1,"dialog_id":"6a212b7022169d5d0ed6d781"}}
[Realtime] QB.chat.send — sent (QuickBlox does not echo it back)
Sending one direction works — the two-tab test in the next section confirms the receive side.
Test real-time delivery in two browser tabs
Open the project in two browser tabs, one for each user — the ?user=A / ?user=B URL parameter tells the page which profile from QB_CONFIG.users to load, so each tab gets its own login, password, and opponentId without editing any file between sessions:
-
Tab 1:
http://localhost:3007/?user=A— signs in as User A (artik), opponent is User B -
Tab 2:
http://localhost:3007/?user=B— signs in as User B (artimed), opponent is User A
Each tab’s login form is pre-filled with the matching profile. Press Sign in in each tab.
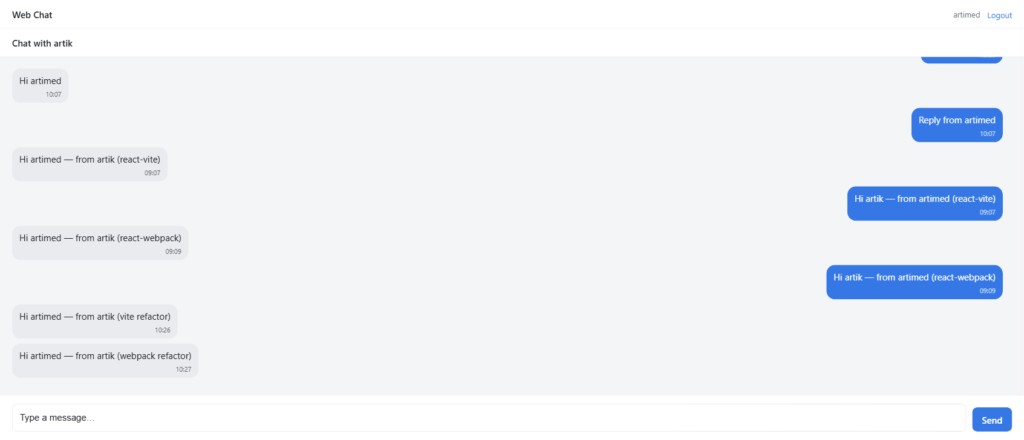
After both tabs sign in, each shows the shared dialog with the same history. Own messages render on the right, the opponent’s on the left — so the two views are mirror images of each other.
Type a message in User A’s tab and press Send. It should appear in User A’s chat window immediately, and in User B’s window shortly after as the listener fires. Send a reply back from User B’s tab — the round-trip proves the listener fires on both sides.
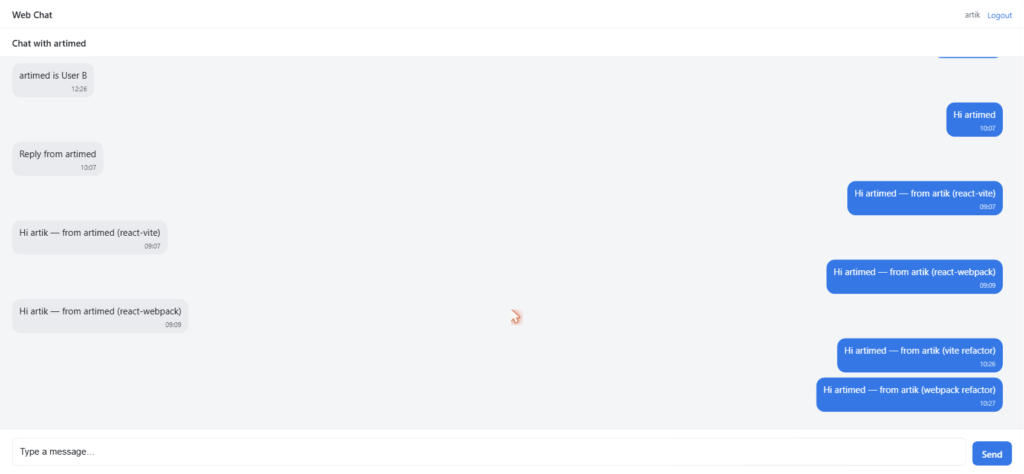
Tab A console (artik, sender) — immediately after the initial send:
[Output]
[Realtime] QB.chat.send — sending to user 134804147: {"type":"chat","body":"Hi artimed","extension":{"save_to_history":1,"dialog_id":"6a212b7022169d5d0ed6d781"}}
[Realtime] QB.chat.send — sent (QuickBlox does not echo it back)
Tab A console — after Tab B sends its reply:
[Output]
[Realtime] onMessageListener — received from user 134804147 : Reply from artimed
Tab B console (artimed, receiver):
[Output]
[Realtime] onMessageListener — received from user 134849380 : Hi artimed
[Realtime] QB.chat.send — sending to user 134849380: {"type":"chat","body":"Reply from artimed","extension":{"save_to_history":1,"dialog_id":"6a212b7022169d5d0ed6d781"}}
[Realtime] QB.chat.send — sent (QuickBlox does not echo it back)
The listener handles every inbound message for the rest of the session, and the history loader from the previous section ensures the conversation survives a reload.
Troubleshooting
Failed to resolve import "nativescript-xmpp-client" (Vite)
Cause: The QuickBlox SDK declares two platform-specific shim packages (NativeScript and Node) as dependencies, but they’re only required when running on those platforms. In the browser they’re dead-branched — but bundlers still resolve every require at build time. Fix: Make sure the alias is in place. For Vite, vite.config.ts must alias both nativescript-xmpp-client and node-xmpp-client to the empty shim. For Webpack, the same two packages must be set to false in resolve.alias and listed in package.json overrides. Restart the dev server after editing either config.
Module not found: Can't resolve 'fs' / 'os' (Webpack)
Cause: The SDK references Node built-in modules in dead branches; Webpack 5 dropped automatic polyfills. Fix: Add resolve.fallback: { fs: false, os: false } to webpack.config.js.
“Application not found” (HTTP 404)
Cause: The appId in config.ts doesn’t match an application in your QuickBlox Dashboard. Fix: Copy the Application ID from admin.quickblox.com → YOUR_APP → Overview exactly as shown. The SDK expects a number — appId: 12345, not appId: '12345'. If the value is wrapped in quotes the SDK treats it as an invalid app reference.
“Required session does not exist” (HTTP 401)
Cause: Either QB.createSession wasn’t called before QB.chat.connect, or the session expired (the default is two hours after the last request). Fix: Check the order of calls is QB.init → QB.createSession → QB.chat.connect. If the user has been idle, sign out and back in to create a new session — that’s what the Logout button does in the sample.
“Wrong user data” on sign-in
Cause: The password doesn’t match the login for this user. Fix: Reset the password in Dashboard → Users → select the user → Change Password, then update the value you type into the login form. Login names are case-sensitive.
No message appears in the second tab
Cause: Most often, QB.chat.onMessageListener was assigned before QB.chat.connect resolved, or save_to_history: 1 was omitted (messages deliver in real time but aren’t visible after a reload). Fix: The useChatListeners hook attaches the listener inside a useEffect that depends on state.user, which is only set after chat.connect succeeds — that ordering is what guarantees the listener installs at the right moment. Confirm save_to_history: 1 is present in every QB.chat.send extension.
TypeScript: Property 'X' does not exist on type 'typeof QB'
Cause: The quickblox.d.ts shipped by the package doesn’t re-export every shape we use, and import QB from 'quickblox' returns a typed default that’s narrower than the runtime object. Fix: Narrow what you use through the app-level types in src/types/quickblox.ts. For SDK calls themselves, the callbacks take unknown and you check the shape — this tutorial does that throughout services/auth.ts and services/chat.ts.
Assemble the Complete Working Example
You have three ways to get the finished project:
-
Open in StackBlitz — no install, no clone. Open
src/config.tsin the file tree, paste your App Credentials and both users into theQB_CONFIGobject, and the preview reloads. Open the preview in two tabs at/?user=Aand/?user=Bto test both directions. -
Clone the GitHub repo (Vite): three commands you run in order. First, clone the repo and move into the project folder:
git clone https://github.com/QuickBlox/quickblox-tutorials.gitcd quickblox-tutorials/javascript/react/one-to-one-chat/react-vite-
Then install the dev server:
npm install -
Open js/config.js and paste your App Credentials and both test users into the placeholders. After that, start the server:
npm start
Editsrc/config.tsbefore signing in.
-
-
Clone the GitHub repo (Webpack): same repo,
cd quickblox-tutorials/javascript/react/one-to-one-chat/react-webpackinstead.
The project layout — same for Vite, with the bundler-specific files marked:
in-app-chat-react/
├── index.html
├── package.json
├── tsconfig.json
├── vite.config.ts
└── src/
├── main.tsx
├── App.tsx
├── config.ts
├── types/quickblox.ts
├── services/
│ ├── auth.ts
│ └── chat.ts
├── context/
│ ├── QuickBloxContext.tsx
│ ├── reducer.ts
│ └── types.ts
├── hooks/
│ ├── useAuth.ts
│ ├── useDialog.ts
│ ├── useMessages.ts
│ └── useChatListeners.ts
├── components/
│ ├── LoginScreen.tsx
│ ├── ChatScreen.tsx
│ ├── Conversation.tsx
│ ├── MessageList.tsx
│ └── MessageInput.tsx
└── styles/App.css
Because the project spans more than two dozen files across services, hooks, context, and components, this section does not re-paste every file. The full source for each file is in the GitHub repo — react-vite and react-webpack. The Vite and Webpack samples share every file under src/; only package.json, vite.config.ts / webpack.config.js, and the HTML shell location differ.
Run it
From the project folder:
npm install
npm start
[Output]
VITE v6.0.7 ready in 263 ms
➜ Local: http://localhost:3007/
Open the project in two browser tabs — http://localhost:3007/?user=A in the first and http://localhost:3007/?user=B in the second (or 3008 for Webpack) — and press Sign in in each tab. Each tab is pre-filled with the matching profile from config.ts, and the two users automatically point at each other.
Next Steps
Explore additional QuickBlox materials to keep building on what you’ve just put together.
Reference material for what you just built:
-
Full SDK reference → docs.quickblox.com/docs/js-quick-start
-
SDK source code on GitHub → github.com/QuickBlox/quickblox-javascript-sdk
-
Production-grade web reference app — Q-municate Web, an open-source React/TS chat client built on the same SDK → github.com/QuickBlox/q-municate-web
-
QuickBlox React UI Kit — pre-built React components for the chat interface → npmjs.com/package/quickblox-react-ui-kit